How To Mix Thinset In Small Batches (Quickly & Easily!)

Thinset has helped countless builder-owners and DIY-oriented homeowners when it comes to tile work. Laying tile in a shower is best done when you have a great mixture of thinset, but you don’t always need to use it a lot. With that said, how do you mix small batches of thinset if you don’t need a large quantity of it?
First, mix 1-2 quarts of water into a 5-gallon bucket and add 5-20 pounds of thinset to the mixture slowly. Use a drill with a paddle attachment or power mixer to mix the thinset for 2-3 minutes, then let it sit for 10 minutes. Mix the thinset again for between 2 and 5 minutes, and it is ready for you to use.
It’s important to read the label as different brands require different amounts of water. You have roughly 3 hours to work with thinset when it’s mixed, and that’s perfect for small batches. Let’s take a close look at how to mix thinset in small batches.
Do You Need to Hire Tile Installers?
Get free, zero-commitment quotes from pro contractors near you.

What Is Thinset?
Thinset is a type of adhesive mortar used to stick tile flooring and walls together. Builder-owners and DIY enthusiasts use thinset because of strong and easy it is to work with. You may hear thinset referred to as mortar in many cases, and it is a unique variation of mortar.
With that said, thinset is more useful for laying tile in a bathroom, and specifically in the shower. Mortar is more useful when laying tile flooring as it can go atop the foundation and the tiles can easily stick. Thinset is useful and it only costs between $5 and $18 for a 50lb bag from brands such as Mapei.
Mixing Instructions
Mixing thinset in small batches is not difficult if you carefully follow the instructions and time it right. You should always take safety measures, such as wearing gloves and safety goggles or glasses, when you mix a batch of thinset. Before you can mix a small batch of thinset, you need to gather the correct materials, such as:
- Safety goggles
- Gloves
- 5-gallon bucket
- Power drill
- Drill mixing attachment
- Measuring containers
You can also choose to use a digital scale to help you get a completely accurate measurement for the mixture. However, that is optional, and many builder-owners forego the scale and use plastic containers for measurements. Now that you’ve gathered your materials, we can dive into how to mix thinset in small batches.
Step 1. Fill Mixing Bucket
Your first step is to fill your 5-gallon mixing bucket with water before you can add the thinset to it. Each brand is different, so you’ll need to check the label to see how much water you need to add to the bucket. For example, you won’t need more than 6.5 quarts of water if you are using a 50-pound bag of thinset.
However, most builder-owners would never need to use an entire 50-pound bag of thinset in one go. If you plan to use 10 pounds of thinset, only use 1 quart, and use 2 quarts for 20 pounds. Take a look at the space that you are using the thinset and determine how many square feet it is.
Most brands of thinset indicate how much material you’ll need per overall square feet that you are covering. Once you’ve determined the size of your working space, you can fill the mixing bucket with the appropriate amount of water. Make sure to use cool or cold water as hot water should never be used to mix thinset.
Step 2. Pour Thinset
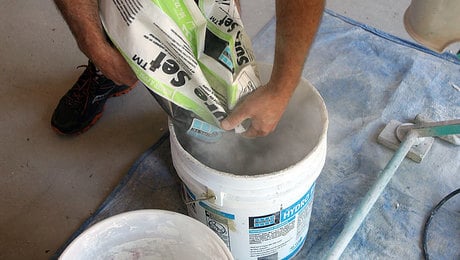
Now, you can pour the thinset into the water quickly so that it doesn’t set as you’re adding it. Use either measuring containers or a digital scale so that you can use the proper amount of thinset. Similar to the last step, you’ll know exactly how much thinset you need based on the instructions on the bag that you use.
If you don’t have the tools to measure the thinset, you can get by without using a scale or container. Eyeballing the thinset can be somewhat tricky, but it is possible if you work quickly and pay attention to consistency. You won’t know if you have the right consistency if you didn’t measure it until you begin mixing the batch.
Step 3. Mix the Thinset

Once you’ve added the thinset, you can begin to mix it using a power mixer or drill. Add a mixing or paddle attachment to your drill and begin mixing on a slow setting. It’s better to use a power mixer than a drill when you mix thinset because it can potentially damage it if the mixture is quite thick.
Mix the thinset and water for no more than 3 minutes keeping the speed slow the entire time. Your mixture could need as little as 2 minutes if you can feel that it gets thick quickly. If you didn’t use a scale or measuring container, you may need to add more thinset if the mixture is too runny to use.
It’s okay if your thinset mixture is slightly thin and runny, but your goal should be a thick mixture. Too thick is a bad thing as well as it can be hard to work with, so using the right amount of water and thinset is important. Try to choose one of the lowest RPM settings on your mixer so that you don’t ruin the consistency by mixing too quickly.
Step 4. 10 Minute Timer
Set your timer for 10 minutes and don’t touch the mixture once you’re happy with the consistency after you mix it. During this time, the water and thinset will mix together and form the proper texture and viscosity. Keep the mixture in a cool environment and out of the light or sun so that it doesn’t become hard too quickly.
Don’t expect the thinset mixture to become fully thick during this time as you’ll need to mix it one more time. You can put the mixture out in the sun if you want to speed up the process, but you may risk hardening it up too much. If the thinset mixture becomes too hard, you won’t be able to mix it again for the next step.
Step 5. Second Mix
Now, it’s time for you to mix the thinset again after you’ve let it sit for 10 minutes. You won’t need to add water to the mixture this time or else it can make the mixture less thick and strong. Give yourself at least 2-3 minutes to mix this time, but no more than 5 minutes.
You can pay attention to how thick or runny it is during this time and adjust how long you mix it for. If you mix it for too long, such as exceeding 5 minutes, the thinset will have a hard time curing. Now, your thinset mixture is ready to apply to tile or whatever you may need it for.
Thinset only stays good for use for 3 hours, so try to work as quickly as possible. If you followed all of the steps correctly, you could apply the thinset easily and it will cure within 48 hours.
Related Questions
Can you mix thinset by hand?
Yes, you can mix thinset by hand if you use a trowel that is meant for working with mortar. It can be tricky to mix thinset by hand for 2-3 minutes, especially once it begins to thicken.
Does thinset go bad?
Yes, thinset can go bad after roughly 6 months, but it can last 3 months or less once it’s opened. Thinset can easily absorb moisture and that’s why it has a limited shelf-life. Once you’ve mixed thinset, you only have about 3 hours to use the mixture before it goes bad.
Do You Need to Hire Tile Installers?
Get free, zero-commitment quotes from pro contractors near you.
What Did We Learn?
You can mix a small batch of thinset in 30 minutes or less, and a modified thinset is better than an unmodified one. First, you add 1-2 quarts of water to a bucket, then carefully pour the thinset in with it. Use a power mixer or drill to stir the mixture slowly for 2-3 minutes.
Let the thinset rest for 10 minutes before you mix it again for another 2-5 minutes. Now your thinset has a 3-hour pot life and can be used for tiling. If the mixture becomes too thick, you can add small amounts of water as you work.
Mixing small batches of thinset is simple, useful, and a great help to any DIY enthusiast.
Nick Durante is a professional writer with a primary focus on home improvement. When he is not writing about home improvement or taking on projects around the house, he likes to read and create art. He is always looking towards the newest trends in home improvement.
More by Nick Durante


![Finishing Basement Without Permit [Is It Really Illegal?]](https://cdn-fastly.upgradedhome.com/media/2023/07/31/9070078/finishing-basement-without-permit-is-it-really-illegal.jpg?size=350x220)