Why Crawl Space Encapsulation: Benefits, Negative, and Costs
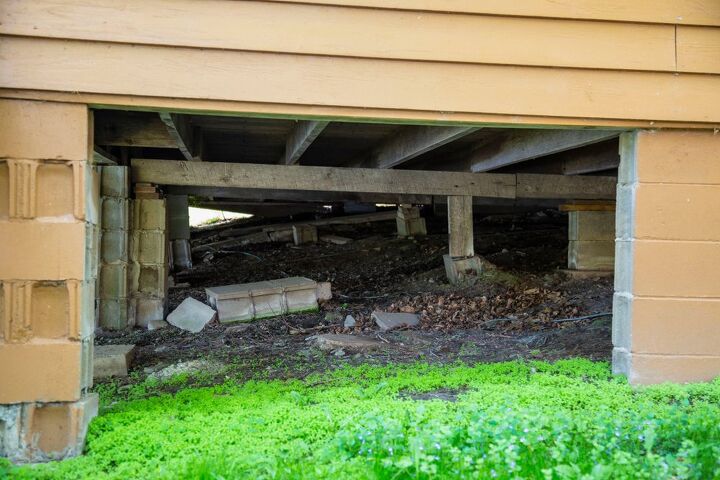
Homes built on a pier and beam foundation or with small crawl space type basements often suffer from cold floors, dampness, or moisture invasion. Pest management is often another reason for encapsulating a crawl space beneath a house. However, crawl space encapsulation is not always a good idea. You should consider the cost, benefits, and negatives of crawl space encapsulation before making any decisions.
Crawl spaces often encourage damp environments beneath your home that can foster inspect and rodent pests. Mold and mildew in your home are often associated with moisture that enters through the crawl space. The efficiency and effectiveness of your HVAC system can also depend on the condition of your crawl space. Encapsulation can often solve these problems.
However, crawl space encapsulation is not always a good choice. Understanding how encapsulation works in a crawlspace is the key to making the right decision. If you know the negatives and the benefits of crawl space encapsulation, you are much more likely to make the best choice for your home.
Do You Need Foundation or Basement Waterproofing?
Get free, zero-commitment quotes from pro contractors near you.

What is Crawl Space Encapsulation?
An encapsulated crawl space has been fitted with special heavy-duty moisture barrier materials over the floor of your crawl space. The walls of your foundation are sealed, as are the foundation vents. Insulation is often added to the walls to increase the efficiency of encapsulation. In many damp areas, a dehumidifier is also added to the crawlspace.
When installed properly, the crawl space encapsulation system will keep the crawl space dry and add a bit of additional insulating properties to your home. The plastic barrier material keeps moisture from migrating into the crawl space area and eventually into your home.
Sealing the foundation walls and vents prevents air infiltration into the crawl space, helping moderate the humidity level and the temperature. This can reduce the stress on your HVAC system and help maintain a more consistent temperature in your home. Many people report that they no longer suffer from cold spots on the floors of their homes after having the crawl space encapsulated.
Why Should I Consider Encapsulating the Crawl Space of my Home?
There are many benefits to encapsulating the crawl space of your home. Some benefits are related to maintenance issues with your home. Other benefits point to better health and a higher quality of life. Together, these benefits build an impressive argument for encapsulating your crawl space.
Improving your Homes Air Quality
Sealing the ground in the crawl space beneath your home can dramatically improve the air quality inside the house. The soil floor in an unencapsulated crawl space creates several problems.
- The bare soil easily admits moisture to the crawl space.
- This moist area in the crawl space can become a breeding ground for mold and bacteria
- Rodents and other pests often make the soil floor of the crawl space a nesting ground
- The encapsulation process helps eliminate the transfer of moisture, dust, and pests into your home.
Eliminating a source of these air quality issues is one of the greatest benefits of crawl space encapsulation.
Eliminating Possible Pest Invasions
A properly encapsulated crawl space can be a major factor in controlling pests in your home. The most damaging of pests are termites. Termites must have a moist environment to survive. Encapsulating your crawlspace eliminates this moisture in your crawl space areas, depriving termites of the moisture they need to survive.
The encapsulation process also works to keep other insect and rodent pests at bay. The barrier materials inhibit pest movement from the soil into your home. A clean, dry crawl space is less inviting to pests looking for a place to call home. If the pests are not present, the problems associated with air quality are also eliminated from your home.
Mold and Mildew Problems
Homes with damp and unprotected crawl spaces often suffer from mold and mildew growth inside the home. Damp air migrating up into the home can raise moisture levels that encourage mold and mildew growth. Preventing the migration of this moisture also inhibits the growth of mold and mildew.
Mold and mildew are known health risks, and you must keep the conditions that support this growth to a minimum. Encapsulating your crawl space is one excellent means of reducing the conditions that foster the growth of mold and mildew in your home.
Protecting Your Investment in Your Home
An encapsulated crawl space protects the foundation and supporting structure of your home. Moisture is one of the greatest threats to your home’s structural integrity. Damp and wet foundations can crumble. Wood structural materials in a moisture-rich environment can suffer rot and are more susceptible to insect damage.
Encapsulating your crawl space helps eliminate these structural problems. The reduction of the conditions that lead to structural damage lengthens the life of your home. You can also count on fewer maintenance costs in the long run.
Making Your Home More Efficient
One of the major costs of homeownership is the ongoing cost of heating and cooling your home. An encapsulated crawl space can make a big difference in how efficient your HVAC system works. Moisture entering your home from an unencapsulated crawl space puts additional stress on your HVAC system.
Once you eliminate the moisture and other contaminants entering your home from the crawl space, your HVAC faces fewer demands and works more efficiently. This translates into less run time and lowers utility bills. In some cases, these savings can be quite significant.
A More Comfortable and Inviting Home
A well-encapsulated crawl space can make your home more comfortable and inviting. Many older homes with crawl spaces suffer from cold floors. An encapsulated crawl space helps moderate the temperature in the crawl space. The temperature moderation helps eliminate cold spots and drafts on or near the floor.
In hot climates, encapsulating the crawl space can eliminate a huge source of moisture inside your home. Warm moist air makes your home feel hotter than it may be. In addition, your HVAC system must work harder to cool the moisture-laden air.
Are There Downsides to Crawl Space Encapsulation?
There are negatives to consider when thinking about encapsulating the crawl space beneath your home. In some cases, the negatives may outweigh the benefits. This difference can make crawl space encapsulation unneeded or unwarranted in your situation.
Consider the Cost Carefully
A professionally installed crawl space encapsulation can be expensive. A well-performed crawl space encapsulation involves much more than just rolling out some plastic over the soil floor of your crawl space. The walls of your foundation must be properly sealed. Vents must be sealed and closed. Often mold and mildew must be mitigated before the encapsulation can begin.
Other Costs You May Face Before EncapsulationThese items are often encountered before the actual encapsulation job can begin, adding to the encapsulation cost.
- Preparing the crawl space area for encapsulation. – This often includes a structural inspection of your home’s foundation to ensure that nothing needs to be repaired before the encapsulation begins. Many professional installers will also clean all the surfaces in the crawl space. This cleaning ensures that any adhesives or tapes will bond tightly to the exposed part of your home’s foundation.
- Inspection and Grading of the areas around the exterior of your home – Moisture infiltration into your crawl space is often the result of poor grading or the area around the foundation walls. The soil outside the foundation walls should slope away from the foundation to keep water from running under your home.
- Proper insulation of ductwork or other piping in the crawl space – Heating and air conduiting ductwork that runs under the floors of your home must be properly sealed and insulated before encapsulation. Water pipes and drainpipes should also be insulated. Exposed ducts and pipes can sweat under some circumstances and create moisture problems in your encapsulated crawl space.
The crawl space and the surrounding environment must be properly prepared before the encapsulation begins. Your installer can advise you on what needs to be done to prepare for a crawl space encapsulation. Many professional installers can also handle these preparatory jobs as part of the overall project.
Additional Maintenance Costs Are a Factor
Your crawl space encapsulation is a system that must be maintained consistently to continue performing its job. There are several components to maintaining an encapsulated crawl space. Some can be performed routinely by a homeowner. Others may need professional attention. You can expect your encapsulated crawl space to require these maintenance items regularly.
- The crawl space should be inspected regularly. This inspection should include examining all the joints in the barrier material to ensure they are tight and secure. The edge of the barrier material where it connects to the foundation wall should be inspected. Look for tears or other damage. Make sure all the vents are properly sealed.
- Check for water incursion into the encapsulated area. Puddling or accumulated moisture on the vapor barrier material is s sign of trouble. Locate the source of the moisture and repair the problem.
- Inspect ductwork or pipes that run through the crawl space for moisture accumulation or leaks.
- If your encapsulated crawl space includes a dehumidifier, the filters and trap basin of the dehumidifier must be changed and emptied.
Keeping the encapsulation materials repaired and properly sealed may need the attention of a service technician. For the encapsulation system to operate efficiently, it must be maintained in good working order.
Your HVAC System May Need Upgrades
Some homeowners experience problems with their HVAC systems after a crawl space encapsulation is performed. The amount of air circulating in your home may be seriously reduced after the encapsulation. This can impact the efficiency of your current HVAC system.
You might consider having an HVAC system professional look at your current HVAC system and evaluate how it will perform after encapsulating your crawl space. It is often better to make improvements or upgrades before the encapsulation process begins if underfloor ductwork needs to be modified or replaced.
The Climate Where You Live May Not Warrant Encapsulation
In climates that are primarily warm and dry, crawl space encapsulation may not be a cost-effective option. Encapsulation of a crawl space is usually done to control moisture in the space and in your home. Areas with low to moderate rainfall often don’t benefit from crawl space encapsulation.
The advice of a professional crawl space encapsulation company is often the best way to judge the value of having your home’s crawl space encapsulated. If there are no crawl space encapsulation companies in your area, more than likely, there is not much need to encapsulate your crawl space.
What Does it Cost to Have a Crawl Space Encapsulated?
Estimating the cost of a crawl space encapsulation is difficult. Many factors can affect the overall price of the job. Your best option is to get bids from at least three crawl space encapsulation professionals on your home.
Typically, encapsulation projects are based on these factors.
- Square footage – The square footage of the crawl space of your home is used to determine the cost of materials such as vapor barriers and insulation. The size of the crawl space also determines what size and how many dehumidifiers you need to serve the volume of air in the crawl space.
- Site preparation – To ensure that the crawl space encapsulation performs its functions, the site under your home and around the foundation must be properly prepared. The area around the foundation may need to be regraded or a French drain system installed on the perimeter of the foundation.
- Sump pumps and groundwater – If the water table under your home is close to the surface, this can lead to problems. Your encapsulation professional may suggest that you install one or more sumps and sump pumps to effectively control the groundwater migration into your crawl space.
These are just a few factors that can contribute to the cost of a crawl space encapsulation. A professional installer can give you more information about what your home may require for such a project.
Average Costs for a Crawl Space Encapsulation
On average, the nationwide cost for encapsulating the typical home crawl space averages between $3,000 and $8.000. Some larger homes or homes with challenging moisture problems can exceed $15,000 for an encapsulation project.
Some sources place the average cost at $5,500, while others place the median cost at $8,500. Regional differences can drive some of the differences, while sizes of homes are the basis for some.
Overall, we find that the average prices for encapsulating a crawl space fit into these ranges.
| Encapsulation Costs | L:ow Range of Cost | High Range of Cost |
| National Average to Encapsulate a Crawl Space | $1,500 | $15,000 |
| Median Cost to Encapsulate a Crawl Space | $5,500 | $8,750 |
| Average Cost Per Square Foot to Encapsulate a Crawl Space | $3.00 per square foot | $7.00 per square foot |
| Cost to Encapsulate a 1,500 square foot home | $4,500 | $10,500 |
| Cost to Encapsulate a 2,000 square foot home | $6,000 | $14,000 |
These average prices don’t include any extra preparation or upgrades to your home. Things such as regrading landscapes around the foundation or installing French drains can add significantly to the installation costs.
What Additional Costs Might I Expect?
Several additional costs may need to be added to the basic encapsulation project estimate. Not every home will require these additional projects, but it is wise to consider what may be required to get a professional crawl space encapsulation.
Additional Foundation Wall Insulation
The need for additional foundation wall insulation is dependent on your location, climate and the construction of your perimeter foundation walls. In some cases, your contractor may suggest that rigid foam insulation be placed on the inside of your foundation walls before the encapsulation is performed.
You can expect the addition of rigid foam board insulation to cost between $0.50 and $2.00 per square foot, depending on the R-value of the insulation board. Fiberglass insulation panels are a bit more expensive. Expect to pay between $2,00 and $4,00 per square foot for fiberglass insulation boards.
Upgraded Vapor Barrier Materials
The vapor barrier material is the heart of the encapsulation system. Many people opt for the cheap solution using 6-mil plastic sheeting. This material will perform the barrier job adequately, but the thin material is prone to ripping and tearing. If you plan on using your crawl space for storage, a heavier vapor barrier material is a good choice.
6-mill plastic sheeting typically costs between $0.25 and $0.35 per square foot. A thicker vapor barrier material usually runs from $0.50 to $0.70 per square foot. This 20-mil product is much more robust, and resists tears much better than the 6-mil products.
Sealing and Air Leak Prevention
One major part of a crawl space encapsulation project is reducing and removing air infiltration into the crawl space. This usually requires sealing the exterior vents into the crawl space and eliminating any gaps in the joints around the exterior wall of the foundation.
Vent covers can be fabricated by the installer or may be purchased from local suppliers. These pre-fabricated vent covers cost around $15.00 to $22.00. Sealing gaps and cracks are usually done with a spray foam material. The cost for a can of spray foam runs between $3,00 and $7.00. Each can of spray foam will fill several hundred feet of cracks and gaps when applied properly.
Ground Water and Runoff
If the groundwater table under your home is close to the surface, sumps and sump pumps may be required to keep your crawl space dry. In general, the average cost of installing a sump runs between $1,100 and $1.500. Some places may require a licensed plumber to make this installation which can add to the cost.
Where runoff water is a problem, the area around the perimeter of your foundation may need to be regraded to ensure that the runoff is directed away from your home. Regrading costs vary between $1,000 and $4,500 dollars.
In some extreme cases, it may be necessary to install French drains on the perimeter of your foundation to adequately move runoff water from around your home. Nationally, the cost to install French drains on the perimeter of your foundation varies from $5,000 to $18,000. The average cost nationally is about $5,000.
Dehumidifiers and Your Encapsulated Crawl Space
An encapsulated crawl space without a dehumidifier is not a complete system. Remember that your encapsulated crawl space is now an isolated volume of air. The entrapped space naturally begins to accumulate moisture to a certain degree. A dehumidifier must be installed to keep the moisture levels in the air at the proper ratios.
For the average home, a dehumidifier sized to keep the moisture levels under control will cost between $800 and $1,500. You must also figure the ongoing cost to maintain the dehumidifier. Filters must be changed, and the water trap emptied regularly.
You may need to install several dehumidifiers for large houses or opt to install a larger commercial-style dehumidifier to adequately handle the moisture loads in your crawl space.
Crawl Space Preparation
Before the encapsulation project can begin, the crawl space must be prepared. There are several considerations when this process begins.
- Builders often leave construction debris in the crawl space. This material must be removed before the vapor barrier is spread over the floor of the crawl space.
- Rocks, concrete, and other hard objects must also be removed. The soil floor in the crawl space must be flat, smooth, and free of anything that could tear or puncture the vapor barrier
- Any mold or mildew must be mitigated from the surfaces of the crawl space. This can involve some expensive treatments that cannot be performed by most homeowners.
- Structural issues with your home must be addressed before encapsulating the crawl space. Sagging floors or broken structural members must be repaired. If the foundation piers have settled, they must be brought back to level.
Some encapsulation contractors include a portion of the cleanup costs in their bids. However, structural issues and mod remediation are usually extra costs. The average cost to repair a foundation is $4,000 but can run much higher. Repairing or replacing structural members to level a floor can run from $2.00 to $30.00 per square foot.
Can I Encapsulate My Crawl Space Myself?
A crawl space encapsulation project is not one that most homeowners will undertake. Working the narrow confines of most crawl spaces is not a pleasant task. It is physically demanding dirty. However, if you are the do-it-yourself type and want to save some money, you can certainly encapsulate your crawl space yourself.
Educating yourself on the techniques and skills, you will need is part of the project. The other is ensuring you have the necessary tools to perform the job. Lastly, preparing your crawl space and the perimeter of your foundation may require bringing in sub-contractors to perform some of the work.
In general, these are materials and tools you will need to gather. The basic steps for performing encapsulation of your crawl space are included.
Gathering your Tools
It is important to make sure that you have the proper tools on hand and ready before you start the process of encapsulating your home’s crawl space. This list represents a minimum set of tools and equipment that you may need.
- Lighting – Most crawl spaces aren’t well lit. You should gather flashlights, headlamps, and utility lamps to make the encapsulation job easier. We suggest that you have at least two LED self-supporting work lights with enough extension cords to reach the points in the crawl space furthest from the access point.
- Utility Knives and Extra Blades – You will need a sharp utility knife to make the cuts required on the vapor barrier material. A sharp blade ensures quick and precise cuts. Extra blades are a necessity. Change the blades often to keep the job easier. Having a utility knife for everyone helping will speed up the job.
- Drill and Masonry Bits – Attaching the supports for the vapor barrier on the foundation wall may require drilling holes in the concrete or brick for screws. A cordless drill with the proper size masonry bits is essential for this job. You may also need the drill and bits to put insulation on the foundation walls before placing the vapor barrier.
- Tape Measures – A good tape measure is essential when cutting both insulation boards and vapor barriers. Measuring accurately will help avoid waste due to missed cuts. Again, each person working on the project should have a tape measure handy to make the job more efficient.
- Trash Bags or Bins – If you clean the crawl space, this is an obvious need. As you begin to install vapor barriers and insulation, you will generate scraps and cutoffs. Having a place to put these scrap materials keeps your workspace clean. Trash bags are handy because they can be moved around the confined crawl space easier than bins or tubs.
- Markers – Keep a generous supply of markers on hand when you are measuring and cutting. Permanent markers work well on the vapor barrier material and on insulation boards. The marks are dark, easy to see, and don’t rub off easily.
- Caulk Gun – If you intend to apply a rigid insulation board to the foundation walls with adhesive, you will need a good caulk gun sized for the tubes of adhesive you will use. Better caulk guns require less effort to use and are well worth the extra cost.
Don’t Forget Your Personal Safety
Any remodel or construction project demands that you take your personal safety and the safety of your helpers into consideration. Working in a confined crawl space is dangerous enough. Add sharp cutting tools, and you increase the risk. We suggest these personal safety items at a minimum.
- Coveralls – Wearing a pair of coveralls over your work clothes is a good idea. The coveralls will add an extra layer of protection for your knees and elbow. A crawl space can be a dirty place to work. Being able to remove the coveralls before re-entering your house can save time and energy on cleanup.
- Gloves – Handling insulation can leave you with irritating particles on your skin. Work gloves protect your hands from these hazards as well as injuries from sharp knives, debris, and other dangers.
- Goggles or Glasses – Any job should not be started without the appropriate eye protection. This is especially true in confined spaces where you are cutting material or drilling.
- Knee Pads – In addition to your coveralls, we suggest a pair of quality knee pads. Much of your work will be done while on your knees, and good knee pads will reduce the fatigue you will feel. The knee pads can also help protect the vapor barrier material as you move around in the crawl space.
The Materials List
Before you start any construction job, it is best to have all your materials on site. This is a time-saving concept. It also can reduce frustration if you aren’t constantly stopping to run to the hardware store for more supplies. The supplies you will need include:
- Vapor Barrier – Make sure you have enough vapor barrier material to complete the job. When measuring, don’t forget the foundation walls, the piers and beams of the foundation, and any extra material for waste and cutting losses.
- Seam Tape – To ensure that the encapsulation is complete, every seam must be sealed with tape. The type of tape may be specific to the vapor barrier material you are using. If the vapor barrier calls for a specific tape, don’t substitute. Make sure you have enough seam tape to adequately complete the job.
- Double-Sided Construction Tape – double-sided construction tape is handy for attaching vapor barrier material to foundation walls and around piers in the crawl space
- Insulation – If you intend to insulate the foundation walls, you must have insulation material on hand before you start.
- Adhesives – An adequate supply of the proper adhesives to apply your insulation is a must.
- A Dehumidifier – To finish your encapsulation project, you should have your dehumidifier on hand before you start. Make sure the dehumidifier is properly sized and that there is an electrical connection available for the dehumidifier.
- Vent Seals – If your foundation has vents to the outside, they must be sealed as well. Vent covers can be purchased at most insulation supply stores or some big box home improvement stores.
The Encapsulation Project
Once you have your materials and tools, it is time to start the job of encapsulating your crawl space. In general, these are the steps that we recommend you follow to complete the job.
Step 1: Cleaning and PreparationStart by preparing the crawl space. The floor should be clean and level with no stones or other debris that might damage the vapor barrier. If you are gluing insulation to the foundation walls, the surfaces should be free of dust and debris. This is a good time to inspect any duct in the crawl space. Pipes or drains should be checked for leaks or damage.
Step 2: Measure and Cut the Vapor BarrierIt is much easier to handle the vapor barrier material outside the crawl space. Trying to unroll and cut the plastic in the crawlspace is next to impossible. Measure the walls first and cut pieces of the vapor barrier to size, allowing a generous portion at the bottom to overlap the floor sections. Cut the floor sections to fit and move them into place.
Step 3: Tape and Seal the SeamsApply the seam tape to the joints. Make sure the overlap is enough to make a good seal. Where necessary, use the double-sided construction tape to seal the vapor barrier against the piers and insulation.
Step 4: Seal the Foundation VentsInstall any foundation vent seals that are required. Be sure to follow the manufacturer’s directions for installing the vent seals. Use the appropriate fasteners and caulk if necessary.
Step 5: Install the DehumidifierFollow the manufacturer’s directions when installing the dehumidifier in your freshly encapsulated crawl space. Remember that you will need to perform regular maintenance on the dehumidifier so place it where it can be easily accessed.
To complete an encapsulation project, you should expect to spend about 8 – 10 hours per 1,000 square feet of floor space. This time can be shortened if you have additional help. More time may be required in large or complex crawl spaces.
Do You Need Foundation or Basement Waterproofing?
Get free, zero-commitment quotes from pro contractors near you.
To Encapsulate or Not
The decision to encapsulate your crawl space requires a lot of study and consideration. Getting professional advice is always a good idea. Hopefully, this article gives you a better understanding of the benefits and disadvantages of crawl space encapsulation.

Dennis is a retired firefighter with an extensive background in construction, home improvement, and remodeling. He worked in the trades part-time while serving as an active firefighter. On his retirement, he started a remodeling and home repair business, which he ran for several years.
More by Dennis Howard