


How to Stabilize Pea Gravel Walkways (In a Few Easy Steps)
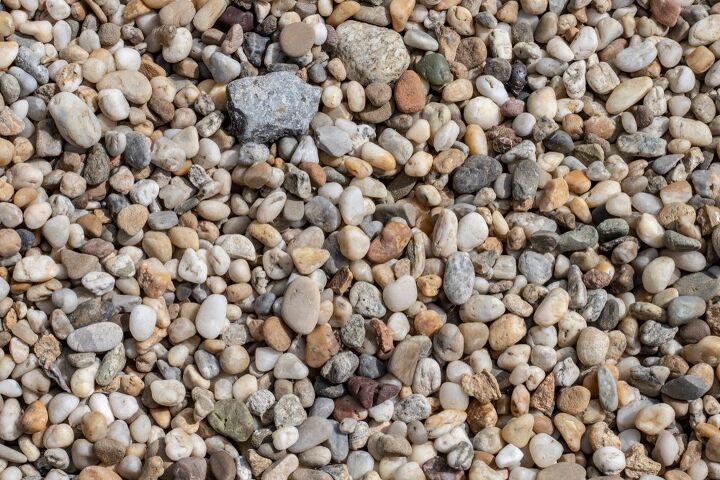
Pea gravel is commonly used for walkways, driveways, and as filler between stone pavers around the home. It consists of small, rounded stones and is commonly used for high-traffic areas due to its smooth finish. However, since the gravel is loose, people often need to know how to stabilize pea gravel.
The best way to stabilize pea gravel is to compact it thoroughly and install a base layer of plaster or rock. Permeable pavers also provide stability while maintaining permeability. Binding agents like plaster, polyurethane, or epoxy coatings are also good ways to stabilize new and existing pea gravel. You can also use cement. However, it will reduce permeability, causing water runoff.
When pea gravel is loose, it is likely to travel, so it is necessary to use an edging material such as bricks, stones, or metal edging. Luckily, there are many ways you can stabilize pea gravel on walkways and driveways. Read on to determine which option is the best for your situation.
Related Content: How Much Does Pea Gravel Cost? | Paver Base Panel vs. Gravel For Patio Base | Patio Ideas On A Budget
Do You Need Landscaping Services?
Get free, zero-commitment quotes from pro landscapers near you.

8 Tips For Installing And Stabilizing Loose Pea Gravel
Pea gravel is highly desirable as it is versatile and cost-effective. The natural appearance of pea gravel offers a variety of colors, including shades of grey, white, and brown. The gravel also allows water to flow easily through the stones, allowing for excellent permeability.
1. Excavate The Area
Make sure to take the proper steps when first installing the pea gravel. Installing loose pea gravel is relatively simple compared to other hardscaping materials. To first install the pea gravel, mark the area where the gravel will go and work the soil to a depth of approximately 5 to 6 inches.
If you simply spread out pea gravel on top of the ground, it will start to shift and move quickly.
2. Lay Down A Base Layer Of Rock
Pea gravel is round and tends to roll, so laying down a base layer of a more coarse, angular rock can help stabilize the pea gravel. After excavating the area, pour in about three inches of a base layer of crushed rock. The recommended base layer is #3 or #57 crushed stone.
Then, pour about three inches of pea gravel on top of this base layer. Starting with a base layer that helps resist flooding problems helps stabilize the pea gravel by offering a firm supporting surface. If there are a lot of weeds present, you may want to add a barrier of landscape fabric between the base rock and the pea gravel.
When selecting your base rock, make sure to pick rough gravel that is large enough to allow the pointy edges to interlock and heavy enough not to be washed away in a storm. Tamp the base rock until it does not move, as this supports the pea gravel.
To make the path very stable, you can also add a layer of decomposed granite after the base rock and before the pea gravel is placed. Once again, tamp the decomposed granite until it does not move. Using decomposed granite will help the pea gravel set and not move when people walk on it.
3. Compact The Gravel
To keep pea gravel from rolling and shifting, tamp it down with a heavy lawn roller or hand tamper after you install it. Compacting the pea gravel will help keep it in place.
Compacting the gravel will also help keep weeds from coming through. When gravel shifts, it can expose the weed cloth underneath, letting weeds overtake the edges of your gravel walkway or driveway.
When using a hand tamper on decomposed granite, it will stick to the bottom of the hand tamper in clumps. This can wreck the flat surface you are making.
To solve this issue, apply WD-40 after wiping off the bottom of the tamper. This will stop the problem of decomposed granite clumping.
4. Install A Border
Placing a border around the perimeter of pea gravel paths and walkways is one of the best ways to stabilize pea gravel. You can choose from various materials like plastic edging or metal borders.
Metal is more durable, but no matter what border you choose, it should be at least 1/2 inch above the ground outside the perimeter. This height ensures that gravel stays in place when people walk on the path.
5. Use Permeable Pavers
Using pavers, like TRUEGRID pavers, to stabilize your pea gravel walkway is another option. This is ideal for new pea gravel installation. You excavate the desired area for your walkway or driveway to about one inch and fill it to the top with pea gravel. Use a roller to compact the gravel, which also helps with stability.
Next, snap the pavers into place over the top of the gravel and fill the empty cells with more pea gravel. Compact the pavers and gravel again with a heavy-duty roller or by driving a vehicle over the area.
6. Add Proper Drainage
If you don’t have proper drainage in your pea gravel walkway or driveway, rain can cause the gravel to start washing away. Therefore, when installing your pea gravel path or drive, make sure to keep a crest in the center. This downward slope on each side will help with water runoff and prevent washouts.
To decrease the gravel carried away by any runoff, you can also add drainage trenches to your pea gravel installation. You can check for drainage issues by spraying the pea gravel with water until it is soaked.
You can see the low spots where the water pools. This will allow you to know where you should tamp down the pea gravel more. If it still collects lots of water, it’s a good indicator that you need to dig a drainage trench.
7. Install Pavers And Decorative Stones
Consider adding decorative pavers where tires will roll in a driveway or stepping stones in pathways for people to walk. These stones will reduce the amount of traffic on the actual pea gravel. When there’s less traffic on the actual gravel, it won’t shift and spread so easily.
8. Use Binding Solutions
When using pea gravel for a hard surface patio or similar area, you need to use a binding solution. First, you will measure the area and check you have the correct amount of binding solution. Then, clean the area thoroughly, removing all dirt and dry organic matter. Use a rake to level the pea gravel surface.
Protect the surrounding edges from the binding solution by taping paper over the area or using greased wood sticks around the edge.
After the pea gravel has been dry for at least three days, follow the manufacturer’s directions to mix the binding solution. Make sure to wear rubber gloves for protection.
Applying Stabilizing Coating To Pea Gravel
Several products on the market specifically work to bind loose gravel surfaces, like Gravel-Lok or EasiHold. You basically pour the product over existing gravel surfaces and let it dry to keep gravel in place. You can also sprinkle cement over gravel to reduce sliding and shifting.
Step One: Apply The Binding Solution
Either pour or sprinkle the binding solution over the pea gravel in even and light layers. If there are large areas, apply the binding solution in two or three coats.
Step Two: Allow Proper Dry Time
Allowing the pea gravel to dry at least 24 hours between each coat. While drying occurs, do not allow anyone to step on the pea gravel.
Step Three: Plan For Water Runoff
However, applying these types of products can reduce the permeability of pea gravel. Therefore, be aware of the possibility of water running off to the edges and plan accordingly. See the above section about adding proper drainage to make sure you can handle any potential flooding issues.
Step Four: Check Pea Gravel For Stability
Once the final coat is dried, test the pea gravel for stability. The pea gravel is stable if it does not move when stepped upon and does not feel slippery. If the pea gravel is slippery, apply another coating.
Before the coat is dry, apply sand over the binding solution. Then allow it to dry for another 24 hours. If you used protecting paper and tape or wood sticks, you can remove them.
This will allow you to enjoy your stabilized pea gravel for years to come. You will likely need to repeat applying a binder every 6 to 8 years.
Do You Need Landscaping Services?
Get free, zero-commitment quotes from pro landscapers near you.
Video: Using Gravel-Lok To Stabilize Gravel Walkways
Choosing The Best Way To Stabilize Pea Gravel
Even with proper installation, pea gravel can shift and start to move over time. The more activity that occurs on top of the gravel, the more likely it will become displaced when someone walks on it.
There are many methods of stabilizing pea gravel. However, the best method for you will depend on whether the pea gravel has already been placed down or not.
Additionally, the stabilization method will depend on what your final product is going to be. If the pea gravel is used on a walkway or driveway, it can be enough to merely compress it to create stability.
On the other hand, if you are using gravel on a patio, it is best if the pea gravel is completely immovable. Consequently, when you place chairs or tables on the gravel, it is less likely to be unsteady and cause furniture to fall over.
In Conclusion
The best way to stabilize pea gravel for walkways or driveways is to see that you install it properly. It’s important to compact it thoroughly with a heavy-duty roller.
If you’re laying pea gravel for a patio, it’s better to use a binding solution to ensure that the gravel remains immovable. You can purchase products like EasiHold or Gravel-Lok, or other epoxy coatings.
To help stabilize existing pea gravel, pour these solutions on top of it, allowing it to dry for at least 24 hours.
Related Guides

We are a team of passionate homeowners, home improvement pros, and DIY enthusiasts who enjoy sharing home improvement, housekeeping, decorating, and more with other homeowners! Whether you're looking for a step-by-step guide on fixing an appliance or the cost of installing a fence, we've here to help.
More by Upgraded Home Team


![Finishing Basement Without Permit [Is It Really Illegal?]](https://cdn-fastly.upgradedhome.com/media/2023/07/31/9070078/finishing-basement-without-permit-is-it-really-illegal.jpg?size=350x220)


