


Do I Have To Remove All Old Grout Before Regrouting?
Grout lasts for an average of 12 years, but it can go bad long before then. Regrouting tiles is never a fun process, but does it mean that you have to remove all of the old grout?
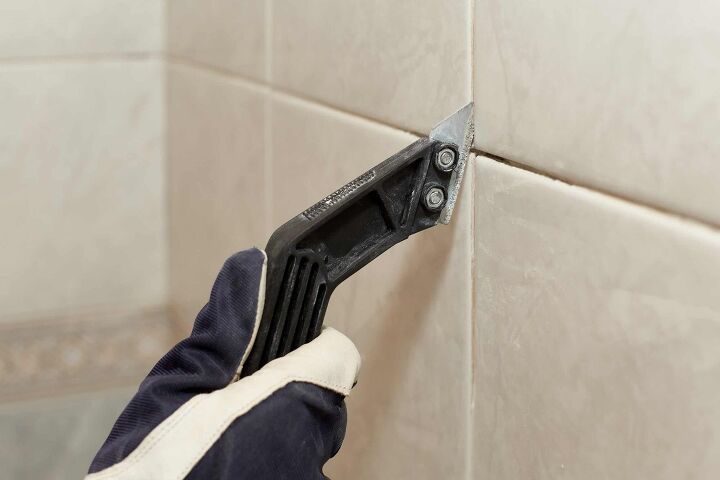
You don’t have to remove all of the old grout before regrouting your tiles, but it is useful. The tiles will look better and the new grout will easily adhere if you remove the old grout. Weaken the grout with white vinegar and remove the excess old grout with a utility knife or reciprocating saw.
Grout is primarily a cement material that needs something to bond to. It is much easier for the new grout to stick well if you remove the old grout. Follow along as we answer the important question; do I have to remove all old grout before regrouting?
Do You Need Grout Replacement or Repair?
Get free, zero-commitment quotes from pro contractors near you.

Can You Put New Grout Over Old Grout?
You can put new grout over old grout, but it won’t adhere to the surface well. It is okay to patch holes in old grout with new grout, but it is ideal to remove old grout before you add more grout. However, it doesn’t necessarily need to be perfect and it’s typically fine if you remove most of the old grout.
The tiles will lay better and the grout will form a stronger bond if you remove the majority of the old grout. It is difficult to lay new grout over old grout if it is crumbled or lumpy, and you should remove as much of it as you can. You can easily remove old grout with a utility knife or reciprocating saw in most cases.
Try to use the same grout as the old grout so that it can lay over it easily. Remove all of the grout entirely if you want to use a different type of grout or else you will encounter problems. Inspect the old grout for mold and remove it all if you find any before you apply the new grout.
Signs That It Is Time To Replace Your Grout
If you’re unsure whether or not your tiles need regrouting, examine the following signs that it may be time to replace your grout:
- Crumbling grout. If you notice the grout beginning to crumble, this is a sure sign that new grout needs to be installed. This issue can occur if the grout was improperly placed originally or it’s simply old. Your grout can also begin to crumble when using the wrong cleaning products for the surface.
- Discolored grout. The relative age of your grout and tile may influence the grout becoming discolored.Cleaning supplies can also have a direct impact on the grout changing colors. Also, installing a sealer over top will protect the grout but can result in discoloration.
- Evidence of mold growth. If you experience mold on your grout or tiles that keeps returning after being cleaned, this indicates mold growth below the grout. This can lead to a number of problems and health concerns if the mold growth is left untreated. In this case, the caulk and grout will need to be removed completely before regrouting.
- Loose tiles. Tiles that have become loose means that the grout is no longer effective. The bad grout is causing water to get behind the tiles, loosening them from the surface. Install new grout to improve water-resistance and better secure your tiles.
Removing Old Grout
In order to achieve the necessary bondage, you’ll need to remove at least some of the old grout before regrouting. Unless you have a significant mold problem, you do not need to chip away all of the old grout. However, the crumbling or discolored grout will need to be chipped away so that the new grout can properly adhere to the surface.
While it’s certainly possible to remove grout by hand, it is recommended to use a power tool. This will make the job much less labor-intensive and require less time to complete. If you decide to go the manual route, you’ll need to acquire a manual grout removal tool. Your options include a carbide cutter for unsanded grout and a grout knife for the sanded variety.
Removing Grout With Power Tools
However, if power tools sound like more your style, there are many options for grout removal. The most popular being a reciprocating saw and oscillating tool outfitted with attachments or saws specifically designed for removing grout. Oscillating tools work great for smaller jobs as they offer a higher degree of control. These tools will remove grout without harming the surrounding tiles.
Regardless, make sure that you keep a flathead screwdriver or utility knife with a dull blade on hand. These can help coax out any of the more stubborn grout pieces. Use extra care with these tools as you can easily chip the tiles when prying the screwdriver along the edges.
Note: Removing old grout will cause quite a bit of dust. Keep a shop vac nearby to clean up debris. Also, wear a mask to protect your lungs and safety goggles to prevent dust from entering your eyes.
How To Regrout Tile
Once you’ve removed some or all of the old grout from the surface, you can officially begin the regrouting process. Follow the below steps to properly install your new grout.
Mix The Grout
Grout is available as a premixed semi-liquid paste or as a dry powder that has to be mixed with water. If you choose the powdered grout, use a margin trowel to mix it in a small bucket.
To properly mix dry grout, start by adding ½ of the suggested amount of water in your bucket, then add ½ of the suggested dry grout. Thoroughly mix together, then gradually add more water and powder until you have a full batch of grout.
You should have enough to cover about 3 to 4 square feet. The resulting mixture will have a paste-like texture that is smooth and just barely pourable.
Fill The Joints
Using a rubber grout float, scoop up some grout and spread it across the surface of the tile. Hold the float at about a 60-degree angle while spreading the grout over and filling the joints.
Move in alternating directions to ensure that you’re completely filling the joints with grout. Any excess grout should be moved to the next section or scoop up more grout as needed. Repeat this entire process until you’ve filled all of the joints.
Sponge The Tiles
Once you’ve filled up all of the grout lines, take a sponge to remove any of the excess grout. Moisten the sponge just barely to prevent the grout from being pulled out of the joints.
Pressing lightly, stroke the sponge diagonally across the surface of the tile to remove any remaining grout. This will take some time so keep cleaning your sponge and moving it across the surface until all of the excess grout has been removed.
Remove Grout Haze
Once the grout has dried, per the instructions on the packaging, you’ll want to finish cleaning up the tiles. You’ll notice the presence of a faint haze on the surface.
Using a soft cloth, buff the surface of the tiles to remove any of the existing haze. Also, you can purchase a haze-removal product from your local hardware store that will polish the tiles and leave them sparkling.
Most Common Regrouting Mistakes
Now that you understand how to properly remove old grout and install new, let’s examine some of the most common regrouting mistakes to avoid during your project.
- Incorrect Timing. With regrouting, timing is very important. Make sure that you wait until the grout has completely set before wiping them clean. Premature wiping can result in gouges. Also, you don’t want to wait too long or the grout will dry onto the tiles.
- Uneven grout installation. Regrouting unevenly will lead to peaks and valleys within the joints. Pack plenty of grout and then wipe down the surface afterwards.
- Improper Mixing. Adding the wrong amount of water to the powder grout mixture is a common mistake. Too much water will cause runny grout that doesn’t set correctly and too little water makes the grout powdery and useless.
- Too Much Grout. Though this mistake is fixable, it will take some serious time and effort to correct. It will require you to wet, scrape and chisel the grout in order to file it down and properly shape it.
Dissolve Old Grout
The best way to completely remove old grout is to dissolve it with chemicals. This can save you the trouble of scraping it all so that you don’t damage your tiles. You can dissolve old grout with chemicals such as isopropyl alcohol, acetone, and mineral spirits.
Fill a spray bottle with the chemical, spray the grout, and let it sit until it dissolves. Household items like white vinegar are strong enough to dissolve old grout, but it may take longer than with caustic chemicals. Prepare to scrape a small amount of grout if the chemicals cannot dissolve it entirely.
It typically takes 30 minutes or less to dissolve old grout, but it varies based on the chemical you use. Hot water is also a great way to weaken old grout, and while it may not dissolve it completely, it’s better than nothing.
Do You Need Grout Replacement or Repair?
Get free, zero-commitment quotes from pro contractors near you.
Summing It Up
You don’t have to remove all old grout before regrouting, but it is helpful. It is much easier for the new grout to stick to the surface if there isn’t old, unhealthy grout beneath it. Remove as much of the old grout as you can with white vinegar or chemicals like acetone and isopropyl alcohol.
Scrape the rest of the old grout away with a putty knife or reciprocating saw if it is necessary. It is okay to leave some remnants of the old grout, but always remove old grout if you find traces of mold. Old grout can easily grow mold because of prolonged moisture.
Related Guides

Jessica considers herself a home improvement and design enthusiast. She grew up surrounded by constant home improvement projects and owes most of what she knows to helping her dad renovate her childhood home. Being a Los Angeles resident, Jessica spends a lot of her time looking for her next DIY project and sharing her love for home design.
More by Jessica Stone


![10 Best Electric Pressure Washers – [2022 Reviews & Guide]](https://cdn-fastly.upgradedhome.com/media/2023/07/31/9070600/10-best-electric-pressure-washers-2022-reviews-guide.jpg?size=350x220)


