


How To Install A Lazy Susan In An Existing Corner Cabinet
For those of us who cook with a variety of herbs and spices, having a lazy susan can be a great way to organize your ingredients. I know I have been guilty of letting spices in my cupboards get cluttered. I’m sure a lot of you can relate to that situation. With a lazy susan, you can have all of your spices and herbs arranged perfectly. Except, how do you install one into your existing corner cabinet?
To install a lazy susan in an existing corner cabinet, you’ll need a pencil and a screw gun to mark measurements and tighten a few screws. If you buy an entire kit, the installation will be easier and include needed items like brackets, an extension pole, pins, and the actual shelves. You will need to install the top and bottom brackets and then the pole into the middle. Don’t forget to test the rotation!
If you already have an existing corner cabinet that you would like to install your lazy susan inside of, we have some tips and tricks for you. At first, it may seem like an impossible task. However, we are here to show exactly how to get the job done!
Do You Need Cabinet Installers?
Get free, zero-commitment quotes from pro contractors near you.

How Does A Lazy Susan Work?
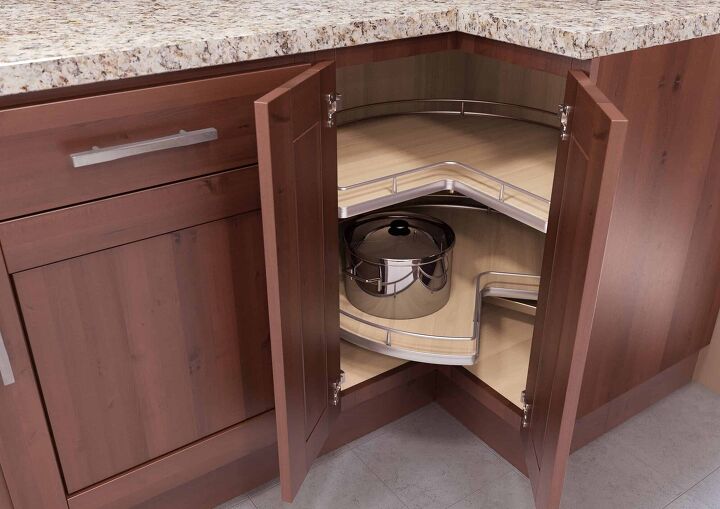
A lazy susan is a round shelve or shelves that rotate in a circle. Some lazy susans have more than one tray and help keep your ingredients organized and easy to get to. You can install them on a countertop or in an upper or lower cabinet. For this guide, we will show you how to install a lazy susan in a corner cabinet. The process is the same for an upper or lower corner cabinet.
Single lazy Susan’s have one tray that turns in a circle. You also have the option of a double or triple lazy susan. In this case, the trays are connected with a round pole in the middle. I’ve had both the stand-alone and the double versions. Both work incredibly well for making things easy to get to.
Corner cabinets usually have smaller doors. The lazy susan utilizes this smaller space by having everything available with just a spin of the tables. For a corner cabinet, you will be using a pie-cut lazy susan.
Tools For Installing A Lazy Susan
You will need a couple of hand tools for installing your lazy susan. You will also need a lazy susan kit or pieces.
List of tools to install a lazy susan:
- Pencil
- Screw gun
You will use these tools to mark measurements and tighten the screws. Your kit should come with all of the pieces for putting the lazy susan together.
What Comes With A Lazy Susan Kit?
The kit will usually contain around 6-7 pieces.
- Top bracket
- Bottom bracket
- Extendable pole
- Screws
- Positive stop
- Shelf pins
- 2 round shelves
Your kit may come with more or fewer screws and attachments.
Steps For Installing A Lazy Susan In An Existing Corner Cabinet
There are a few steps for installation. The lazy susan kit will come with a template for installing the brackets. This will be a cardboard or paper template showing where to place the screws.
The template shows where the screw holes go on both the bottom and top of the cabinet. Now that you have your tools and materials let’s get started.
Instructions
- Mark where the screws will go. Use the provided template to mark out where the screws will go, on the bottom and top of the corner cabinet. You will use a pencil for this.
- Check the fit of your template. Make sure that the template fits snug on the 90-degree angle at the front of the cabinet before marking your holes.
- Install the top bracket. Use the screws to install the top bracket at the top of the cabinet. These will usually have four screws for attachment.
- Install the bottom bracket. Next, you will install the bottom bracket. This bracket may have two or more screws. The bracket will have slideable holes, making it easy to adjust the placement.
- Adjust the brackets. You may have to adjust these at the very end to make sure the placement is correct.
- Place the pole and shelves. Place the pole through the center hole of the first (top) round shelf. Slide in the first shelf pin through the hole in the top of the pole. Now, bring the shelf down, so it locks in place with the pin. This is the upper shelf that you are installing.
- Remove the bottom. Next, remove the bottom (positive stop.) Then, slide the second (lower) round shelf through the bottom of the pole.
- Place the pin in the bottom position. Now you may place the second shelf pin in the bottom position. Slide the lower round shelf down until it locks into place.
- Re-install the bottom. Reinstall the positive stop back into the bottom of the pole. Make sure it fits firmly. The positive stop makes it so when you spin the tables around; they will go a full 360 degrees and then stop. It doesn’t completely stop the tables; it just softly prevents them from continuing to rotate.
- Set the bottom of the pole. Place the bottom of the pole with the positive stop into the hole of the bottom bracket.
- Twist the pole into place. Now slide the adjustable part of the pole (at the top) until it reaches the top bracket. You will twist it clockwise until the twist-lock fits firmly into the top bracket.
- Test the rotation. Test the rotation of the tables to make sure everything is turning correctly. This will help make sure the placement is correct. If the rotation hits the edges or does not rotate, adjust the bottom bracket with the adjustable holes, and retighten screws until it spins correctly.
- Reattach your cabinet doors. You will now attach the two cabinet doors to the pie part of the round tables inside with the screws provided.
Additional Tips For Installation
I’ve installed a few lazy susans and have some tips that may help you out along the way.
- Always make sure that the battery to your screw gun is fully charged. Nothing is worse than running out of juice in the middle of a project.
- Make sure you have all of the tools that you need before you start the project. Different kits may require different sets of tools.
- If you do not have a screw gun, a screwdriver will also get the job done with a little extra elbow grease.
- Not every lazy susan kit will be the same. Read the instructions provided with your equipment to make sure you have everything you need.
Types Of Lazy Susans
There are many types of lazy susans. They will fit in just about any space depending on the kit that you buy.
The five primary types:
- Full round
- D-Shape
- Kidney shape
- Pie cut
- Half-moon
The full round lazy susan can go inside of a cabinet or on a countertop. The rest of them fit inside of the cabinets.
For this guide, we used the “Pie cut” lazy susan. This one has 90-degree angles cut into them. The two cabinet doors attach to the angles and spin along with the lazy susan. The doors are inset so that they may rotate freely into the opening.
What Is The History Behind The Lazy Susan?
Thomas Jefferson invented the lazy susan in the late 1800s. It was known as a dumbwaiter at that time. History books tell us that he developed it because his daughter, Susan, was tired of always being served last. She complained that she would never leave the table feeling full!
Eventually, around 1917, they were advertised in Vanity Fair and became very popular. They even replaced the need to have food servers, in some cases, letting people serve themselves. This then overflowed and boomed as a necessity, in which now billions of people around the world have lazy susans in their homes around the world.
Related Questions
Can a lazy susan hold more than just spices and herbs?
Absolutely. A lazy susan can be used to organize many things. You can store and hold all types of household items, such as cleaning products, Tupperware, and other food ingredients. They are also great in a workshop that has cabinets to hold things like screws, nuts, and bolts.
What problems can a lazy susan have?
You may run into a few easy to fix problems with a lazy susan. Sometimes they will be hard to turn, and you may need to add grease to the bearings. You may also need to adjust them if they get out of whack over time.
Do You Need Cabinet Installers?
Get free, zero-commitment quotes from pro contractors near you.
In Summary
A lazy Susan is almost a necessity in households across the world. There are various types that you can install, including ones that are created for existing corner cabinets. To install them, it’s a straightforward process in which you don’t need to hire a professional to do. Although, recommend you at least have the tools necessary so that your projects go smoothly without any interruptions.
Related Guides

We are a team of passionate homeowners, home improvement pros, and DIY enthusiasts who enjoy sharing home improvement, housekeeping, decorating, and more with other homeowners! Whether you're looking for a step-by-step guide on fixing an appliance or the cost of installing a fence, we've here to help.
More by Upgraded Home Team


![10 Best Scroll Saws for 2022 [Ultimate Reviews & Buyer's Guide]](https://cdn-fastly.upgradedhome.com/media/2023/07/31/9070684/10-best-scroll-saws-for-2022-ultimate-reviews-buyer-s-guide.jpg?size=350x220)


![Standard Dining Room Table Dimensions [for 4, 6, 8, 10 and 12 People]](https://cdn-fastly.upgradedhome.com/media/2023/07/31/9074335/standard-dining-room-table-dimensions-for-4-6-8-10-and-12-people.jpg?size=350x220)

