What To Do With An Old Intercom System (4 Simple Ideas!)
Older homes often featured intercom systems that were once useful and cutting edge, but have since fallen out of style. Intercom systems have made a comeback, but countless homes still feature outdated systems that are all but useless. It’s hard to know what to do with an old intercom system, that is unless you explore all of your options.
Remove your old intercom system if it is outdated or broken and you don’t intend to use it. You can also repair or upgrade an old system to improve your intercom and add value when you sell your house. Otherwise, you can deactivate the intercom system and cover it with a picture, bookcase, or paint that matches the room.
There is no reason to get rid of an old intercom system that still works unless it is simply in the way. Follow along as we explore the best options for what to do with an old intercom system.
Do You Need Alarm or Security System Installers?
Get free, zero-commitment quotes from pro contractors near you.

Intercom Systems Have Changed
For many years, intercom systems were a panel located on one of the walls. A visitor could push the buzzer, sounding the panel in your home. If someone is home, they can press the button to respond to the visitor.
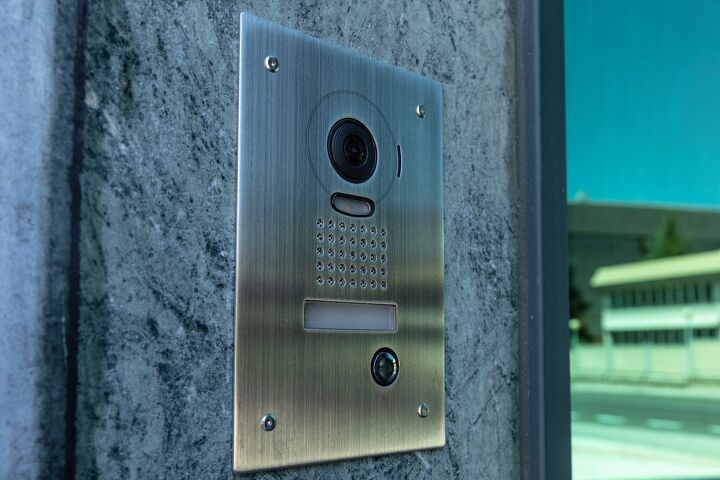
Times have changed and everything now has video capability. Intercom systems are no different. Instead of listening and responding, you can now see when a visitor is at your door. Visual verification just adds another layer of security to this function.
With the addition of video to intercom systems, the older models have become outdated and not nearly as effective. That begs the question of what to do with them.
What to do with an Old Intercom System
An intercom system can simply get in your way if it is outdated and you haven’t used it in a while. Whether you have an intercom system for security needs or easier communication around the house, everyone outgrows it eventually. So, what should you sho with an old intercom system?
Remove It
You can easily remove a plug-in or battery-operated intercom system from your home without professional help. However, it can be a chore to remove a hardwired intercom system from your home, and you may need to hire someone.
All that you need to do is unplug and unscrew the old intercom system from the wall mount if it isn’t a hardwired system. This is a one-person job and should only take moments unless it is a bulky and heavy intercom system. However, it is much trickier to remove an old intercom system that is hardwired because it involves more steps.
You must first shut off the power, remove the mounting screws, and disconnect the wires that run to the back of the system. Pull the old intercom system out of the wall and make sure that there are no dangling wires. Cap the ends of each wire before you stuff them back into the wall to make it safe and cover the hole in the wall.
Conceal It
It isn’t always necessary to remove an old intercom system if you can simply cover it up and conceal it. This can save you time and money compared to removing the system, and you can do it without professional help. Intercom systems are generally flush with the wall, and you may be able to cover them with something as readily available as a picture frame.
Otherwise, you could slide a bookcase or plant in front of the old intercom system. The goal is to conceal the old intercom system completely without drawing attention to it. Make sure to shut off the intercom system and disable it before you cover it so that it doesn’t sporadically turn on and off.
You can also simply paint over it to match the décor of the room if the unit is thin enough and you don’t mind looking at it. If it doesn’t bother you at all, simply leaving it in place is the simplest method to go with. But concealing it is just as easy and you don’t have to see it whenever you walk into the room.
Repair It
Repair your old intercom system if you want to be able to continue to use it. It may come in handy when you go to sell your home even if you don’t want to currently use your intercom system. It costs an average of $2,100 to repair an intercom system, but costs vary based on how old the unit is and what the problem is.
It is only worth it to repair your intercom system if it will restore it to its former glory or even improve upon it. Otherwise, it may not be worth the cost if you don’t intend to use it or it’s too outdated to add value to your home. If your intercom simply isn’t working, try having it repaired instead of just getting rid of it.
Modern intercom systems are particularly expensive, so it is generally worthwhile to repair an existing system. You may want to repair your old intercom system even if you don’t use it but want to sweeten the pot when you sell the home.
Upgrade It
Whether your existing intercom system is merely outdated or broken and not working at all, there is always the option to upgrade it. As mentioned in the previous section, repairing it may not be the most cost-effective solution. When the price gets to be close enough, upgrading to a modern unit is likely the better option.
More importantly, intercom systems have evolved in just a few short years. Where they used to be audio-only, they have now come to include video. Moreover, there are modern video intercom systems that have additional features that would not have existed with prior generations.
Home security is of the utmost importance. If you are considering scrapping that old intercom system, consider upgrading it to a new unit that will give you video functionality as well.
What Should I Replace the Old Intercom with?
Let’s say that you have decided on upgrading from your intercom system. The good news is that there are a plethora of choices out there in terms of upgrade. There are intercom starter kits, which are the basic option. You can go wireless with video, touchscreen video, even wireless DVR security cameras with built-in intercoms.
Intercom Starter Kit
Though technology affords us much more versatility and functionality than ever before, not everyone is keen on adding a bunch of features and buttons to the mix. That is why a no-frills system could prove to be most effective.
The intercom starter kit generally has a master station, an AC transformer, and a weatherproof door. These are cost-effective, easy to install, and won’t include a bunch of potentially confusing options that make using it more difficult.
Wireless Intercom with Video
Video is all the rage these days and with good reason. Being able to see your visitor can give you the comfort of knowing precisely who you are talking to. No need to recognize voices or wonder who is at your door.
A lot of these wireless systems are battery-powered, meaning you set it up, mount, and go on with your life. Some of these wireless intercoms come with additional features but they are basically going to be like the starter kit with video added in.
Touchscreen Video Intercom
As nice as it is to have video, some of the older video units can feel a little clunky. They may have thicker cases with physical buttons to push down. These are nowhere near as slick-looking as some of the more modern units out there.
Touchscreen video lets you buzz visitors in with just a tap of the screen. There are also several alarm inputs that can be set through touchscreen. You are also likely to find a plethora of options that would otherwise not be included on the older models.
Wireless DVR Security Camera
Of course, you may find that you don’t need an intercom at all because another device does the job. There are some wireless security cameras that come with not only DVR functionality, but also have an intercom built-in.
These cameras also typically have cool features like motion detection, which trigger the cameras to record when motion is detected. This is by far the most comprehensive option out there and provides the most features of any of the types listed here.
Do You Need Alarm or Security System Installers?
Get free, zero-commitment quotes from pro contractors near you.
How to Remove a Hard-Wired Intercom System
Should you have a hard-wired intercom system and come to the decision that you want it gone, removal will be a little more complicated. For the most part, hard-wired intercoms are rarer and rarer to find these days.
If you have a hard-wired intercom, the removal is not terribly difficult but it takes time and a little bit of work.
Step 1: Shut Off the Power
Before beginning, turn off the power to that breaker. Find it at your breaker box and flip the switch. Whenever an electrical current is involved, you want to be as safe as possible. Besides, you will need to disconnect and possibly cut wiring to separate it from the old intercom system.
Step 2: Remove the Mount
Hard-wired intercom systems have the panel mounted to the wall, usually with screws. With the power off, you can remove the screws that hold the mount in place. When loosening the final screws, hold the unit firmly with your other hand so that it doesn’t fall to the floor and break.
Step 3: Disconnect the Wires
You will need wire caps and possibly a pair of wire cutters to perform this step. When you remove the mount, you should see a small hole with wires sticking out of it. In some instances, the wires can simply be disconnected from the unit.
Whether you cut the wires or simply unscrew them, make sure to put wire caps over the top before you shove them back into the wall. Finally, cover the hole in the wall with spackle if you do not plan to mount another unit in its place.
Related Articles

Ryan Womeldorf has more than a decade of experience writing. He loves to blog about construction, plumbing, and other home topics. Ryan also loves hockey and a lifelong Buffalo sports fan.
More by Ryan Womeldorf


![10 Best Cordless Leaf Blowers – [2022 Reviews & Ultimate Guide]](https://cdn-fastly.upgradedhome.com/media/2023/07/31/9070789/10-best-cordless-leaf-blowers-2022-reviews-ultimate-guide.jpg?size=350x220)