How To Install An Undermount Sink In A Corian Countertop

Corian countertops are all the rage these days, primarily due to their low maintenance requirements and elegant appearance. This upscale type of resin from DuPont has become synonymous with affordable style, but when it comes to installing a sink in the stuff, things can get sticky.
This is particularly true with undermount sinks. Undermount sinks are stylish, sturdy, and also have several sanitation perks that make them highly worthwhile for harried homeowners.
To install an undermount sink in a corian countertop, you’ll have to use tools like a cutting tool, painter’s tape, cutting blades, spring clamps, and other tools. Before cutting, you’ll have to clamp your cutting guide to match up with the line from the drill hole. After cutting the long sides and the corners, you’ll be ready to install the countertop.
After all, it can be daunting to have a faux granite countertop that you need to prep for a new sink. Thankfully, this doesn’t have to be a major chore. Here’s how you can install your undermount sink in Corian.
Do You Need to Hire Sink Installers?
Get free, zero-commitment quotes from pro contractors near you.

When Should You Install Your Undermount Sink?
Timing is everything when you want to have an undermount sink. Unlike drop-in sinks, which can be installed after your countertops are added, undermount sinks need to be installed on the countertop prior to the countertops being affixed to your cabinetry.
Trying to install an undermount after the countertop has been installed just won’t work. Gravity won’t be in your favor, and in many cases, attempts can damage the countertop. If you already installed your counters, make a point of getting a drop-in sink instead. It’ll be easier on all fronts!
Step One: Prep Your Countertop
There’s some good news about buying Corian countertops that you should know. Many retailers carry pre-fabricated countertops that come complete with all the necessary holes for standard-sized undermount sinks. If your countertop didn’t, don’t worry. Prepping it is a cinch.
Getting Your Tools Ready
To get started, you’re going to need a rotary cutting tool, painter’s tape, extra cutting blades, a cutting guide, and spring clamps. For safety purposes, we strongly suggest getting a face mask and some goggles, since solid surface countertops can emit noxious chemicals when cut.
How To Do It
Before you start any cutting or measuring, make sure to don your protective gear and have everything else laid out before you. Once you’ve got all those items in front of you, prep your sink using the steps below.
Flip over the countertop, and place the sink where you want to position it. Use the painter’s tape to demarcate where your sink is as well as the dimensions it has. You want to demarcate where the sink ends, plus an inner lining based on the size of your sink.
- Place four tabs of painter’s tape at 45-degree angles on each corner of the sink area. This helps preserve your corners. Drill two pilot holes on each side.
- Place your rotary cutter in one of the drill holes, and then clamp your cutting guide to match the line made from one drill hole to its matching hole across the sink. Make sure that it’s a straight line.
- Cut the “long sides” using the guide to help you drill through.
- Next, cut the corners. You can use the same method you did for the longer sides of the countertop.
- After the last corner is cut through, the countertop’s hole should fall through. Sand down the edges if you want.
Step Two: Installing The Countertop
Corian is not a stone countertop. It’s what’s known as a solid surface countertop, and that means that you will need to follow a specific set of directions when installing it. Here’s what you need to know…
Getting Your Tools Ready
Installing your sink will require more than just the basic cutting tools that prepping it. You will need the following before you get started:
- Acrylic Epoxy. This is specially made for solid surface sinks.
- Popsicle Sticks.
- Cardboard.
- Silicone-Adhesive Caulk.
- Masking Tape
- 100 Percent Denatured Alcohol
- Sink
- Faucet and Plumbing Work
- Sink Clips With Glue-On Stud Bases
How To Do It
Ready for the big step? Awesome. Here’s how you can install your undermount sink on that sleek Corian countertop.
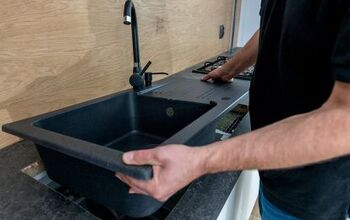
- Start with the countertop facing upside-down. You need to install the sink before you install the countertop.
- Wipe the inside edge of your cutout with denatured alcohol. You want to ensure that your edge is totally free of dust. Otherwise, the glue won’t hold. Add masking tape to the edges.
- Gently place the sink on top of the reveal. You want to have the sink match up with the kind of reveal you want. Once you have everything lined up, trace the outline of your sink on the masking tape. Then, put your sink aside.
- Lay out the sink clips that came with your setup along the areas that you traced. You want one sink clip at each corner, followed up with an even spacing of all the rest.
- Grab some cardboard scrap and mix enough two-part epoxy to adhere your clips. To mix the epoxy, take a look at what the instructions on the packaging tell you to do. Each epoxy brand is slightly different! Once you have that under control, the next part is going to need you to work fast.
- Using a popsicle stick to spread the epoxy, “glue” your clip studs and bases in place. You want to push the bases down hard enough to have glue escape through the holes of the base. Let the epoxy cure for a day at the bare minimum.
- Once the sink clip studs are good to go, add silicone bead along the line that you traced. This will help keep your sink in place and will seal it from any water leaks it could have while it’s in use. Set your sink in the place you want it to be, making sure to adjust it if things are uneven.
- Next, add the slotted sink bears. You want to have the clips capable of holding the sink in place. Then, add the wingnuts to the studs and slowly clip each part of your sink in its place. Try not to make the clips too tight, as it could damage your sink.
- Flip the sink over, and clean off excess silicone. You don’t need a rag for this. A finger will suffice. Then, remove the masking tape.
- Add your faucets and accessories. Once your sink is installed, it’s time to install your faucets and other accessories.
- After your countertop has been properly filled up with all the right hardware, you can hook place it over the sink area. After that, you can hook up your sink to the proper plumbing outlets. You should be good to go!
Do You Need to Hire Sink Installers?
Get free, zero-commitment quotes from pro contractors near you.
Our Final Take
Installing an undermount sink on a solid surface like Corian is going to be an involved process. It’s also a more involved process than you would expect from a typical drop-in sink installation.
However, there’s a silver lining that needs to be noted here: it’s doable as a solo project if you so choose. Though you can do it as a DIY project, many people still find that installing a sink in a Corian countertop is a project better done as a team—or better still, as a professional gig.
So, the final call is up to you. If you have the time, tools, and patience to make it happen on your own, go for it! Otherwise, asking for some help won’t hurt.

We are a team of passionate homeowners, home improvement pros, and DIY enthusiasts who enjoy sharing home improvement, housekeeping, decorating, and more with other homeowners! Whether you're looking for a step-by-step guide on fixing an appliance or the cost of installing a fence, we've here to help.
More by Upgraded Home Team