How To Start A Riding Lawnmower (That Has Been Sitting For Years)
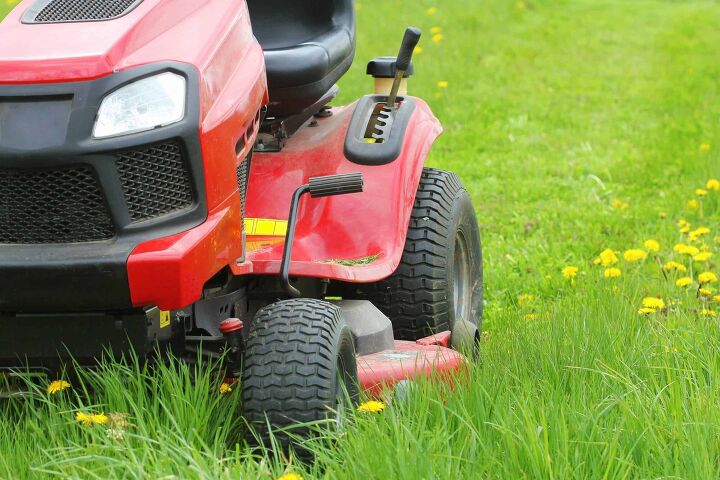
Usually, mowing the lawn is a regular task, like taking out the trash or cleaning the gutters. However, in some cases, you may go years before touching your riding lawnmower. Whatever the reason may be for such neglect, one this is certain – your mower probably needs to be inspected before starting it.
The amount of work you’ll have to do depends on the length of time the lawnmower has been unused. For example, if the machine has been in a garage for 20 years, it will need a lot more care and attention than one that hasn’t been used in three.
To start a lawnmower that’s bit sitting for years, you first need to check all fluids and fluid-containing parts for any wear or tear, or leaks. Then, check the tires, and look for any rust or corrosion on the bottom side of the riding lawnmower. Charge the battery and then start it!
Since there are so many variables and unknowns, we will break down the most common components to check before starting a riding lawnmower. In most instances, these fixes should get the mower up and running again. However, be aware that some parts may be rusted or worn down, so they will have to be replaced ASAP.
Do You Need a Mower Repair Service?
Get free, zero-commitment quotes from pro contractors near you.

Tools You’ll Need to Inspect an Old Riding Lawnmower
- Oil dipstick
- Gas can
- Funnel
- Screwdriver
- Flashlight
- Spark plug wrench
- Siphon hose
- Oil drip pan
- Air compressor
- Tire pressure gauge
What to Do if Your Riding Lawnmower Doesn’t Start Immediately
If you’re lucky and the mower hasn’t been sitting for too long, it might start up with no problems. However, the longer a machine sits unused, the more likely it will need attention before it can be back to normal. It may blow white smoke, or it might not start at all. These steps are not in any particular order, so feel free to inspect the lawnmower however you see fit.
Check the Oil
While engine oil doesn’t necessarily go bad, it can collect dirt and pollutants. When checking the oil, look at the color first. If it’s black or dirty, you should change it immediately. If it seems relatively fresh (i.e., a light caramel color), it should be okay.
If you have to change the oil, follow these steps:
- First, run the mower for a few minutes (if possible). Doing this will warm the oil and make it easier to drain.
- Next, find the oil drain spout. You will need to attach a drain tube so that you don’t make a mess.
- Put an oil drip pan underneath the tube, then open the spout. You will also have to remove the dipstick to allow for a better flow.
- Once the oil stops pouring through, you can close the spout.
- If your mower has an oil filter, you want to change that as well. It is likely on the opposite side of the engine. You will need a strap wrench to loosen it. We recommend placing the drip pan underneath the filter to catch any drips.
- Once the filter is removed, you can install a new one and fill your tank with oil. Use the dipstick to make sure that you have put enough.
Be aware that you have to take your old oil to a disposal facility. You should look up the closest one before starting so that you know where to go. We also recommend pouring the oil into an old jug or something with a screw cap. This way, it won’t spill in transit.
Check the Spark Plugs
If you have trouble starting the mower, the culprit could be the spark plug. This should be relatively easy to find since there is a black rubber wire attached to it. However, you can refer to your owner’s manual (or find one online) if you can’t see it.
Use a wrench to remove the plug and check for corrosion or damage. It will be evident whether you need a new one or not.
Check the Gas Tank
While gasoline is highly stable, it is a complex mixture that will break down over time. If it’s been years since the mower was used, the gas inside is likely bad. On average, gasoline will break down within three to six months, so there is little chance that the liquid is salvageable.
To remove the gas from the tank, we recommend using a siphon hose. Stick one end of the hose into the tank, and suck on the other end until gas comes out. Be sure to have a receptacle for the gasoline as it empties. Once there is no more left, you can refill the tank. As with oil, you will have to dispose of the old gas properly. If it’s not overly dirty, you may be able to pour some into your car’s tank. It will mix with the good gasoline, making it viable again.
If you plan on leaving the mower sitting for months on end again, you can buy extra-stable gasoline. This version doesn’t go bad as quickly, so you shouldn’t have problems when starting the mower next season.
Check the Air Filter
Even though the mower hasn’t been running for a while, the air filter can still get dirty. If you have trouble locating it, refer to your owner’s manual. Once you remove the filter, it should be pretty obvious if it’s dirty or damaged. Be sure to buy a replacement that fits your specific riding lawnmower. Otherwise, it won’t work.
Check the Tires
Over time, tires will lose small amounts of air. So, if your mower has been sitting for years, the tires are likely low, if not flat. Usually, all you have to do is re-inflate them with an air compressor. Use a tire gauge to make sure that you don’t overfill them. Doing so could potentially lead to a blowout.
Check for Rust
If your lawnmower has been unused for more than five or ten years, chances are that some components are rusted. Use a flashlight to inspect every part of the engine. Rusted pieces are weak, meaning that they can break and cause further damage. Be sure to replace any rusted part as soon as possible.
Check the Carburetor
While modern vehicles don’t use a carburetor anymore, riding lawnmowers still do. If there was fuel in the engine when the mower was put away, the carburetor likely has some sticky residue from the evaporated gasoline. All you have to do is remove the piece, soak it in vinegar (or a specialized cleaning detergent), and then reinstall it. Refer to your owner’s manual for specific instructions.
Tips and Tricks for Storing a Riding Lawnmower Long-Term
Ideally, once you get the mower up and running, you shouldn’t have to leave sitting for a long time again. However, if you live in a climate with long winters, you need to put your lawnmower away properly for the season. Follow these tips to ensure that it will run smoothly next spring.
- Drain or Treat the Fuel – If the mower only sits for a few months, a fuel stabilizer will work well. Otherwise, empty the tank altogether.
- Disconnect the Spark Plug – Doing this will prevent an accidental engine start. You can also remove the plug entirely so that it won’t rust.
- Cover Your Lawnmower – Use a tarp or canvas covering to keep the elements out.
- Drain the Oil – This step can make it easier for starting the mower next season. Best of all, you should be able to store it in an old jug and reuse it later on.
- Clean Your Mower – Rust happens when water and air corrode metal pieces. Your mower blades are particularly susceptible. Give your machine a thorough cleaning and make sure it dries before putting it away.
Do You Need a Mower Repair Service?
Get free, zero-commitment quotes from pro contractors near you.
Related Questions
What if parts of my lawnmower have rusted? Can I still use it?
Realistically, rusted parts are no longer viable. Replace these components instead.
What potential dangers can occur if I start a riding lawnmower after a few years?
Usually, the biggest problem is that the engine won’t start. However, in extreme cases, you may damage internal components or overheat the motor.
Related Guide

We are a team of passionate homeowners, home improvement pros, and DIY enthusiasts who enjoy sharing home improvement, housekeeping, decorating, and more with other homeowners! Whether you're looking for a step-by-step guide on fixing an appliance or the cost of installing a fence, we've here to help.
More by Upgraded Home Team


![10 Best Electric Lawn Mowers - [2022 Reviews & Top Rated Models]](https://cdn-fastly.upgradedhome.com/media/2023/07/31/9070486/10-best-electric-lawn-mowers-2022-reviews-top-rated-models.jpg?size=350x220)