How To Build Cascading Stairs (Step-by-Step Guide)
Cascading stairs are an elegant way to take your outdoor deck to the next level. They can be built with either flat slabs of rock or shallow wooden boxes. Either way, they’re an ideal fit for patios and decks with shallow rises.
You can build cascading stairs by measuring to figure out the total number of steps needed. Then, prepare the substrate and cut 2-by-6-inch lumber to create a frame and 5/4-by-6-inch decking lumber to create stair treads. Repeat the process for each step, decreasing the depth and width as you go.
Building a set of stunning cascading stairs can feel overwhelming at first. However, with the right instruction, any DIYer can get the job done. Keep reading to learn how you can do it.
Do You Need a Wood Stairs and Railing Contractor?
Get free, zero-commitment quotes from pro contractors near you.

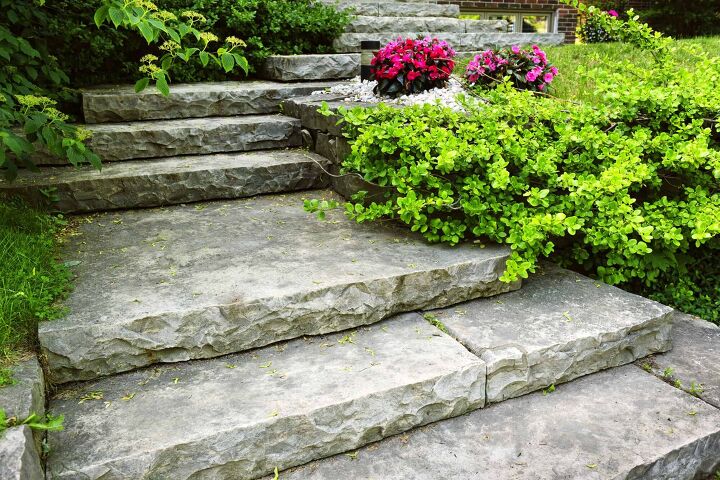
What are Cascading Stairs?
Cascading stairs are most commonly seen on outdoor decks. More specifically, they fit nicely with low decks. When done well, cascading stairs provide an attractive and functional way to complete your outdoor space.
They stand out from other types of stairs in the way they increase in size as they get closer to the ground. They’re designed to flare out but the specific shape of a cascading staircase can vary based on the design needs of the deck they’re attached to.
What Tools and Materials Do I Need to Build Cascading Stairs?
The first step in any home improvement project is gathering the tools and materials needed to get the job done correctly. To build cascading stairs, you’ll need several things. This is a list that includes:
- Measuring tape
- Chalk or another marking tool
- Cement or gravel
- 2-by-6-inch lumber (amount determined by deck size)
- 5/4-by-6 decking lumber (amount determined by deck size)
- 10D or 16D nails or decking screws
- Strap ties
- 3/8-by-5-inch Deck bolts (DIYers can choose larger or smaller ones based on needs and preference)
- Cross-bracing blocks (optional for added stability)
Once you’ve gathered all of these items, you’re ready to get started on your new cascading staircase.
How to Build Cascading Stairs: Planning and Preparation
When building a staircase, it’s important for DIYers to invest time and energy in the planning and preparation phase of the project. If you fail to do so, you’re likely to run into a variety of issues during the installation phase.
- Start by measuring the total slope (rise) and length (run) of your stairs. Use this information to determine the desired height of each step in your staircase.
- Divide the total rise by the height of each step. Performing this calculation will tell you how many steps you need to make.
- Multiply the number of steps (found in step 2) by the desired tread depth.
- Measure the distance perpendicular to your deck. Once you’ve completed this, mark the boundary of your stairs with chalk or the marking tool you’ve opted to use.
- Draw a line that runs from the width of the lowest step in your staircase to your deck.
- Prepare the marked area for construction by removing any sod it contains. You’ll also want to remove about 4 to 8 inches of substrate.
- Check to make sure the marked area is level. It’s crucial that you begin your project on a level surface.
- Fill the marked area with cement or gravel then check the level again before proceeding.
How to Build Cascading Stairs: Installation
After completing the planning and preparation phase, you’re ready to get started with the installation of your new cascading staircase. Here’s how to do it:
- Measure, mark, and cut 2-by-6-inch lumber to form the frame that will cover the area you filled with cement or gravel. Once you’ve done this, use the nails or decking screws you selected to attach the lumber together.
- (Optional) Add cross-bracing blocks inside the box frame if you’ve opted to do so for extra stability.
- Measure, mark, and cut 5/4-by-6-inch decking lumber to form your stair treads. Make sure to add about 1/2-inch to the depth of each tread. This extra length will give each of your steps an overhang.
- Nail the completed treads to your frame. Repeat this process to add each successive step. As you work, reduce the depth of each box by one tread depth to give your stairs the cascading appearance you’re going for. Each box should be built at the same height.
- Begin assembly by placing the bottom step on the filled area.
- Stack each box on top of the last, moving in order of decreasing size.
- Once finished, connect the boxes to one another with strap ties.
- Finish by bolting it all together with the deck bolts you’ve opted to use.
Which Type of Wood is Best for Decks?
One of the most important steps in building your deck’s cascading staircase is selecting the right wood. Homeowners have several intriguing options to choose from.
The most common of these are redwood, cedar, and pressure-treated wood, which can be made from a variety of wood species. Each offers unique benefits that may appeal to DIYers for different reasons. Redwood and cedar are both naturally insect and rot-resistant. They also provide a clean, natural look that homeowners love. These features make both a solid choice for outdoor projects.
Pressure-treated wood may be a better option for DIYers on a budget. It’s available at affordable rates in many colors and styles. However, pressure-treated wood can be unstable and prone to warping. These issues seem to be most commonly seen in lesser-grade woods.
If you choose to use pressure-treated wood for your deck, consider spending a little extra for a higher-grade variety to avoid these issues.
How to Maintain Your Cascading Stairs
After spending time, energy, and money on building cascading stairs, you’ll want to be diligent in caring for them to protect that investment. You can lengthen the life of your new staircase by following a few simple steps.
First, you should perform regular inspections of your stairs. This should involve checking for exposed nails, filling holes in boards, replacing rusted hardware, and keeping the area clean by sweeping it.
You should also try to perform annual deep cleanings of your outdoor space. This is an opportunity to:
- Use a putty knife to remove debris between boards
- Clean the stairs with an outdoor cleaner that removes mildew
- Scrub out tough spots and stains
- Rinse with a garden hose
You may also need to stain or seal your staircase periodically. Doing so will make it look better while also protecting it from the elements.
Give your stairs at least 60 to 90 days to weather before staining them. Then, clean the deck thoroughly and remove all items from it before getting started. This will ensure the staining or sealing process actually accomplishes what you want it to.
Do You Need a Wood Stairs and Railing Contractor?
Get free, zero-commitment quotes from pro contractors near you.
Related Questions
How much does it cost to build cascading stairs?
The average cost to install exterior stairs is about $850. Your costs could go up or down depending on the quality of the wood you select and how large you need the stairs to be.
Do I need to waterproof my cascading stairs?
Experts recommend having your entire deck waterproofed annually. When you do this, you should include your cascading stairs in the process. This is especially important if you live in an area that receives a lot of rainfall. It’s the only way to protect your deck and its stairs from the harmful effects of that rainfall.

We are a team of passionate homeowners, home improvement pros, and DIY enthusiasts who enjoy sharing home improvement, housekeeping, decorating, and more with other homeowners! Whether you're looking for a step-by-step guide on fixing an appliance or the cost of installing a fence, we've here to help.
More by Upgraded Home Team