


The 9 Cheapest Ways To Soundproof A Basement Ceiling
The basement can be your refuge. Maybe it is the hangout for your teens or the practice room for your band. Perhaps it is your office, and you need quiet to focus and get work done.
Whatever you use the basement for, sound traveling up from the basement or down from the main part of the house can be more than a little irritating. Fortunately, there are simple and inexpensive ways you can soundproof the basement ceiling to improve the experience of everyone in the home.
The cheapest and easiest ways to soundproof your basement ceiling are to add thick mats and carpets to the floor above the basement and to rearrange the furniture to reduce the sound of footfalls. If you need more soundproofing, you can add insulation, drywall, multi-load vinyl, and acoustical tiles to the basement ceiling and walls.
Consider what level of soundproofing you need and read the options below for the least expensive and most effective methods of soundproofing your basement ceiling.
Do You Need Basement Remodeling Services?
Get free, zero-commitment quotes from pro contractors near you.

Soundproofing the Basement Ceiling
When you start to tackle the noise problem, you have to determine where the noise is coming from and what kind of noise it is. Is the noise coming from upstairs down into the basement, or from the basement into the main living areas upstairs?
Another consideration is whether the noise is airborne, like voices or music, or whether it is impact noise transmitted through solid surfaces. Sound waves don’t travel through the air as easily as they do through solids, so airborne noise is easier to block.
We will include these considerations in each of the solutions below.
Cheap and Easy Ways to Soundproof the Basement Ceiling
1. Rearrange the Furniture in the Room Above the Basement & It Is Free
If you are using the basement as a home office or a quiet retreat, you may find that footfalls from the floor above you are the main problem that needs to be addressed. If this is the case, a free and simple solution is to rearrange the furniture in the room above your quiet space. Shift the flow of the furniture so that the path people walk through the room doesn’t go directly over your head.
Moving the furniture can also help with airborne noise coming up from the basement. If there is a thinner spot in the insulation between the floor and basement, place a heavy cloth-covered piece of furniture, like a sofa, over that spot. The fabric will help break up the sound filtering up from the basement.
2. Use Thick Rugs and Sound Dampening Mats on the Floor Above the Basement $100-$200
Another way to reduce the sounds of upstairs drifting downstairs through the floor is to add thick rugs or carpets to the floor. You can place rugs in the trouble spots where the most sound comes through. You can purchase a plush 5×8 rug for about $100. Furthermore, for an investment of about $50-$100 you can add thick mats under the rugs like exercise mats, padding, or mass-loaded vinyl.
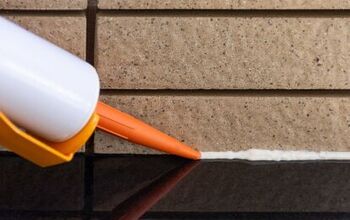
3. Fill Any Cracks in the Basement Ceiling $13-$25 and up
Basements often have some areas of disrepair or gaps in the ceiling. Filling in the cracks or gaps that allow sound to pass through is essential to deadening the sound that may be coming from band practice in the basement.
Locate the gaps and fill them with sealant. You can use a regular caulk, like Flex Shot Rubber Adhesive Caulk, (about $13 per container), or one that is specifically made to be sound deadening, like Green Glue (about $25 per tube). Either way, you will be blocking airborne sound waves.
Filling any cracks is an essential step. Even if you complete other soundproofing measures, if there are gaps, your soundproofing will not be effective.
Combining a thick rug ($100) over an exercise mat ($50) and filling the gaps in the basement ceiling ($13), can go a long way to reducing ambient basement sounds for less than $200.
Affordable DIY Soundproofing Solutions
If you are ready to tackle a little more than rearranging furniture or sealing cracks, you can get a medium level of soundproofing with a moderate investment. Soundproofing insulation, mass-loaded vinyl, or acoustic foam tiles each cost about the same amount. If you start combining options, your soundproofing will improve. Insulation plus mass-loaded vinyl as well as sealing any cracks will make a noticeable difference in your soundproofing for around $400.
4. Add Soundproofing Insulation Between Ceiling Joists $60-155 for 80 sq feet
This solution works best if your ceiling is not yet finished. Otherwise, you will need to take down the drywall on the ceiling. You can add insulation in between the joists of the ceiling to increase the amount of proofing.
Regular batt insulation will work. You just cut it to the correct length and push it in between the joists. Be sure to measure and purchase the size that you need. Remember to wear long sleeves, gloves, and a mask when working with insulation so that you stay safe from the little fiberglass particles.
You can also buy acoustical insulation. This is a mineral wool insulation that comes in a variety of sizes and thicknesses. It is made specifically for sound dampening. It is considerably heavier than fiberglass insulation, so be prepared to work harder with this insulation.
5. Add Mass-loaded Vinyl Behind the Drywall $175 + for 100 sq feet
Mass-loaded vinyl (MLV) is designed to dissipate sound waves by vibrating differently than sound waves. You can use MLV under or over drywall on your ceiling and walls. If your basement has exposed joists, you can staple MLV directly to them then cover them with drywall. Because the vinyl needs to vibrate, it doesn’t need to be pulled tight – just tidy.
If you already have a drywall ceiling up and you don’t want to take it down, you can install MLV over the drywall. It may not be beautiful, but it will definitely soundproof your basement.
The proper way to install MLV over drywall is to nail furring strips where the studs are. This will create a thin space between the ceiling or wall and the MLV so it can vibrate. Then, you can staple the MLV to the furring strips.
You can also lay MLV on the upstairs floor under your carpet or rugs to help block noises coming from the basement.
6. Install Acoustic Foam Panels on the Walls and Ceiling $50 – $200
When you think about acoustic foam panels, you may imagine rolls of pyramid-shaped foam like you’ve seen in recording booths. This may not inspire you to hang them in your basement. However, Acoustic foam panels come in all kinds of varieties, one of which wi bound to meet your needs.
These are your basic black 12×12 sound-absorbing panels. They can be installed on walls and ceilings with staples, tacks, or green glue (sound dampening glue). If you want something more tailored, consider these fabric-wrapped acoustic panels available in 16 colors. You can even find acoustic panels with artwork printed on the fabric.
7. Repaint the Basement Ceiling with Soundproof Paint $100 per gallon
Yes, soundproofing paint is a real thing. It does help with soundproofing by blocking some airborne noise like conversational voices, but you shouldn’t rely on it for a stand-alone solution. It will not make a difference against impact sounds like footfalls or loud sounds like a barking dog or afternoon video game competitions. Soundproof paint works best when used along with other soundproofing methods.
The Most Effective Methods for Soundproofing a Basement Ceiling
8. Hang New Drywall on the Ceiling with Resilient Channel $150 and up
Because sound travels best through solids, the best way to stop the sound from traveling from the basement to the house and vice versa is to break the pathway for the sound to travel. You can do this by removing any existing drywall from the ceiling and installing new drywall over resilient channels. This method is designed for impact sounds like footsteps on the floor above.
A resilient channel is a bent aluminum strip that you install across the joists at a right angle. Then, you will attach the drywall to the resilient channel, not to the joist. This technique creates a gap between the drywall and the joists so that any vibration from impact dissipates.
It is important to follow the manufacturer’s instructions and use screws that are the correct length when installing this system. You want to have the fewest possible connection points between the drywall and the joists.
9. Combine Soundproofing Methods for the Best Effect $500 and up
Each of the methods discussed here has some benefits in reducing sound transmission from one space to another. For example, installing a new ceiling with a resilient channel can decrease the sound from impacts up to 90% when installed correctly.
Mass Loaded Vinyl installed under drywall along with a sound dampening insulation provides an effective and easy solution to both vibrational and airborne noises.
And of course, you need to seal the gaps with foam, caulk, or green glue regardless of the methods you choose. Sound will travel through the gaps, so make certain that those are securely sealed.
Do You Need Basement Remodeling Services?
Get free, zero-commitment quotes from pro contractors near you.
Final Thoughts
You need to be able to enjoy your home. One step to enjoying it is managing the sound level. Whether you have noisy upstairs neighbors or a downstairs marching band, you can try some of these sound reduction techniques at home for a little peace and quiet.
If your sound problems are minimal, start by moving furniture and adding some rugs. Its easy and will give your room a refresh. In the event that your sound dampening needs are greater, try some insulation, sealing gaps in the basement ceiling, or adding acoustic panels.
If you need serious soundproofing for a recording studio, you will need to invest some time and money into a combination of soundproofing techniques. Soundproof insulation, installing new ceiling drywall on resilient channels, adding acoustic foam panels to walls, and sealing any gaps with green glue will get you a soundproof room you can shout about (but no one will hear you.)

We are a team of passionate homeowners, home improvement pros, and DIY enthusiasts who enjoy sharing home improvement, housekeeping, decorating, and more with other homeowners! Whether you're looking for a step-by-step guide on fixing an appliance or the cost of installing a fence, we've here to help.
More by Upgraded Home Team


![12 Washing Machine Brands to Avoid [with Recall Data]](https://cdn-fastly.upgradedhome.com/media/2023/07/31/9075781/12-washing-machine-brands-to-avoid-with-recall-data.jpg?size=350x220)


