


What Is The Green Stuff On My Copper Pipes?

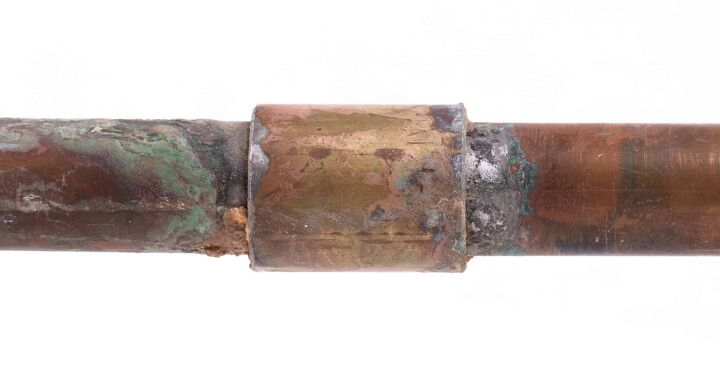
Finding an unusual coloration, namely green, on your copper pipes can be disturbing. You may have questions racing through your head, which is an entirely typical response to this. So let’s answer this question: what is the green stuff on your copper pipes?
The green stuff on your copper pipes is a sign of rust and corrosion. In addition to the discoloring, you may notice a metallic odor coming from your water. Drinking water from these pipes can cause numerous health issues. This can lead to significant leakages, which can cause water damage to your house.
Now that we know what the green stuff is, how do you take care of it? We will solve that problem with a step-by-step guide below on replacing your copper pipes. We will also get into ways to avoid this green rust on your copper pipes in the future.
Do You Need to Hire a Plumber?
Get free, zero-commitment quotes from pro contractors near you.

What Is The Green Stuff On My Copper Pipes?
When your copper pipes have green stuff all over them it is because your pipes are rusted or have corrosion. Be sure not to drink any of your tap water as it can make you extremely sick.
How Do I Fix My Green Copper Pipes?
If you noticed green stuff on your copper pipes, don’t worry! You can fix this. Below, we’ve put together a step-by-step process to make this easy on you.
Step 1: Check That You Have The Supplies You Need
Replacing pipes can be a bit of a process. Be sure you have all of the supplies listed below:
- Measuring tape
- Pipe wrench
- Tube cutter
- Copper pipe
- Copper pipe joint
- File
- Soldering kit
- Emery cloth
- Flux
- Safety glasses
- Work gloves
Step 2: Perform An Inspection To See If You Have More Green Pipes
You know what they say: when it rains, it pours. It typically is the case when it comes to copper piping, as that 70-year shelf life tends to expire all at once.
Check around your house to see if you cannot see any other signs of corrosion. Mark and measure each section you find on a notepad. You will need to do so to find out how much copper pipe you will need to purchase.
Step 3: Determine If You Can Replace The Affected Pipe
If you find that the issue is widespread enough, you may need to call a professional plumber. Small portions of pipe are sufficient as a DIY project, but large projects will require trained professionals.
Many trained professionals have pipe cameras that can determine if there are some unseen pieces of green. Many times these issues originate inside the pipe. They remain unseen for some time until the water smells and tastes funny.
If the amount of pipe is small enough for you to handle, you can purchase based on the measurements you took in step one. Always overestimate, as it will give you room to make mistakes.
Step 4: Turn Off The Water
One step that beginners can, unfortunately, forget is turning off the water. Failing to do this will result in significant water damage and scrambling to turn off the water while flowing into your house.
When looking at your water supply line, you should notice a valve handle that is clearly labeled. The valve should be in the opposite position. Don’t forget to turn the water back on after you finish.
Step 5: Cut The Portion Of Copper Pipe You Need
Using the measurements you received in step one, cut down the pipe until it matches your exact numbers. While we suggested a tube cutter in step one, you can also cut it with an angle grinder or circular saw.
If you don’t have either of these tools available, you will need to purchase a tube cutter or a hacksaw. These options require a bit more manual labor, but they will work just fine.
Step 6: Solder Your Pipe In
If you solder, you merge two pieces of metal into one by adding a third metal. Typically, this metal is a thin wire that is melted onto the copper pipe so that it seals the small gap between the two.
If you can, try and find a friend with an incredibly steady hand. You will need the pipe to remain still while you handle this part.
Before finalizing your solder, you should clean your pipes with a burring knife around the inside of the line you just cut. You can also use emery cloth to clean out the outside and inside. Also, apply a layer of flux to the ends of the outside of the pipe.
The wire you need should be labeled as lead-free and found in the plumbing section of any hardware store. You will be soldering a separate joint onto the two pipes.
Step 7: Test Your Work
After you have given the soldering enough time to have firmness, it is time to test your handiwork.
Have someone wait near the pipe to indicate any leaks as you are turning on the water main. You will know you did it right if there is no leaking. Never assume you did it correctly. It is always best to see it with your eyes.
How Do I Prevent Green Pipes From Happening?
A common reason for green pipes comes from the acidic content of the water. Water with a low pH can eat away the copper pipe, resulting in these green pipes. Run a test before assuming that your water is considered acidic.
One way you can solve this issue is by installing a water treatment system. If you purchase the right one, a water treatment system will reduce the number of minerals in your water, making it less acidic.
Your other option is to replace the pipes in your house, but this can be expensive and unnecessary. Copper piping is one of the longest-lasting high-quality options on the market. Other options are not typically as good, as copper pipes tend to last up to 70 years.
Do You Need to Hire a Plumber?
Get free, zero-commitment quotes from pro contractors near you.
Is The Green Stuff On My Copper Pipes Mold?
If you find something green on copper pipes, it is not typically mold. Copper is a metallic substance that is not friendly to molds. Because of this, green on these pipes generally is corrosion.
If the issue is limited to copper joints, green can come from plumbers not removing flux during their copper replacement. You can use acetone to remove this green substance. If you do, be sure to wear a face mask and safety goggles, as acetone is a strong chemical
If this doesn’t work, you can also have the green removed with a propane or butane torch. These torches can also be used in soldering, as they melt the wire into the joint.
I'm a guy who becomes the expert of whatever I stumble upon, writing-wise. I've written tons about cool home products, home improvement, and smart technology in the home. I'm also the proud father of a kiddo born on new years, making my holidays very busy.
More by Eli Smith


![Finishing Basement Without Permit [Is It Really Illegal?]](https://cdn-fastly.upgradedhome.com/media/2023/07/31/9070078/finishing-basement-without-permit-is-it-really-illegal.jpg?size=350x220)


