How To Remove A Ceiling Fan (And Replace It With A Light Fixture)

Ceiling fans can be a great way to provide both light and air circulation to a given room. But older homes can have outdated ceiling fans that stand in stark, negative contrast to the rest of a particular design aesthetic. Moreover, they can collect tons of dust and be difficult to keep clean on a regular basis.
So, replacing a ceiling fan with a standard light fixture is a common remedy. It can give the room an entirely new look and can use the wiring and electrical box that the much heavier ceiling fan used.
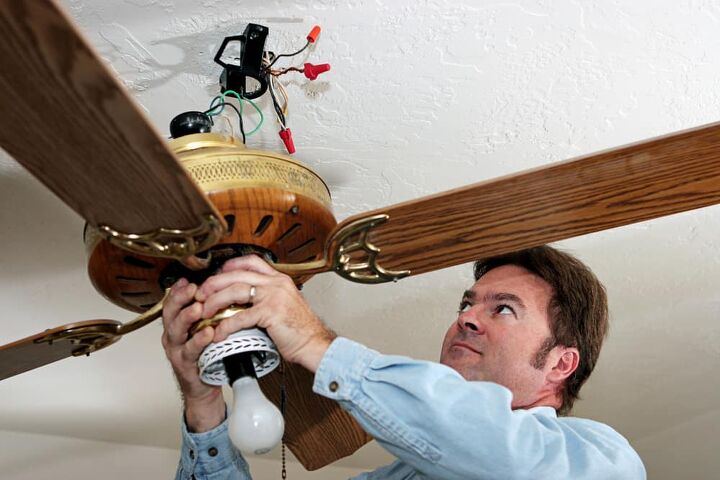
To remove a ceiling fan and replace it with a light fixture, you will need to remove the ceiling fan, perform a bit of rewiring in the ceiling, and install the new fixture accordingly.
Do You Need to Hire an Electrician?
Get free, zero-commitment quotes from pro contractors near you.

Step 1: Turn Off the Breaker
As is the case with any appliance or fixture that has an electrical current, you will need to cut the power off to the room. It’s not quite as simple as dealing with an electrical appliance where the appliance can simply be unplugged.
In order to turn off the power to the breaker, you will have to go to the breaker. From there, you can turn off the power by turning off the circuit breaker at the main breaker box.
Step 2: Removing the Fan Blades
This step depends entirely on the weight of the ceiling fan that you are dealing with. Some ceiling fans, particularly older ones, may be too heavy for you to remove the canopy in one simple step. You run the risk of the entire fixture coming down when there is too much weight.
To lessen the weight of the fan, you will have to remove the individual ceiling fan blades. These can generally be removed at the base of the ceiling fan by undoing the few screws that hold the blades in place. Place the blades off to the side until it’s time to clean up.
Step 3: Remove the Canopy
When you are confident that the ceiling fan is light enough to be removed safely, you can move on to the canopy. The canopy is the part of the ceiling fan that covers the electrical box and sits flush against the ceiling.
Remove the screws that hold the light to the electrical box. Even if you have turned the breaker off, this next part is important. With a voltage tester handy, touch the wires to the blade of the voltage test. You are doing this to ensure that the wires are not live. If the wires are live, the tester will light up and chirp. Don’t ever touch live wires.
Step 4: Pulling the Wires
The next step is to pull the wires out of the electrical box. After pulling the wires out, you will need to unscrew the wire nuts and then pull the wires apart. Depending on the complexity of the job, you might need someone to hold the fan as you work.
Take the mounting bracket off – this can also be known as a strap – that spans the entirety of the electrical box. You can now remove the old ceiling fan entirely before moving on to the next step.
Step 5: Open the New Lighting Fixture
Before moving on to the next step, open up the packaging on the new light fixture. Set aside anything that you can install later, things like covers and light bulbs. It is helpful to take out the instructions and read them as well.
The instructions should shed some light on any potential mounting instructions that you will need to be aware of. It is important that you be aware of these steps because it can mean serious inconveniences later on.
Step 6: Install the New Bracket
With the wires out and the old mounting bracket removed, it’s time to install the new one to your electrical box. Start by mounting the screws onto the bracket and leaving them just a little longer to mount the light base; you can tighten them later.
It is important that you don’t tighten the new mounting bracket entirely right now. Doing so can make it difficult to maneuver the new bracket when it needs to be moved.
Step 7: Stripping the New Wires
Locate the ends of the light fixture’s wires so that you can strip them. Carefully strip each of the wires so that the bare wire is exposed anywhere from ½ to ¾-inch in length. Use wire strippers to make the job easier and to make even cuts.
When this part is done, lift the fixture up close to the electrical box to make the wire connections. The next step is crucial, so follow along carefully.
Step 8: Connecting the New Wires
Twist the bare ends of the black wires together; these are your “hot” wires. Follow that up by twisting the white (neutral) wires together and then finishing up by twisting the bare copper ground wires. If the wires of the new fixture aren’t white and black, refer to the manual. It is imperative that you don’t mix the hot and neutral wires.
Not only that, some fixtures may not come with a ground wire but a green screw instead. That green screw will be attached directly to the mounting bracket. If this is the case, you can connect the ground wire to that green screw.
Step 9: Tightening the Wire Nuts
With the wires properly paired up with one another, all that is left to do with them is cover them and tuck them away. Screw a wire nut over each of the twisted wire bare ends. You want to tighten the wire nuts until they feel tight but be careful to not overtighten.
When you over-tighten these wire nuts it can strip them, loosening the connection. When that happens, the connection can arc and come apart. With the wire nuts secure, tuck them carefully back into the electrical box.
Step 10: Tightening the Mounting Screws
The wires have now been connected and tucked away neatly, so it’s time to put the base of the new fixture into place. Lift the base into position; most of them will have slotted, curved holes meant to hold the mounting screws.
Tighten each of the mounting screws until the base of the fixture sits tightly against the wall. As is the case with the wire nuts, avoid over-tightening. The base of the fixture should be neither loose nor easily turned by hand.
Step 11: The Finishing Touches
All that’s left to do is install the bulbs and then place the shade or light cover over the top. When you are confident that everything is where it should be, turn on the circuit breaker to that room and give the light switch a test.
When in Doubt, Call an Electrician
Dealing with electrical wires can be a daunting task, especially for those amateurs out there with a limited skill set. That’s not even mentioning the fact that it can be potentially dangerous to work with said wires if the proper precautions have not been taken.
So, if you have concerns about removing an old ceiling fan and replacing it with a light fixture, don’t be afraid to call in a professional. Not only will you not have to worry about doing it incorrectly, but you can relax while a knowledgeable professional does the job.
Do You Need to Hire an Electrician?
Get free, zero-commitment quotes from pro contractors near you.

Related Questions
Can One Person Install a Ceiling Fan?
The short answer to this question is “maybe”. Can you technically do it yourself? Sure, but it can be difficult depending on the weight of the fan. Even if you can install a heavy ceiling fan on your own, it may not be the best idea as there is a risk of dropping the fan and either breaking it, injuring yourself, or both.Thankfully, most modern ceiling fans come with an installation hook. The installation hook comes built directly into the ceiling mounting and takes the weight while you handle things like wiring or dealing with screws. Of course, you have to be strong enough to put the fan up onto the hook first, but after that, it is relatively easy.
How Much Should I Pay for Ceiling Fan Installation
The number one reason that people take on DIY projects is due to cost. Aside from the cost of parts, there are no other fees required. Depending on the project at hand, taking on a project yourself can mean major savings.With something like a ceiling fan installation, you may be better off paying a pro. The average ceiling fan installation ranges between $75 and $150. When parts and labor are combined together, that cost comes out to somewhere between $150 and $350 all in. Installation is generally between $50 and $75 per hour and will take between 1 and 2 hours.
How Do I Know if My Ceiling Box Can Support a Fan?
If you’re looking to install a ceiling fan, it is important to know if the ceiling box is capable of supporting that weight. The National Electric Code requires that any fan over 35 pounds be supported with the use of an outlet box or outlet box system that has been listed for ceiling fan support.

Ryan Womeldorf has more than a decade of experience writing. He loves to blog about construction, plumbing, and other home topics. Ryan also loves hockey and a lifelong Buffalo sports fan.
More by Ryan Womeldorf




![10 Best Zero Turn Mowers – [2022 Reviews & Ultimate Buyer's Guide]](https://cdn-fastly.upgradedhome.com/media/2023/07/31/9070522/10-best-zero-turn-mowers-2022-reviews-ultimate-buyer-s-guide.jpg?size=350x220)



![How To Reset A Whirlpool Cabrio Washer [In 5 Easy Steps!]](https://cdn-fastly.upgradedhome.com/media/2023/07/31/9076531/how-to-reset-a-whirlpool-cabrio-washer-in-5-easy-steps.jpg?size=350x220)
