


How To Install Wall Cabinets Without Studs
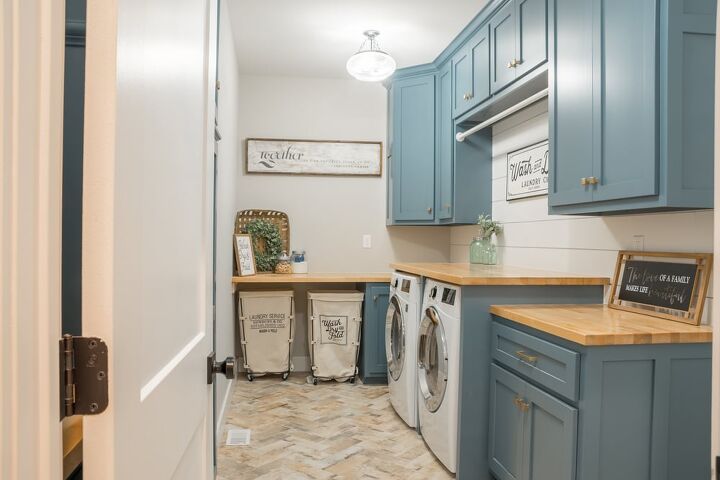
It can be intimidating to install wall cabinets. These amenities are quite heavy, and hanging them on the walls needs to be secure enough to bear weight. It can be hard, especially when you do not have studs in your wall to support the overhead cabinets.
Additionally, wall cabinets don’t always align with the wall studs due to modifications or faults in the structure. In both cases, you cannot just screw the cabinets on the drywall, as the load can cause the cabinets to fall off.
A practical solution is to use drywall anchors available in various types, shapes, and sizes.
Do You Need to Hire Cabinet Installers?
Get free, zero-commitment quotes from pro contractors near you.

What Are Drywall Anchors?
A drywall anchor is a tool that bridges the drywall and screw to add stability while hanging heavy things on the wall. The screw goes into the anchor to keep the item steady in place. Based on the heaviness, shape, and size of the wall cabinet, you may want to choose a specific drywall anchor.
Tools Needed To Install Wall Cabinets
To install wall cabinets, you are going to need the following devices:
- Drywall anchors
- A power drill with drill bits
- A hammer
- A cabinet jack
Based on the type of anchors you are using, you might need a specific drill bit to screw the anchor in the drywall. Thus, we recommend getting the complete drill bit set for convenience.
Ways To Install Wall Cabinets Using Drywall Anchors
By Expansion Anchors
These look like hollow plastic screws with wings protruding outwards. These are the most commonly used tools that are available easily in almost all shelf kits at your local stores.
Expansion anchors got their name because upon ingesting a screw, an expansion anchor expands to grip the drywall tightly. Being made of plastic, they have a limited weight-holding capacity of up to 20 pounds only. However, if you have small cabinets, then these can help hang them.
Let’s look at the steps to use expansion anchors:
- Start by marking the drill points on the back of the cabinet.
- Mark points for drilling on the drywall at a similar distance as on the cabinet.
- After marking the areas on the drywall, start drilling a hole in the wall, which should be almost similar in length to the anchor piece.
- Place the expansion anchor on the drilled hole and hammer it gently into the drywall. The anchor should dig into the hole seamlessly with some resistance.
- Make sure that the anchor fits in entirely without difficulty.
- Now, use the power drill to make holes at the marked points on the cabinet.
- Insert screws from the inside of the cabinet, so that the pointy end protrudes at the backside.
- Adjust the height of the cabinet jack near the drywall where the cabinet needs to be installed.
- Place the cabinet on the jack and position the screws on each of the anchor holes.
- Use the power drill to drive the screws in the anchors one by one.
- Remove the cabinet jack placed beneath it, and check for stability in the cabinet.
By Threaded Anchors
These types of anchors feature a plastic body with threads on them. They also resemble large screws and are often known as Zipp-its. Their threads are larger to let them bite firmly in the drywall, thus creating an excellent grip.
Though threaded anchors have a better grip than expansion anchors, they still are suitable only for light-duty applications. You can expect them to carry weights up to 30 pounds only.
Here’s how to use threaded anchors:
- Mark the drill points on the drywall and the back of the cabinet at the same distance.
- Drill the holes on the markings. The depth of the holes should be the same as the length of the threaded anchor.
- Use the power drill to drive each of the anchors in holes. Drive it into the drywall until they sit entirely inside.
- Now, drill the holes on the marked points on the cabinet.
- Insert the screws from the inside of the cabinet, so that the end is visible at the backside.
- Place the cabinet jack at the appropriate position beneath the drywall.
- Place the cabinet on the jack and position each of the anchors close to the protruding screws.
- Use the power drill to drive the screws into the anchors one by one.
- Remove the jack and check for stability.
By Molly Bolts
Molly bolts are quite sturdy at lifting heavy items. These anchors are usable on almost any surface, as molly bolts are made of steel to withstand the pressure. They are straightforward to install. In order to use it with your cabinet, you need to choose the right-sized anchor to grip the drywall firmly.
Here’s how to use Molly bolts:
- After marking the drill hole points on the wall and the cabinets, start drilling on the wall as per the diameter of the bolt.
- Hammer the anchor part in the drilled holes to the point where they fit in securely.
- If the molly bolt has teeth on the head, then make sure to hammer it entirely until the teeth grip the drywall.
- Molly bolts have a pre-installed screw in it. Remove that screw from the molly bolt placed in the drywall.
- Now drill the markings on the cabinet.
- Place the cabinet on a cabinet jack and position the drilled holes over the molly bolts in the wall.
- Insert the screws from the inside of the cabinet to drive them in each of the molly bolts one by one.
- Make sure to add the washer that comes with the bolt for a secure grip.
- Remove the jack from beneath and check for the stability of the cabinets.
Note that molly bolts have four little metal wings on the other end that grip the drywall and keep the hung item stable. Those wings need to be pressing up against the wall for the best possible grip. So, choose a molly bolt anchor of the appropriate size.
Do You Need to Hire Cabinet Installers?
Get free, zero-commitment quotes from pro contractors near you.
By Toggle Bolts
These bolts are one of the most reliable classes of drywall anchors that you can use for installing wall cabinets. Their strength comes from the toggle wings that distribute the load over a larger surface area. The wings can be squeezed shut from the bottom side as they have a spring-load action.
Here’s how to use Toggle bolts:
- Mark the drill points on the drywall and the cabinet. Drill the holes in the wall large enough for the folded toggle wings to pass through.
- Drill the holes on the marked points on the cabinet as well. These holes need to be large enough to fit the screw part of the toggle bolt.
- Unscrew the wing from the bolt and insert the bolt into the cabinet hole with the tail end protruding at the rear.
- Now, mount the toggle wings back on the screw positioned on the cabinet holes.
- Place the cabinet on a jack at the appropriate position next to the drywall.
- Insert the toggle bolts in the holes made on the drywall.
- The toggle wings should slide in the wall while folded.
- The wings unfold on the other side of the drywall, thus locking in place.
- Tighten the screws from the inside of the cabinet to fix it in place.
- Remove the cabinet jack and test the stability of the cabinet.
Several other anchor models are available nowadays in various shapes and designs for hanging items on drywalls. These can be great if you do not have convenient studs available behind the wall to support the cabinet.
Related Guides

We are a team of passionate homeowners, home improvement pros, and DIY enthusiasts who enjoy sharing home improvement, housekeeping, decorating, and more with other homeowners! Whether you're looking for a step-by-step guide on fixing an appliance or the cost of installing a fence, we've here to help.
More by Upgraded Home Team


![Finishing Basement Without Permit [Is It Really Illegal?]](https://cdn-fastly.upgradedhome.com/media/2023/07/31/9070078/finishing-basement-without-permit-is-it-really-illegal.jpg?size=350x220)


