How To Install Over-The-Range Microwave Without A Cabinet
Microwaves are a vital part of our on-the-go lifestyles. The convenience of quickly heating a meal is something most American households consider a must-have. But sometimes, fitting them into your kitchen design scheme can be a challenge.
Most microwaves are designed to fit underneath an upper kitchen cabinet. Without a cabinet, your best bet is to create a fake cabinet or shelf above the microwave for mounting. As an alternative, there are certain kinds of brackets made to support microwaves in this situation.
Related Content: Can An Over-The-Range Microwave Be Used On A Countertop? | Can Any Microwave Be Mounted Under A Cabinet? | Do Microwaves Need To Be Vented?
Do You Need Appliance Repair Services?
Get free, zero-commitment quotes from pro contractors near you.

Why A Cabinet?
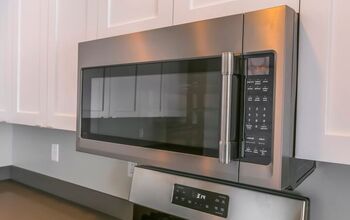
Most microwaves are designed to be supported by a kitchen cabinet. They are supported first by a mounting plate on the wall. This creates a small lip for the bottom rear edge of the microwave to rest on. However, it doesn’t provide enough support to hold it overall.
Microwaves are then usually attached with screws from the upper cabinet into the top of the appliance. This allows the microwave to “hang” from the cabinet while being held by the mounting plate. Instead of a cabinet, you must design something from which to “hang” the microwave.
The other reason for having a cabinet above the microwave is to conceal cords and ducts. The appliance has to plug in somewhere, and wires hanging above a stove are both dangerous and unsightly. Many over-the-range microwaves include a vent feature, which requires a duct if venting to the outside.
The Vent Dilemma
This question gets asked a lot in home improvement circles. Do you really need a vent for your stove and oven? Does it matter if the vent is internal or external?
Legally, no, you don’t always need a vent for an electric stove. But practically, your kitchen will get smoky and greasy without one regardless of the type of stove you own.
Vents that release kitchen exhaust externally will be more effective but require much more in-depth work. You may need to bring in an HVAC professional to run ducts through your walls so the vent can exit your roof or exterior wall. This can be costly, but a good investment.
For renters who can’t cut into their walls, an internal vent is sufficient. An internal vent sucks up the air and recirculates it in the room like a fan. Still helpful for when you burn the burgers you’re trying to make for dinner.
Because both of these vents draw air up from underneath the microwave, putting it on a shelf above the stove is not an option. This placement inhibits airflow. Plus, it allows the shelf to get sticky with grease, precisely what the fan is trying to avoid.
Installation Safety
Microwaves might not look very big, but they can be heavy. It’s essential to make sure that whatever installation technique you use is sturdy enough to hold the microwave safely.
When mounting any type of load-bearing holder on the wall, make sure you’re drilling into the studs. Screwing into the house’s support structure will guarantee stability, where merely screwing into the drywall will not. Even anchors or toggle bolts made to secure heavy items into drywall have a higher chance of failing over time.
For the same reason, microwave installation is a two-person job. It’s nearly impossible to simultaneously hold the weight of the appliance and attach a support structure. Grab a friend or partner to assist you: your back will be glad you did.
As with any home improvement project, it’s best if you consult with a professional. If you have any doubts as to the structural stability of your microwave, get a second opinion. Better to spend a little money to do it right now than have to do it all over again later!
Options For Installation
There are two options for installing an over-the-range microwave with a vent attached. One is to build a shelf above to mimic the support of a cabinet. The other is to use wall-mounted accessory brackets explicitly designed for microwaves.
Wall-Mounted Microwave Brackets
There are a variety of bracket options on the market that claim to hold up microwaves safely. When mounting this appliance above a range, it’s essential to ensure that the brackets don’t interfere with the fan’s airflow.
The best kind of bracket for this application looks like a pair of stainless steel arms that hold the microwave from underneath. They attach to the bottom of the microwave for support, one on each side, running parallel to the appliance’s short side.
These brackets can be found online and in specialty appliance stores. Some big-box home improvement stores carry them, but others deem them too much of a specialty item to stock.
Tools & Materials:- Measuring tape
- Stud finder
- Cordless drill
- 2.5 or 3-inch wood screws (to attach the bracket to the studs)
- Self-tapping screws for metal (to attach the bracket to the microwave)
- A drill bit that matches screws (Phillips head or star bit, depending on your screws)
- Pencil
- Level
- A buddy to help with the heavy lifting
- Wall-mounted microwave brackets (2)
- Determine the location of the microwave. Make sure it’s centered over the range and that the bottom of the microwave is at least 30 inches above the cooktop. Ensure there’s an electrical outlet within reach of the cord and venting in place, if necessary.
- Draw a line where you want the bottom of the microwave to be. Make sure it’s level, and find where the studs are located in the wall. Ideally, your microwave will be placed evenly between them.
- Using a stud finder to confirm your placement, attach the brackets into the studs. Use a drill and 2.5” screws.
- Set the microwave on the brackets. Place it so the arms support the flat area on the bottom outer edges without blocking the vented area. Push the microwave back against the wall.
- Using self-tapping screws, secure the microwave to the bracket by screwing up through the bracket and into the appliance.
Shelf Above The Microwave
Let’s call this one the “fake cabinet.” Using this method, we’re creating a shelf that’s sturdy enough to serve the same purpose as a cabinet would. For the shelf to support the weight of the microwave “hanging” on it, the shelf must be super secure.
The brackets used here are the kind where the shelf hangs at the bottom of the brackets. They can be reasonably decorative, but make sure you get something sturdy. Metal works better than plastic here, though sturdy wood can also suffice.
The goal is for these brackets to look decorative but also distribute the weight of the microwave. Triangles make things stronger: in engineering, they distribute the load in bridges and other commercial applications.
Tools & Materials:- Measuring tape
- Stud finder
- Cordless drill
- 2.5 or 3-inch wood screws (to attach the bracket to the studs)
- Self-tapping screws for metal (to attach the bracket to the microwave)
- A drill bit that matches screws (Phillips head or star bit, depending on your screws)
- Pencil
- Level
- A buddy to help with the heavy lifting
- Pre-cut shelf or sturdy wood material
- Triangular brackets designed to hold a shelf from above
- Determine the location of the microwave. Center the microwave over the range and ensure that the microwave’s bottom is at least 30 inches above the cooktop. Ensure there’s an electrical outlet within reach of the cord and venting in place, if necessary.
- Determine the placement of the shelf. It will sit flush with the top of the microwave, so draw a line where the microwave’s top will be. This line will mark the bottom of your shelf.
- Locate the studs in your wall. This application should not be trusted using just drywall anchors or toggle bolts. Using a stud finder, confirm that you have wood to screw the brackets into.
- Align the bottom of the brackets with the line you’ve drawn. Screw the brackets into the wall with 2.5 or 3-inch screws at the bottom, top, and middle if possible. You may need to drill additional holes into the brackets to have more places to screw.
- Install the microwave as per the manufacturer’s instructions, including using the mounting plate on the rear wall. Once you set the microwave on the mounting plate, make the appliance’s top edge flush with the shelf.
- Using self-tapping screws, secure the microwave to the shelf by screwing down through the wood and into the appliance.
Do You Need Appliance Repair Services?
Get free, zero-commitment quotes from pro contractors near you.
Related Questions
Where are other places I could mount a microwave?
Many newer kitchens feature a fancy built-in microwave drawer. It slides open like any other drawer, but hidden inside is a special top-loading microwave. The Rolls Royce of convenience!Alternative under-counter applications exist, too. Some brackets will mount a microwave to the underside of a cabinet. These styles hook in underneath but screw in from above. The kind of microwave you put under the counter is not the kind made to vent a stove, obviously.If all else fails, there’s no shame with a microwave just sitting on a kitchen counter. If space is at a premium, consider putting it in a higher-up area like on top of the refrigerator or a shelf. A rolling cart or island can also be handy in kitchens with minimal counter space.
Who can I reach out to for help with installation?
For ductwork and venting, an HVAC contractor is your best friend. They know the ins and outs of running ventilation through all kinds of walls without making a big mess. HVAC pros can advise you on the best way to install an externally venting range hood and do it in no time.Have you lost the instruction manual for your microwave? It happens all the time. The manufacturer’s website often has links to the installation guides. YouTube is also a valuable resource: any question you have, someone else has had before.If the whole installation process has you puzzled, call a general contractor or handyperson. They’ll have the construction know-how and all the tools needed to do the job right. Make sure they’re licensed and insured, just in case anything goes awry.
Related Guides

Stacy Randall is a wife, mother, and freelance writer from NOLA that has always had a love for DIY projects, home organization, and making spaces beautiful. Together with her husband, she has been spending the last several years lovingly renovating her grandparent's former home, making it their own and learning a lot about life along the way.
More by Stacy Randall