Chainsaw Chain Direction: Which Way Should It Go?
A neighbor who has experience with chainsaws borrowed yours a couple of weeks ago for some yard work. When he returned the chainsaw, he put it back up on the shelf for you. Now, you plan to do some trimming in the yard, so you haul down the chainsaw. But wait a minute.
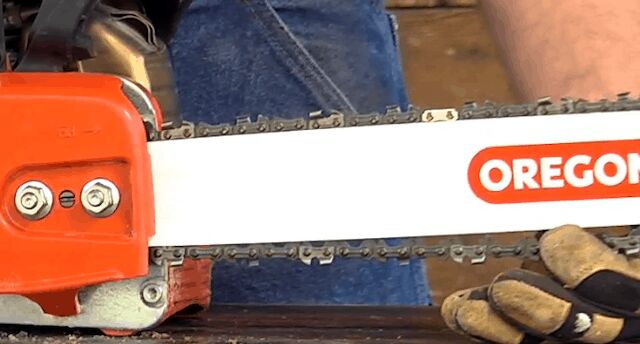
A closer look at the chain reveals it is loose on the guide bar . . . and on backwards! This is a formula for all kinds of chainsaw problems.
Given that the chain will rotate clockwise, it is important to make sure the spikes of the blade are facing away from the motor and in the clockwise direction. This is true for all chainsaws no matter the brand or kind of chainsaw. Properly soak the chain in lubricate before attaching it to the saw.
Putting the chain back on in the correct direction and getting the tension right is not difficult. However, while the chainsaw cover and chain are off, a few simple maintenance checks can be done.
Removing the Chain from the Guide Bar on the Chainsaw
If you haven’t done maintenance on your chainsaw before, there are some tools that you will need for this task.
- A scrench (a combination screwdriver and wrench) It probably came in the box with the new chainsaw.
- A guide bar groove cleaner
- Bar oil
- A grease gun or applicator
- Leather gloves (A new chain is cutting blade sharp!)
Unscrewing the Chainsaw Guide Bar Nuts and the Chain Tension Screw
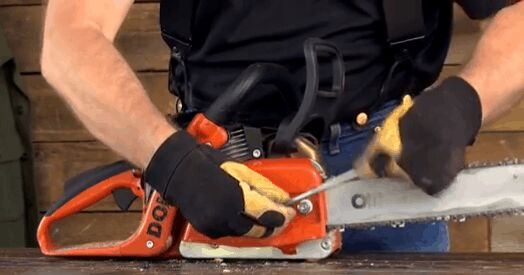
Use the socket part of the scrench to loosen the stud nuts on the side of the chainsaw housing. Most chainsaws usually have two stud nuts holding the bar in place under the cover.
Use the scrench’s screwdriver to loosen the screw that adjusts the tension on the chain (shown here between the stud nuts). The chain will sag on the bar as a result.
Then remove the loosened stud nuts and take off the cover.
Removing the Chain from the Chainsaw Bar
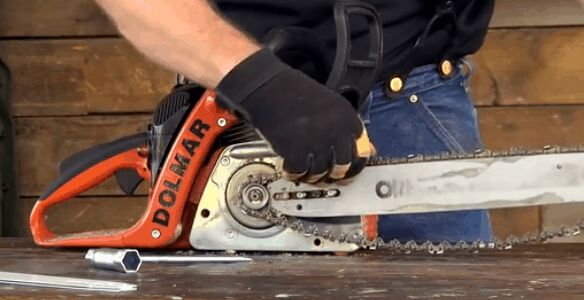
Slide the bar away from the chain tensioner pin (shown here in the bottom hole below the stud). Then remove the backwards chain from the bar.
Remember that the chain is very sharp. Use gloves.
Checking the Guide Bar Channel
It isn’t necessary to remove the guide bar to replace the chain. However, whether new or old, you’ll want to inspect the guide bar channel that holds the chain in place. With the stud nuts off, the bar should come off easily.
The guide bar channel should be clean and clear. A guide bar groove cleaner tool cleans out a dirty channel. A clogged channel can keep the oil from lubricating the chain.
The compounding effect is that a clogged channel makes cutting more difficult. It also causes smoking from the dry chain rubbing and wearing against the channel guide rails.
This wear eventually damages the guide bar channel. The rails in the channel groove should be parallel, as shown here, not sloping inward and down from wear.
The nose of the bar is likely damaged as well. With channel damage, the bar will have to be replaced.
Checking the Bar Oil Reservoir and Lubricating the Guide Bar
Top off the oil reservoir in your chainsaw, if needed. The cutting component system needs a constant supply of oil while operating. You should check the oil level each time you fill the chainsaw’s gas tank.
Manufacturers recommend that you use a bar oil. Unlike motor oil, it has a sticky additive which keeps it from flying out of the bar as it lubricates.
However, all bar and chain oils are not the same. Manufacturers recommend specific oils for their chainsaws. Go to your manufacturer’s website to find out which oil is recommended for your saw.
If using motor oil, use new filtered oil (SAE 30 for summer/SAE10 for winter) since used oil has damaging grit. Because of motor oil’s splatter, you have to frequently check the reservoir level while operating the chainsaw. Using motor oil might also void your warranty.
Most chainsaw bar guides have a grease hole(s) in the tip, or nose, of the bar. If dirty, clean the grease hole. The guide bar groove cleaner can also be used for this.
Use the grease gun to add new grease to lubricate the hole.
Checking the Wear on the Sprocket
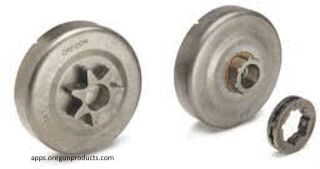
With normal wear, chainsaw manufacturers recommend that you change the sprocket after every two new chains used.
Remounting the Guide Bar
With the maintenance checks done, put the guide bar back on the chainsaw. Be sure the chain tensioner pin is not lodged in its hole in the bar yet. The bar will rest on the studs but not all the way in.
Putting the Chain Back on the Chainsaw Bar Correctly
If the chain is not new, check to be sure that the links are flexible and move easily. A stiff chain should be replaced because it creates more expensive problems. It can also be a safety hazard.
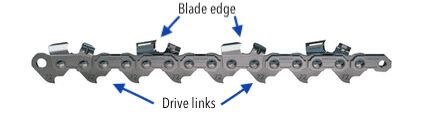
The chain’s drive links will go into the guide bar channel. On top of the bar, the tips of the links will be facing forward toward the nose of the bar. They will be facing away from the housing of the chainsaw.

The chain will hang loosely underneath the bar. The cutting blades underneath the bar will now be facing the housing.
Align the chain tensioner pin through its hole in the bar. Move the bar further in.
Creating the Correct Chain Tension around the Guide Bar
With the chain loosely on, put the side cover back on the chainsaw. Hand screw the stud nuts; don’t tighten them yet.
Lift up on the nose of the bar only, not the chainsaw housing. While in this position, use the scrench to screw the chain tensioner screw back down.
Keep screwing until the drive links of the entire chain are in the guide bar channel rails. Another clockwise half-turn or two of the screw should make the chain “snap tight.” Before you check the tension, tighten down the stud nuts.
Finally, grab the chain and slide it towards the nose of the bar and then around the bar. The movement of the chain should be smooth.
Be sure the chain is cool when adjusting tension. Correct chain tension is essential to running your chainsaw, extending its life, and operating safely.
Getting the Correct Chain for Your Chainsaw and Your Needs
If your chainsaw shakes, chatters, or pulls while cutting, the problem may be the chain. It could be dull, stiff, or damaged. It may even be ruining your bar. It’s time to get a new chain.
Identifying Your Chain
You want to be sure that you get the correct chain for your chainsaw. The easiest way to do this is to check the owner’s manual for the chain number.
If you don’t have the manual, you can go to the manufacturer’s website and type in your chainsaw model number. Then, look for the recommended chain and its number.
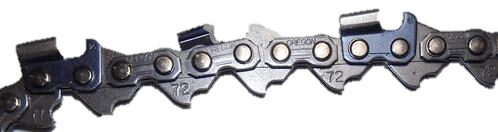
A third option is to look at the number on the old chain. Below is an example of an Oregon chain with the series model number 72 stamped on the drive link.
Chain Specifications
A chain has three primary specifications: gauge, pitch, and number of drive links.
- The gauge is the thickness of the drive link (in./mm) in the guide bar channel.
- The pitch is the distance between any three consecutive rivets divided (÷) by two.
- The number of drive links determines the length of the chain and the proper fit on the bar.
The low profile chain for most casual users generally has a 0.043″ or 0.050″ gauge and a 3/8″ pitch.
A chainsaw classified for casual use (residential) comes with this low kickback chain for safety purposes.
The lighter weight is also easier on the chainsaw’s motor – and the user. But it is still a versatile-use chain.
The chain combination of gauge and pitch will depend on what you want to cut. There are also other factors to consider, such as cutting blade type and chain cutter sequence. Time to consult with your local chainsaw expert wherever chainsaws are sold.
Some chain configurations cut faster and may stay sharp longer but also have a higher kickback risk. These are also generally used by more experienced and professional chainsaw users.
Breaking in a New Chain
The life of a new chain can be extended with proper use and a few simple break-in measures.
It is highly recommended that you soak a new chain in bar oil before using it. Though the new chain out of the packaging may feel oily, this substance is not lubrication.
Soaking the chain will well lubricate all the pivot points in the chain. Soak it for a couple hours; then turn it over for a couple more hours. After soaking, hang it up with an oil pan underneath to catch the dripping oil.
If the chain has dried after soaking, you can drizzle some bar oil over the installed chain for extra precaution. And be sure to check you oil reservoir before starting the chainsaw.
Before cutting, run the chainsaw at half throttle. This will allow the system to lubricate the sprocket, bar, and chain thoroughly.
Shut the chainsaw off after 15-20 minutes of just warming it up. Check the chain tension once again. As the chain heats up, it expands and will be loose on the guide bar.
Let the chain cool down before readjusting the tension. Depending on how long you will be running the chainsaw, you may need to adjust the chain tension more often. Make the first several cuts light cuts.
Wrapping Up
So, that’s it. Performing a few maintenance tasks while correcting the backwards chain will extend the life of your chainsaw cutting system. Cutting will be easier and safer.
UpgradedHome has other useful articles of interest for outdoor projects:“10 Best Electric Lawn Mowers – [2020 Reviews & Top Rated Models]”
“10 Best Zero Turn Mowers – [2020 Reviews & Ultimate Buyer’s Guide]”
“How to Stabilize Pea Gravel Walkways (In a Few Easy Steps)”

We are a team of passionate homeowners, home improvement pros, and DIY enthusiasts who enjoy sharing home improvement, housekeeping, decorating, and more with other homeowners! Whether you're looking for a step-by-step guide on fixing an appliance or the cost of installing a fence, we've here to help.
More by Upgraded Home Team


![10 Best Cordless Leaf Blowers – [2022 Reviews & Ultimate Guide]](https://cdn-fastly.upgradedhome.com/media/2023/07/31/9070789/10-best-cordless-leaf-blowers-2022-reviews-ultimate-guide.jpg?size=350x220)


![Cost To Drill A Well [Pricing Per Foot & Cost By State]](https://cdn-fastly.upgradedhome.com/media/2023/07/31/9074980/cost-to-drill-a-well-pricing-per-foot-cost-by-state.jpg?size=350x220)