


How To Install Recessed Lighting In A Room With Attic Access

You can transform the look of any room in your home with recessed lighting. Whether you are planning a remodel or are just changing your lighting, you should plan the design first. Decide what kind of recessed lighting you want to use, how you want to present them and make sure you have enough room for what you want to do.
After turning off the electricity, mark your holes for the lights you want to hang. Then, you can either cut your holes from the main floor with a keyhole saw or go into the attic and use a power saw. Make sure the circuit your lighting is on can handle the amount of wattage your new lights will be using.
Of course, it is easy but not that simple. There are many steps to go through first to make sure you do the job correctly. It is important to follow the steps in order to prevent accidents or possible electrical overload as well. Also, if you have insulation in your attic, you need to make sure that you get insulation compatible (IC) lights. Regular recessed lighting can become dangerously hot and start a fire.
Do You Need to Hire an Electrician?
Get free, zero-commitment quotes from pro contractors near you.

Installing Recessed Lighting with Attic Access from the Main Floor
If you do not want to work in the attic for some reason, you can still install the recessed lighting from your main floor. It is best to check that there is nothing in your way up in the attic before starting though, so if you can get up there to take a look beforehand, that would be great. If not, just remember to cut at an angle so you do not cut into any wiring that may be up above.
- Turn off the electricity at your main circuit breaker box or fuse box. You do not have to turn it off to your whole house, just to the rooms you are rewiring.
- Test the wires to make sure that the electricity is off even though you know you just turned it off. It pays to double-check.
- Switch the wall switch to the off position.
- Use the template that came with the lighting fixtures to mark where the openings need to be. Using a stud finder, check to be sure there is no joist where you are placing the light.
- Put on protective clothing, a mask, and work gloves. Drill a quarter-inch hole in the middle of the spot you drew for the opening. You will need to go up in the attic to make sure there are no obstructions.
- Use a Sawzall or keyhole saw to cut the hole where you drew the outline. You can also use a hole attachment on your drill to make the hole even easier.
- Run non-metallic sheathed (NM-B) wire from the power source to the switch box for the first hole. Be sure to leave at least an extra foot of cable to make wiring easier.
- Run the cable to the circuit breaker or fuse box and clamp it to the box.
- Using a wire stripper, strip the wires of insulation about ½ inch up to reveal the wires underneath.
- Do the same thing to remove ½ inch of coating from each individual wire.
- Connect the colored wires together matching white to white, black to black, and the ground wire to the ground wire. The ground may be bare wire, or it could be covered in green insulation.
- Be sure to use UL-approved wire connectors.
- Fold the wires into the box and close the cover.
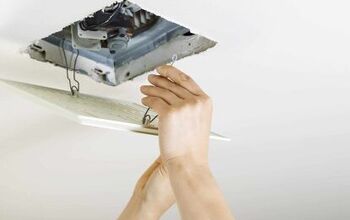
- Push the light housing into the ceiling spot from below, making sure the clips do not stick out from the sides of the can.
- Push the light into the housing until it is tight. Push each clip up and out until it clicks into place.
- Install the light trim by hooking the springs to the trim inside the can.
- Put in the right sized light bulb and turn the power back on to make sure it works.
How to Install Recessed Lighting with Attic Access from the Attic
- Be sure to turn off the electricity in the room where you are working. Go to the circuit breaker or fuse box and flip the switch to the off position.
- Use your ohmmeter to check that the electricity is off before touching anything. Better to be safe than sorry.
- Turn off the light switch attached to the light that you are replacing.
- Mark where the openings will be to make sure you have room for all of the lights you are working with. They need to be at least six inches away from each other. Use the template that came with the lighting fixtures.
- Since you will be cutting into drywall and using sharp tools, you need to wear work gloves, a mask, and protective clothing like long sleeves and long pants.
- Make a hole in the ceiling in the middle of each outline you drew with a drill after looking in the attic to see that there is nothing that will be in your way.
- Using a keyhole saw, a hole attachment on your drill, or a Sawzall, cut around the outline you drew.
- Head up to the attic to run the cable for the lighting. You will need NM-B (non-metallic sheathed) wire to run from the power source to the switch box You should also have at least a foot of extra cable to make wiring the light easier.
- Next, you will need to run that cable to the circuit breaker or fuse box, clamping it to keep it secure.
- Strip ½ inch of insulation off the cable with a wire stripper to expose the wiring underneath.
- Then you will have to strip ½ inch of insulation from each of those wires with the wire stripper.
- Using UL-approved wire connectors, securely connect the wires to their like colors. Match the black wire to the black wire, white to white, and the ground wire to the ground wire. The ground wire is either green or bare wire.
- Carefully push the wires into the circuit box and close it up.
- From the attic, put the can light together and just slide it into the hole you made from below.
- If there are clips to hold the can to the ceiling, make sure they are clipped securely. If not, use the spring-hooks to the connectors inside the housing.
- Make sure all the wiring is connected securely and then you can go back down to the main room
- Put lightbulbs into the lights and turn the electricity back on so you can make sure it works.
Do You Need to Hire an Electrician?
Get free, zero-commitment quotes from pro contractors near you.
Related Questions
How do I strip a wire?
There are three different ways to strip a wire. But first, always make sure there is no electricity running through the wires. You do not want to get electrocuted. Using wire strippers is the easiest way, but if you do not have any, you can use a utility knife or even some scissors.
If you are using wire strippers, first find out what gauge your wire is by comparing it to the guide on the stripper. Then, put about 1 ½ inch of wire into the wire stripper, close the strippers, and pull the wire out. The insulation should slide off.
If you are using a utility knife, lay the wire down on a piece of wood or your workbench. Hold the utility knife in one hand and let it rest on the insulation. Use the other hand to roll the wirer so the utility knife cuts through the insulation (but not deep enough to cut the wire). Pull the insulation off with your fingers or a pair of pliers.
If you are using scissors, open the scissors halfway and push the wire in between the blades until it is tight. Close the scissors a tiny bit to cut through the insulation and twist the wire so it goes all the way around. Put the insulation off with your fingers or a pair of pliers.
What do I do if I cut a hole in the wrong spot?
All you have to do is patch the hole. It is not a difficult job, but it will take a couple of hours.
- Put on your mask and eye protection.
- Sand any loose drywall or paint.
- Apply a mesh patch from the attic, securing it with tacks or cleats.
- Back downstairs, spread joint compound or spackle over the hole. You will probably need three coats, letting each coat dry before applying another.
- Sand the spot until it is smooth.
- Clean it with a damp cloth to remove dust and paint the spot to match the rest of the ceiling.

I am a DIYer who loves writing about anything home-related. When I am not writing, you can find me studying for my PhD in Psychology, photographing nature, and swimming at the lake with my grandkids.
More by Patricia Oelze


![12 Washing Machine Brands to Avoid [with Recall Data]](https://cdn-fastly.upgradedhome.com/media/2023/07/31/9075781/12-washing-machine-brands-to-avoid-with-recall-data.jpg?size=350x220)