How To Install A Bathroom Fan Without Attic Access

When installing a bathroom fan, it is always easier to have access through the attic. Unfortunately, this is not always the case. And while it may be easier to install the bathroom fan with attic access, it also isn’t the only way. So, if you don’t have access, how do you install the bathroom fan?
The best way is to run the venting duct between the closest exterior wall and the ceiling joists. Make sure that you do not cut the joists for any reason whatsoever. You will need to make sure you connect the ductwork properly as well as install the wiring. If you’re not comfortable with the wiring you can always hire an electrician for that particular part.
There is a process to achieving the results that you want without having that access that can make things just a little easier. In this guide, we will provide you with the steps and the information you need in order to install your fan when you do not have access to an attic.
Do You Need an Exhaust Fan Installation Service?
Get free, zero-commitment quotes from pro contractors near you.

Does The Bathroom Exhaust Fan Have To Get Vented Outdoors?
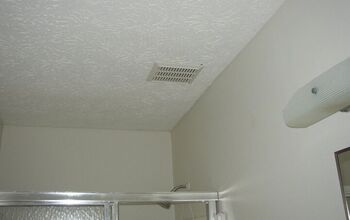
The short answer to this is yes, but there are some differences. With attic access, the fan can actually vent up through the roof or what is known as a gable wall. If you let the exhaust fan vent into an open attic, however, it can result in some moisture buildup under the roof.
So, when you don’t have access to the attic you will need to find a different way to get the fan vented to the outdoors. That way, you don’t need to deal with any moisture issues building in your walls, or anywhere else. You can do this through your wall. You can also connect it to your ductwork to allow it to travel through the duct exhaust and empty to the outside.
Hiring A Professional
It only makes sense that some jobs require more confidence and skill than others. Not everyone feels comfortable enough to take on a task like this, so that begs the question of what it would cost a pro to do the job.
On average, the cost of installing a new exhaust fan in the bathroom is somewhere between $238 and $536, with the average being $373. The fan can range in cost greatly depending on the model that you choose. Likewise, installation labor costs can be cheap or expensive depending on you go with. Having about $400 available for installation is a good rule of thumb if you plan on having a professional do the job.
Doing The Job Yourself
Of course, you have the option to do this as a DIY project, which, we’re all for! It’s very involved and you have to take your time as the process can be somewhat complicated. However, it’s doable on your own. We’ve included the steps below for you to follow if you want to try this project on your own.
Step 1: Check The Duct And Housing Size
Before you even go so far as to purchase a new exhaust fan, you should take off the cover to the old one and measure the housing for the exhaust fan. This will be in between the drywall. This gives you an idea of how big the new fan should be.
If you have purchased the fan already, it is still a good idea to know these sizes. If the new fan is larger, it will require cutting away some of the drywall while also attaching some supports made of wood onto the joists. Duct size is important, too. Generally speaking, duct size is always either 3” or 4”. Knowing what kind of adaptor can make things easier, otherwise you will have to install a totally new duct to the outside of the home.
Step 2: Hittin’ Switches
If you want the new fan to be able to use the switch to the old fan, that’s as far as it needs to go. But if the new unit has things like a heater, light, or humidity sensor to it and you want separate switches, you’ll have to not only buy them but wire them as well.
Keep this in mind before the purchase so that you can avoid any potential curveballs in the planning and installation process. It will save you quite a bit of headache in the end.
Step 3: Take Out The Old Fan
Before the new exhaust fan can be installed, the old one has to come out. Make sure that you shut off the power first and foremost. The last thing anyone wants is to get electrocuted from the work involved in replacing the fan.
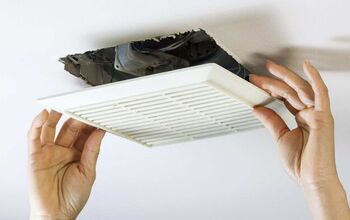
When you have cut the power and ensured that there is no more electricity flowing (use a tester), it is time to take off the grill or cover to the exhaust fan. You can pull down on the cover and squeeze the metal clips that hold the housing in place, allowing the cover to come off easily.
Step 4: Running The Wiring
When you have taken out the old fan and checked out the size of the new fan and ductwork, it comes time to remove the junction box cover for the new exhaust if it has one. This is where the wiring from the home gets pulled through so that it can be connected to the new motor. Ignore this step if there is no junction box.
The wire needs to be secured with a bushing or grommet to defend against damage to the metal edge. The new exhaust fan may come with one; be prepared just in case it doesn’t have one.
Step 5: Connect The Flapper Or Duct Connector
The duct connector is a piece of plastic used to connect the duct to the new exhaust fan. It has dampers or louvers that will close when the fan is not in use; make sure that the flaps are downward when installing them. This lets the air to go out, but not come back in.
Installation can be achieved in one of two ways. The first is connecting the duct to the connector with some foil tape. When this is done, line the housing assembly up with the flapper when the housing has become secured to the joists.
The second way is by connecting the flapper to the housing. From here, you can push the entire meta housing up into the ceiling, just make sure to connect the ducts before you secure the assembly as you’ll have to go back a step.
Step 6: Secure The Housing To The Joists
A helpful tool that comes with some new bathroom exhaust fans is called a hanger bar. This tool makes it much easier to attach the new fan to the joists without the need for wood fillers. All you have to do is slide the bars onto the housing and make sure that the tabs are facing the right way.
If the unit didn’t come with hanger bars, all you do is screw one side of the housing into a single wood joist. Most bathroom ventilation fans aren’t very heavy, so securing one side should do the trick sufficiently.
Step 7: Connect The Wiring
With the housing secured, it’s time to fully connect the wires. Remember, the wiring was pulled through earlier but not connected. Newer fans have quick-connects, others require twisting the wires together with a wire nut.
If at all possible, have someone hold up the housing while you connect the wiring. Doing it one handed isn’t impossible, but it is difficult. When the wiring has been connected, push the wiring into the hole or into the storage compartment that some housing assemblies.
Step 8: Seal The Housing And Re-Install
The last step is to seal the gaps with some caulk to avoid any air leaks. If you don’t want to use caulk, try some foil/metal tap to tape the housing edge instead.
When the gaps have been sealed, the cover needs to be reinstalled. Like the removal process, the housing needs to be clipped into place to secure the housing in place. When the housing is properly in place, the last thing is to flip on the electrical breaker and check to make sure the fan is working.
Related Questions
What is the best way to vent a bathroom exhaust fan?
The exhaust needs to go directly to the exterior of your house. You cannot put the vent termination in your soffit or overhand. Also, don’t put it on a wall anywhere near or under your overhang. This will allow the air to be sucked back into your open soffit vents into your attic, resulting in moisture issues.
Is it OK to vent the bathroom fan into the attic?
You would never vent your bathroom fan into your attic especially in colder months because of the excess moisture. The vent will eventually build up some frost and the ice will melt and leak into your insulation and drywall in your ceiling.
Do You Need an Exhaust Fan Installation Service?
Get free, zero-commitment quotes from pro contractors near you.
Wrapping It Up
If you don’t have access to an attic but you need to vent your bathroom exhaust fan, don’t worry! You will need to find a different route to get the exhaust to the outside. You can choose to do this on your own or hire a professional. We hope this guide has been of great help to you! Good luck!
Related Guide

Ryan Womeldorf has more than a decade of experience writing. He loves to blog about construction, plumbing, and other home topics. Ryan also loves hockey and a lifelong Buffalo sports fan.
More by Ryan Womeldorf