How To Install Metal Roofing Over Plywood (Step-by-Step Guide)
Metal roofing can give your home a sleek, sophisticated finish. Plus, it’s exceptionally durable, and a well-maintained metal roof could last you an average of 45 years or more! With these qualities, you could definitely consider installing a metal roof an upgrade.
But, a metal roof can only be as good as the foundation beneath it. Therefore, if you plan to install metal roofing over plywood, it’s essential to ensure the wood is in excellent condition. Plus, proper preparation, like getting rid of raised nails and installing waterproof felt, is vital to your metal roof’s success.
Metal roofs come in a wide variety of styles, colors, and types, from aluminum to zinc and more. However, no matter what kind of roof you decide to install, it’s crucial to know the right steps to follow.
Do You Need Metal Roofing Installation or Replacement?
Get free, zero-commitment quotes from pro contractors near you.

How to Install Metal Roofing Over Plywood
Once you’ve removed the old roofing material, it’s time to install your new, beautiful metal roof. However, it’s of the utmost importance to take your time with your prep and don’t skimp on materials. This way, you can ensure a strong, dependable roof for years to come.
Tools You Need for the Job:
- Push broom
- Ladder
- Roofer’s felt
- Slip sheet or smooth building paper
- Roofing/Utility knife
- Hammer
- ½” roofing nails
- Metal snips
- Tape measure
- Metal flashing
- Gutters (as needed)
- Chalk and chalk box
- Drill/screw gun
- 1 ½” galvanized metal screws
- Rubber pipe boot kits (for each vent)
- A buddy (when you’re working on your roof its best to have a second pair of eyes and hands to help avoid accidents and injuries)
- A roofing harness; again, safety first
Step One: Prepare the Plywood Decking
Before doing anything else, you need to inspect the existing plywood for any damage. If you find rotted or warped pieces, you need to replace them. Also, make sure the plywood is at least 15/32 inches thick.
If you see any raised nail heads, hammer them down, so they don’t interfere with the new metal panels. You want a nice, smooth surface, so use a push broom to clean the plywood. Finally, make sure to remove any unused vents or pipes.
Step Two: Install Waterproof Felt and Slip Sheet
You don’t want to lay your roof panels directly onto the plywood. You need a barrier for protection against things like weather and moisture; that’s where the underlayment comes into play.
Place the roofer’s felt flat on all areas of your roof, overlapping each row about two inches. Use the roofing knife to cut the felt around any protrusions, like working vents and pipes. Make sure the felt is smooth and lies flat, then secure it with ½” roofing nails.
The slip sheet (building paper works well) goes on top of the felt. It helps protect it from tearing and sticking to the metal roof panels. You can secure it with a few roofing nails to keep it in position.
Step Three: Install Flashing and Gutters
Use the tape measure to determine the length of the roof’s edge. Cut the flashing material to size using the metal snips and install along the roof’s edge with ½” roofing nails.
If you need to install gutters in any of the valleys, cut the gutters to size using the snips. Then secure the gutters in place with the ½” roofing nails.
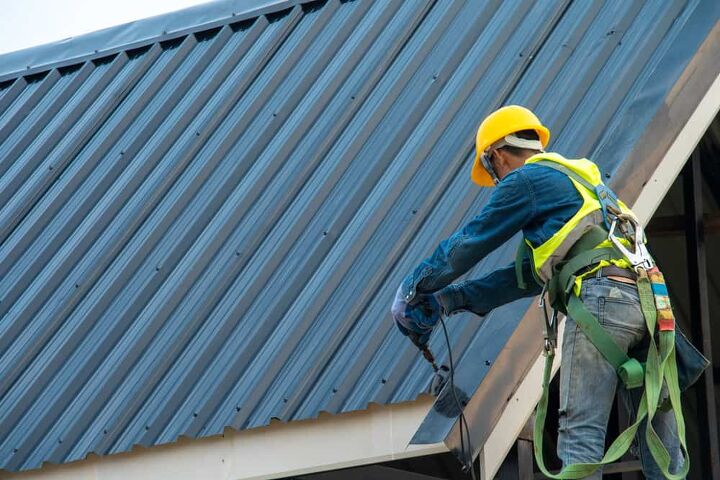
Step Four: Install the First Metal Roof Panel
Once you’re ready to start installing the metal panels, you’ll work from left to right. Start at the bottom of the roof. Use the chalk box to snap a vertical line ¼” from the roof’s rake edge and square with the eave.
The rake edge is the part of the roof that sits above the house. It helps water flow off the roof and onto the ground without running down the side of your home.
Place the first panel into position on the bottom, left side of the roof. Overlap the roof’s edge by one inch and work up toward the ridge. Use the 1 ½” galvanized metal screws to secure the panel to the decking. Place a screw about every 12 to 16 inches apart.
Step Five: Installing the Rest of the First Column
With the first panel in place, you’ll start to install the next panels. Work your way up to the peak of the roof. Then, you’ll go back down to the bottom to start the next column.
Line up the second panel directly above the first, overlapping the edge about 12 inches. Secure the panel with the metal screws the same way you did the first panel.
Continue installing the panels in this way until you reach the top of the roof. Note: Use the metal snips to trim the final panel (at the roof’s peak). Make sure to measure twice and cut once.
Step Six: Finish Installing the Remaining Panels
Now it’s time to begin installing the next column of panels. Start back at the low end of the roof, positioning the panel slightly over the installed panel. Place the first left-side rib of the new panel over the last right-side rib of the adjacent installed panel.
Repeat for each panel until you’ve finished covering the entire roof.
Step Seven: Finishing Touches
Once you’ve covered the whole roof, install the ridge and place rubber pipe boot kits around the vent pipes. Finally, it’s time to climb down safely and admire your new, stunning metal roof.
Types of Metal Roofing
When choosing what type of metal roof you want for your home, you have several options. Metal roofs come in aluminum, copper, steel, tin, and zinc. Each of these metals has pros and cons, so always consider your needs carefully before making a decision.
Copper and Zinc Roofs
For example, a copper roof could potentially last for over 60 years and even over 100 years. It’s also a very soft metal, making it one of the quietest metal roofs. However, this quality also makes it very susceptible to damage from things like hail.
Although, being soft, it is more likely to dent than end up with a puncture. Of course, with its long-lasting, super-quiet perks comes a hefty price tag. Depending on the quality, you could pay anywhere from $14 to $25 per square foot.
Zinc roofs have similar benefits to copper as well as a similar price tag.
Aluminum Roofs
Aluminum roofs can last about 50 years and are rust-resistant. However, the sheets can be thin and not always the best for areas with high winds.
Per square foot, an aluminum roof costs between $4.50 and $10. The lower end is if you do it yourself, the higher end is if a pro installs your roof.
Tin Roofs
Tin roofs are no longer very common in roofing applications. Most times, in new homes, when they say tin, it’s probably steel.
Steel Roofs
Steel roofs come in several variations and are very durable with an affordable price tag. A steel roof lasts for about 40 years, perhaps more depending on maintenance and environmental factors. Per square foot, a steel roof costs about $2 to $7, depending on the type.
Do You Need Metal Roofing Installation or Replacement?
Get free, zero-commitment quotes from pro contractors near you.
Related Questions
How much does it cost to install a metal roof?
Of course, a lot depends on the size of your roof, type of roof, and who installs it. You can expect to pay between $8,000 and $15,000 for a basic metal roof on an average-size home. However, if you choose high-end materials and go with something like copper, you could pay over $40,000. Unless opting for more expensive metals, like zinc and copper, your metal roof’s cost will be similar to asphalt. This is if you consider the roof’s lifespan. In other words, you will pay more upfront for a metal roof, but you won’t replace the roof as often. A typical asphalt roof lasts for about 15 to 20 years, depending on maintenance and conditions.
How do I determine how many roof panels I need for a metal roof?
Metal panels come in a variety of sizes as well as overlapping dimensions. Standard lengths are 8 feet, 10 feet, 12 feet, and 16 feet. However, you could also talk to the distributor about cutting the panels to size. A common panel width is either 24 or 36 inches. But, the actual width will be larger to account for overlap. Depending on the style of the panel, these measurements can vary slightly. To decide how many panels you need, you first need to determine the size of your roof. Measure your roof section by section, multiplying the length by the width to obtain the square footage. Once you have the square footage of all the sections, add them together for your total roof size. Next, divide your roof’s square footage by the panel’s square footage to figure out how many panels you need. Note: It’s a good idea to add about an extra 10% to the number of panels you need. Additional panels are a good idea to account for mishaps, cuts, and waste.
Related Guide

Stacy Randall is a wife, mother, and freelance writer from NOLA that has always had a love for DIY projects, home organization, and making spaces beautiful. Together with her husband, she has been spending the last several years lovingly renovating her grandparent's former home, making it their own and learning a lot about life along the way.
More by Stacy Randall