


How To Install A Moen Shower Valve Rough-In

Installing a Moen shower valve rough-in is not difficult, but it takes time and attention. Moen is the choice of many builders, owners, and renovators because of how consistent their shower valves and other products are. It also does not hurt that Moen shower valves are easy to install for a plumbing rough-in.
To install a Moen shower valve, be sure to shut off the water first. Then, you will need to go to the bathroom space you have chosen for the shower valve, and if the plumbing is already assembled, simply install a wooden backing to support the valve and plumbing. You may need to make cuts if the plumbing is already installed to accommodate the Moen shower valve.
Now, simply line up the Moen shower valve with the shower faucet in the space. Most Moen shower valves will fit right on the faucet, but if not, you may need to solder copper tubing to the faucet so that the valve fits. All that is left to do is to attach the Moen valve to the water supply using PEX tubing or copper piping.
In this article, we will walk you through the correct way to install a Moen Shower valve rough-in. Additionally, we’ll talk a bit about what exactly a Moen Shower valve is and give you the information you’ll need so you can do this job successfully.
Do You Need a Faucet, Fixture, or Pipe Repair or Replacement?
Get free, zero-commitment quotes from pro contractors near you.

What Are Moen Shower Valves?
Moen shower valves are top of the line valves made of nickel, chrome, copper, and more. They range in price from $92.05 for a chrome shower valve, to $4,421.00 for a brushed nickel valve with a hand shower. One of the things that Moen shower valves are well known for is how responsive they are to movement and adjustment.
For Moen shower valves, you can connect to the water line using PEX tubing or copper pipes. That makes installing Moen shower valves easier than installing tub valves. With tub valves, you need to use piping and typically have to solder it on.
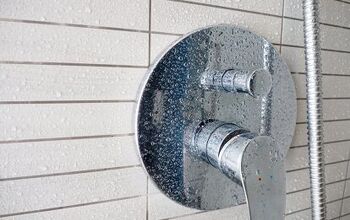
How Does A Moen Shower Valve Work?
The specific Moen Posi-Temp valves are created to be able to balance pressure. The valve that’s on the Posi-Temp, for instance, balances the pressure so that it maintains a constant water temperature even if the pressure from the cold pipes or hot pipes either decreases or increases.
By balancing the flow of water and temperature, it will let your shower experience be even more comfortable. No more moments of scalding hot water and freezing cold water when the pressure decides to fluctuate.
Installing Moen Shower Valve Rough-In
During your plumbing rough-in, it is important that all plumbing fixtures are properly connected and left unsealed. That is so that the inspector can come in and either pass or fail your rough-in. You are allowed to keep trying until you pass if you fail, however, passing on the first try means that you can move on in building and renovations.
Some Moen shower valves come as tub/shower combos. In that case, more assembly is required because of the tub spout. The tub spout is where the water will come out when running a bath. Otherwise, installing the shower valve itself is simple.
Tools For The Job
Before you can get started, you need to assemble the necessary tools. To install a Moen shower valve, you will need the following tools:
- Handsaw
- Soldering paste
- Torch
- Eye and face protection
- Copper cutter
- Moen shower valve
Each of the above tools and supplies will come into play during the Moen shower head installation.
Step 1: Prepare Your Moen Shower Valve
Some prep work needs to be done to the Moen shower valve. Typically, there is a plastic cartridge within a Moen shower valve. You must remove the plastic cartridge, otherwise, it could be destroyed in the following steps.
To play it safe, consider taking a picture of the cartridge in the shower valve before removing it. That way, you can place it exactly as needed later on when it is time. If your Moen shower valve is going in a shower that doesn’t have a tub, cap off the bottom valve.
Cap the bottom valve by soldering a copper cap onto the opening. Now, simply brush in soldering paste into all of the pipe sockets on the valve. Be careful when soldering the cap as you don’t want it to get too hot otherwise, this can cause some warping or damage.
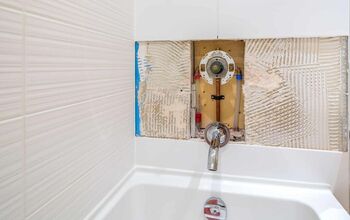
Step 2: Insert The Valve Into the Wall
Since this is a rough-in, your wall should already be open. If for some reason the shower valve won’t fit, you can cut it into the wall with a reciprocating saw. Otherwise, all that you need to do is attach the Moen shower valve to the shower riser pipe.
This part can be tricky because the shower valve can easily wobble and fall into the wall. To avoid this, have a helper, or tether the Moen shower valve to a string. That way, if the valve falls, you can pull it up easily. Once the shower valve is secure, you can then remove the string.
Next, you need to connect the hot and cold water pipes into the inlets on the shower valve. Once the copper pipes are fixed to the inlets on the shower valve, solder them. Again, you’ll need to keep this step brief as heating it too much can cause irreversible damage, and then you’ll have to purchase new inlets or possibly even new pipes. However, this is in extreme cases.
Step 3: Secure The Joints
This step is vital but can also be dangerous. You will need your propane torch and proper eye protection. Now, carefully go to each of the joints attached to the shower valve and solder them.
It is critical that you solder each joint all the way around. Otherwise, you can’t be sure that there is a complete seal. You can check your work to make sure that each soldering is complete by using a mirror, or even the camera on your phone.
Because you are in the rough-in stage, there is less wall in the way to pose a fire hazard. With that said, however, the wooden framing around the shower valve and plumbing is flammable. Because of that, keep water nearby, or even prepare the framing by getting it lightly wet before you solder, to begin with.
Step 4: Re-Insert The Cartridge
Now it is time to re-insert the cartridge that you removed earlier. Give yourself 2-5 minutes to make sure that the metal is completely cool from the soldering. Make sure that the cartridge fits back into the shower valve the exact way that it was originally.
Once your cartridge is back in the valve, go ahead and turn the water supply back on. However, don’t run the water yet until after installing the valve handle.
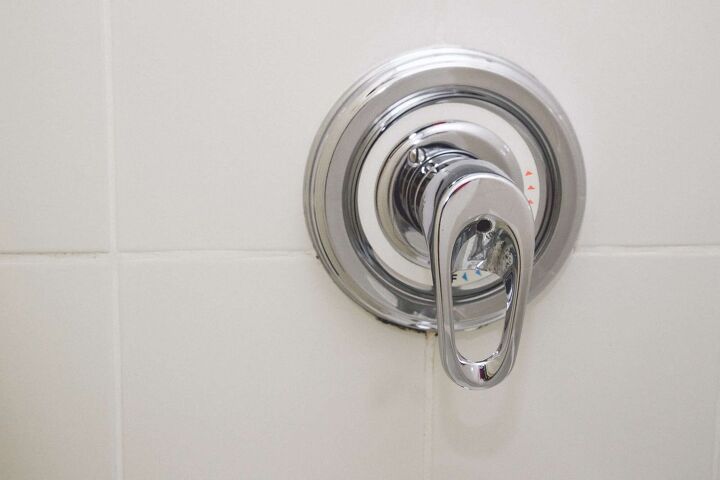
Step 5: Install The Shower Valve Handle
All of the hard work is out of the way. For the last step, you can finally install the shower valve handle. Most Moen shower valves come with trim plates for the handle to sit against. However, depending on the state of your plumbing rough-in, you may not be able to install the trim plate yet.
If you are able to install the trim plate, it simply screws into the wall. After you install the trim plate, you can put in the cartridge sleeve for the handle to slide onto. Keep in mind, however, that this final step may not be able to be completed for everyone depending on how much wall they have during their rough-in.
In the event that you cannot finish this last step until after having your plumbing rough-in inspected, leave the shower as it is. That way, you’ll only have 30 seconds of work ahead of you when all that is left is installing the valve handle.
Related Questions
Can a shower mixing valve go bad?
Yes, a shower mixing valve can go bad. If you’ve checked the anti-scalding device and that’s okay, then most likely your shower mixing valve has gone bad and isn’t allowing the hot water to mix properly into your shower water. These valves can break or may even be installed incorrectly.
How do I know what shower valve I have?
If you have two handles then this means that it’s a double-handle faucet. This means that the cold and hot pipes connect to different handles. However, if there’s only one handle then it’s a single-handle faucet. Three handle models are rare.
Do You Need a Faucet, Fixture, or Pipe Repair or Replacement?
Get free, zero-commitment quotes from pro contractors near you.
What Did We Learn?
Installing a Moen shower valve rough-in is simple. You must do the proper prep work, such as removing the plastic cartridge from the valve, before beginning. After that, carefully insert the shower valve into the wall.
Connect the hot and cold water pipes to their respective inlets on the shower valve. After that, carefully solder all of the joints together, put your plastic cartridge back in the valve, and install the handle.
Remember to be safe, keep water or a fire extinguisher on hand for the soldering, and keep track of the plastic cartridge throughout the installation.
Nick Durante is a professional writer with a primary focus on home improvement. When he is not writing about home improvement or taking on projects around the house, he likes to read and create art. He is always looking towards the newest trends in home improvement.
More by Nick Durante


![Finishing Basement Without Permit [Is It Really Illegal?]](https://cdn-fastly.upgradedhome.com/media/2023/07/31/9070078/finishing-basement-without-permit-is-it-really-illegal.jpg?size=350x220)


