How To Hang Pinch Pleat Curtains (Quickly & Easily!)
There are many positive benefits to hanging curtains. Curtains offer a sense of comfort, privacy, and they keep out the heat from the sunshine and the cold winter air.
Pinch pleat curtains can provide an elegant look to liven up any room. With the right set, it can turn a bland space into a dream home decor. Many times people come over to visit and will wonder how to hang pinch pleat curtains for themselves.
To hang pinch pleat curtains, you need pins to make the pleats with accurate measurements. Putting the curtains on the rings is the most tedious step. Anchors, rods, and rings are used to hang the curtains as the rod fits over or through the anchor with a 12-step process.
Do You Need Handyman Services?
Get free, zero-commitment quotes from pro contractors near you.

What Are Pinch Pleat Curtains?
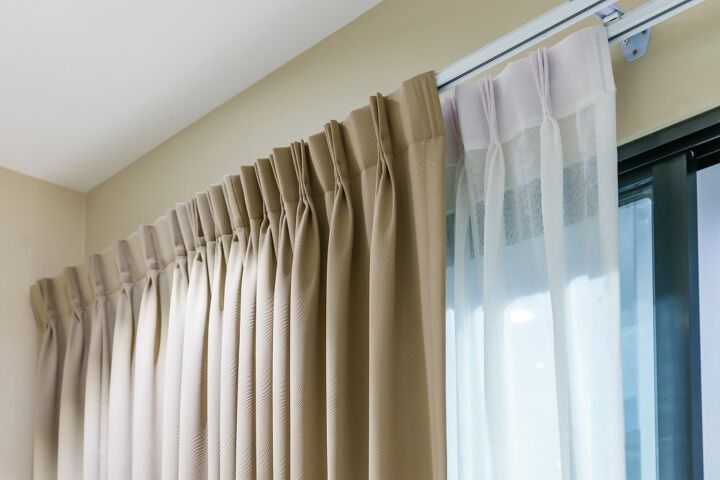
Pinch pleat curtains are often made of heavy fabric such as suede, velvet, silk, and jacquard. They are fabulous curtains with one, two, or three pieces of fabric pinched at the top to form a crease. It adds an almost wavy look to the material from the top on downward.
French pleat curtains are often used in traditional living rooms and dining rooms rather than casual family rooms and kitchens. They make a statement for fine living within a home. It almost tells a story of the homeowner’s life inside the house.
An Easy 12-Step Process on Hanging Pinch Pleat Curtains
One of the best ways to adding style to your home decor is by following these steps to hanging curtains. Steps one through seven are pinning the curtains correctly, being careful to measure appropriately along the way. The last steps, 7 through 12, involve the actual hanging of the curtains.
Step 1: Lay the Fabric Face Down
Use a large table, a bed with sheets only, or even a freshly vacuumed floor to spread the material. You want to spread the back of the curtain face down, with the top of the fabric facing you.
Step 2: Have a Hook for Each Pleat
Count the number of pleats that you have. You’ll need one hook for each pleat, plus a beginning and endpin. If you have an eight-pleated curtain, you’ll need ten pins.
In addition, lay out the number of rings or gliders you need. If you have ten hooks, then you’ll need ten rings or gliders.
Pay attention to the hooks to see that they are all of the exact sizes. When you look at them closely, you’ll often find several hooks that are wider. Be sure and squeeze them together, so they are all equal.
Step 3: Measure from the Top of the Hook to the Fabric
This measurement is critical as you want the fabric to cover the curtain hardware completely. A typical measurement might be three-quarters of an inch.
Step 4: Measure the Back of the Pleat
Ensure the measurement is exact, with the bottom of the hook being as far down as you previously measured. Then mark that spot with either a pencil impression or use a small pin.
Step 5: Insert the First Pin into the Fabric
Make a note where you have marked the back part of the fabric for piercing. Then pierce the sharp part of the hook into the fabric.
Here you want to go through the back part of the fabric and the inner padding. But you do not want the sharp end of the hook to pierce through the front. Be sure to double-check and turn the fabric over to ensure you didn’t penetrate the front of the material.
Step 6: Add More Pins
You want to insert a few additional pins along the creases. Always use your measuring point, such as .75 inches. Then when you have a few hooks in, connect them with your curtain rod and rings.
You must be careful when performing this as the rest of the rings are not connected. A helping hand is necessary, but lift the section of the curtain and check the overall length.
If there are sections of the curtain that are too long or too short, you will need to backtrack. Remove some of the pins and reinsert them to fit. You want your curtain to be the ideal length.
Step 7: Continue with the Pins
Once you put all the additional pins in the material, be sure to use your measurement throughout the entire process. Pay attention to lining up the two end hooks as there is no pleat to guide you. Use your measurements for accuracy.
If you have followed your curtains’ process, they are of the ideal length. You don’t need to readjust any of the pins. Congratulations, it is now the halfway point.
Step 8: Add the Finished Look
The essential element here to give your curtains a finished look and find the space between two pleats. When you push pleats together, either inward or outward, the pleat will tend to bunch up.
Step 9: Push the Pleats in Place
You will want to push the pleat toward the pole, curtain, or track. Now fold the area in half to make a definite crease. Continue folding all of the pleats. At the two ends, fold the hem allowance in half with the hood placed in the middle.
Step 10: Attaching the Hooks
Next, begin to attach the hooks to the gliders or the rings of your hardware. With a ring, there will be a small eyelet at the bottom of the ring. For the glider, there will be a small eyelet on the glider.
If you are using a glider, locate the eyelet before trying to push the hook through it. Continue to connect the hooks through the rings or the gliders, being careful not to skip any. Go in sequence; otherwise, if you miss one, you’ll have to redo the entire set.
Be careful to support the weight of the curtain until everything is strung. Otherwise, your curtains could become creased and fall on the floor.
Step 11: Move the Curtains to the Desired Spot
Move your curtains left and right to check how they fill in space. If the area isn’t completely filled, the best way to handle that is to leave one side alone. Continue to Step 12 if you have this issue.
Step 12: Wrap up Everything and Fix the Balance
Take a few hooks out, and sew additional material to add a better balance. Then add the necessary hooks as well as other hardware such as more rings.
Getting the Room You Want
When choosing curtains, the two factors that stand out the most is the colors and the material. The colors of the curtains must match the room and furniture for it to look professional. Friends and neighbors may have a persuasion over the decision, but you choose the in-home decor in the end.
Curtains are the added feature of a room. It screams decoration, creativity, style, and good taste. Those who wish to impress others, statistic-wise, curtains are the first thing people notice when walking into a home.
The Most Popular Colors for Curtains
To match curtains in a room, the first thing to look at is the wall color. The most popular colors are those that go with anything.
Brown, black, dark red, and tan are the most popular choices in curtains. Some people venture out to blue, purple, green, and other colors, but there is a problem with that. Not all of those colors go with the room.
Do You Need Handyman Services?
Get free, zero-commitment quotes from pro contractors near you.
Related Questions
How much material do you need for a living room?
Experts say that you typically should take the width of your window and multiply it by 2.25. So if your curtains were covering a 74-inch picture window, you would need about 166 inches of fabric.Other factors may make a difference, such as how many windows and the size of the windows. Not all windows in a living room are the same size. It may take more or less in the fabric, hooks, rings, poles, and other materials.
Which is the easiest hardware to hang your curtains?
Most experts believe ordinary curtain rods with curtain rings are the easiest for the home decorator to manage. However, although a little trickier to install, poles with gliders offer a smoother operation.Stay away from electric operations. They often fail and are more trouble than they are worth. After all, it takes only seconds to open a curtain manually.
Should I hire an installer rather than do it myself?
If you are doubtful of your abilities, it may make sense to hire an installer. Not everyone is capable of DIY projects. Some may be better at hanging curtains than others.The critical factor is realizing it will typically cost you a few hundred dollars to have someone hang your curtains. Our suggestions are to Do It Yourself, be careful, and it is generally a good idea to have a helper. Preferably use one that is as meticulous as you are for the results.

We are a team of passionate homeowners, home improvement pros, and DIY enthusiasts who enjoy sharing home improvement, housekeeping, decorating, and more with other homeowners! Whether you're looking for a step-by-step guide on fixing an appliance or the cost of installing a fence, we've here to help.
More by Upgraded Home Team