How To Get Rid Of Mushrooms In Mulch (Step-by-Step Guide)
While mushrooms are not necessarily bad, they can be a bit of an eyesore in your garden. If you have pets or young children, it’s good to get rid of mushrooms. Curious animals and kids might eat them, and that could lead to problems.
To get rid of mushrooms in mulch, you can use vinegar, baking soda, dish soap, or remove them by hand. To prevent new growth, you can rake the area, trim back trees, and remove or treat your mulch. To use fungicide, dilute the product in water and apply onto the mulch using a spray bottle.
Do You Need Lawn and Tree Maintenace Pros?
Get free, zero-commitment quotes from pro contractors near you.

What Causes Mushroom Growth?
If you have mushrooms in your garden, don’t assume you’re a lousy gardener. Mushrooms love any damp environment. If mushrooms keep popping up in your yard, it’s probably a result of proper watering or recent rains.
Mushrooms also thrive in a woody environment. If you have mulch made of wood rather than synthetic materials, it’s likely mushrooms are popping up there too.
Don’t fret! Mushrooms are often a sign that you have healthy soil.
However, make sure not to layer too much mulch in your garden. An excess of mulch can start to suffocate plant roots. This excess may cause plants to die prematurely, making them an excellent food for mushrooms.
Removing Mushrooms in Mulch with Vinegar
Vinegar acts as a natural fungicide and can rid your garden of those pesky mushrooms. To use vinegar to kill unwanted mushrooms, follow these steps:
Step 1: Mix It Up
Mix four parts water with one part vinegar in a spray bottle.
Step 2: Protect Nearby Plants
Cover your other plants and grass with a tarp or garbage bags. This coverage will protect them from being sprayed by the vinegar accidentally.
Step 3: Time To Spray
From about four to six inches away, spray the mushrooms with the vinegar and water mixture. Spray generously to ensure you kill the mushrooms.
Note: Wear some form of eye protection to prevent the vinegar from getting in your eyes.
Step 4: Wait It Out
Allow the vinegar and water mixture to sit on the mushrooms for three to four days.
Step 5: Remove the Mushrooms
After three to four days have passed, remove dead mushrooms.
Step 6: Check and Repeat
Respray any remaining live mushrooms with the vinegar and water mixture, and repeat steps four and five.
Removing Mushrooms with Fungicide
If vinegar didn’t do the trick to get rid of those mushrooms, fungicide just might. Do the following to kill mushrooms with fungicide:
Step 1: Find a Fungicide
Purchase a general purpose fungicide. You can purchase it at a local hardware store, or places like Walmart or Amazon. Prices for fungicide generally range from $10 to $15.
Step 2: Dilute the Fungicide
Dilute the fungicide with water according to the instructions on the bottle, and add the mix to a spray bottle.
Step 3: Time To Spray
Spray the fungicide and water mixture generously on the mushrooms.
Note: Fungicides usually don’t kill individual garden plants. But, the product label should include a list of specific plants you should not spray.
However, if you are unsure of what a fungicide will do to some elements in your garden, do a test spray. If you want to take extra precautions, cover the rest of your garden with a tarp or garbage bags.
Step 4: Wait It Out
Allow a few days for the mushrooms to absorb the fungicide.
Step 5: Remove the Mushrooms and Repeat
Check back after a few days and remove the dead mushrooms. Then, respray any live mushrooms, and repeat steps four and five.
Remove the Mushrooms By Hand
If you don’t want to use chemicals in your garden, you can remove mushrooms by hand. This process can be more tedious than spraying with vinegar or fungicide. It’s especially time-consuming if you have a large mushroom population.
To remove a mushroom altogether, you have to pull it out at its base. You can do this with your hand or with a knife for a cleaner cut.
You can also run your lawnmower over the group of mushrooms. Pick up all the mushroom pieces from each removal and dispose of them in a plastic bag in your trashcan.
Note: You should aim to remove mushrooms as soon as they sprout. The longer you wait, the longer the mushrooms have to release spores, which will grow more mushrooms.
Preventing Mushrooms
After you’ve removed all the mushrooms, it’s time to take some precautionary measures to prevent new growth. You can avoid more mushrooms from growing by raking, removing, or treating your mulch and trimming back trees.
Raking Your Mulch
Mushrooms thrive in a wet environment. If you live in a rainy climate, your garden mulch is the perfect environment for mushrooms to grow.
Try raking your mulch after watering your garden and after heavy rains. This process will loosen the mulch and allow it to dry out.
Raking your mulch can also break up existing mushroom colonies waiting to sprout. It can even give your plant roots more room to breathe.
Removing Your Mulch
If you notice more mushroom growth, this may be a sign to remove and replace your mulch. Mushrooms feed on decomposing plants and other natural materials.
If it’s been a while since you mulched, your old mulch is the perfect mushroom food. It’s time to replace your old mulch with a new layer.
Once you’ve removed the mushrooms, turn the soil. Add a new layer of mulch and rake it through.
Treat Your Mulch
If your mulch is relatively fresh and you don’t want to replace it, treat it instead. Mushrooms love acidic soil, and most plants prefer a neutral environment. You can neutralize your soil by adding lime.
Lime will not kill existing mushrooms, but it will make it much harder for them to grow in the future. If mushrooms do attempt to return, the lime will slow their growth significantly.
Trim Back Your Trees
Another way to prevent mushroom growth is to trim back trees in your garden. Not only do mushrooms like wet, acidic soil, they also like shade.
Trimming overhanging branches and blooming shrubs can help shed some light on the mushrooms. Trimming, combined with new, lime-treated, and raked mulch, can prevent new mushroom growth.
Living with Mushrooms
If you’ve tried all the tricks and those mushrooms keep coming back, it may be time to learn to live with them. Since they don’t pose a threat to your plants, they won’t harm your garden.
Some gardeners suggest incorporating stubborn mushrooms into the landscape of your garden. Add a few garden gnomes and other ceramic decorations to create a whimsical garden vibe. Feel free to remove a mushroom or two if it interferes with your decor.
However, if you notice artillery fungus in your yard, these should be removed. They are unsightly, can damage whatever they grow on, and shoot spores 20 feet into the air.
This fungus is significantly more harmful than typical lawn mushrooms, which are mostly just eyesores.
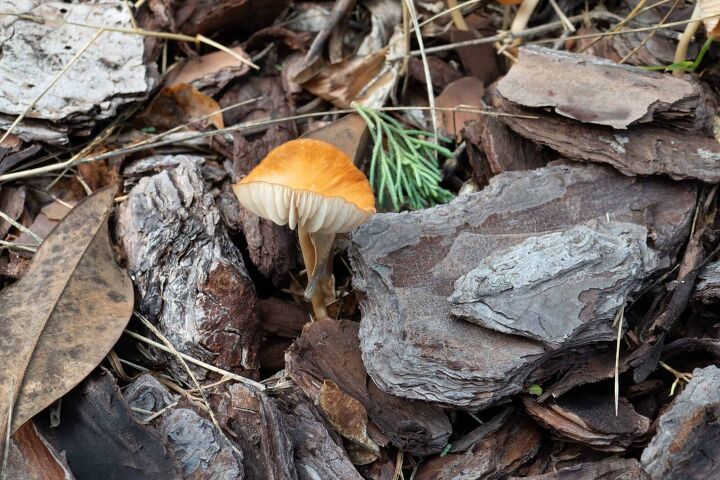
What Kind of Mushrooms Grow in Mulch?
When mushrooms grow in mulch they may appear as quickly as overnight after a rain shower in a arrange of shapes, colors, and sizes. Mushrooms in mulch are usually either feeding on the bacteria within the mulch or on the mulch itself. That said, here are the most common types of mushrooms that like to grow in mulch:
Stinkhorn Mushrooms
Stinkhorn mushrooms are an erect type of mushroom that, as described by the University of Illinois Extension, protrude from mulch like a finger. They have a slimy appearance, due to the spore-containing substance on the top of the mushroom. The tip of a stinkhorn mushroom has a very unpleasant odor, which is appealing to flies and other insects. When they land on the slime, the bugs will pick it up and spread the spores.
The best way to get rid of stinkhorns is to handpick them or dig them up. Though, like all other mushrooms found in mulch, they are not dangerous to your lawn and only present a problem aesthetically.
Puffball Mushrooms
Puffball mushrooms also grow in mulch. They have a cream/white color and a round structure. When they reach maturity and release thousands of dark-colored spores, these mushrooms develop a hole in their tops. Puffball mushrooms generally measure about 1 inch in height and like other mushrooms, they like to grow on decaying plant material. They also do not pose a threat to your lawn and can be left alone or removed by hand.
Mushroom-like Fungus
Slime mold is commonly referred to as a mushroom, but is actually a fungus. It thrives on decaying organic matter, such as mulch, and also will not harm your lawn or plants. This type of fungus is characterized by a “gooey mass” of yellow, white, red, brown, or gray mold on the surface of mulch. Because of its unattractive appearance, slime mold is commonly called “dog vomit”.
Once dry, it will usually disappear on its own. Though, you can remove it immediately by raking, mowing, using spraying it down with a hose. While it isn’t dangerous to your lawn, slime mold may cause minimal damage to plant life by blocking air and sun.
Do You Need Lawn and Tree Maintenace Pros?
Get free, zero-commitment quotes from pro contractors near you.
Related Questions
Can I eat the mushrooms that grow in my yard?
Mushrooms that grow in yards are generally not poisonous. However, it is a good idea not to eat one unless you’re 100% sure it’s safe. Always keep children and pets away from lawn mushrooms as a precaution.
What does it mean when you have mushrooms growing in your mulch?
Mushrooms love wet soil. If mushrooms have suddenly appeared in your garden, there’s a possibility that you’re overwatering your soil.However, mushrooms are usually an indication that you have healthy soil, and mean that you it has very rich organic matter. So, don’t limit your watering just yet. Try raking your mulch to give it a chance to dry out first. If this seems to help with the mushrooms, then overwatering was probably not your problem.

Stacy Randall is a wife, mother, and freelance writer from NOLA that has always had a love for DIY projects, home organization, and making spaces beautiful. Together with her husband, she has been spending the last several years lovingly renovating her grandparent's former home, making it their own and learning a lot about life along the way.
More by Stacy Randall