Garage Door Opener Won't Work (Unless Holding Down Button)
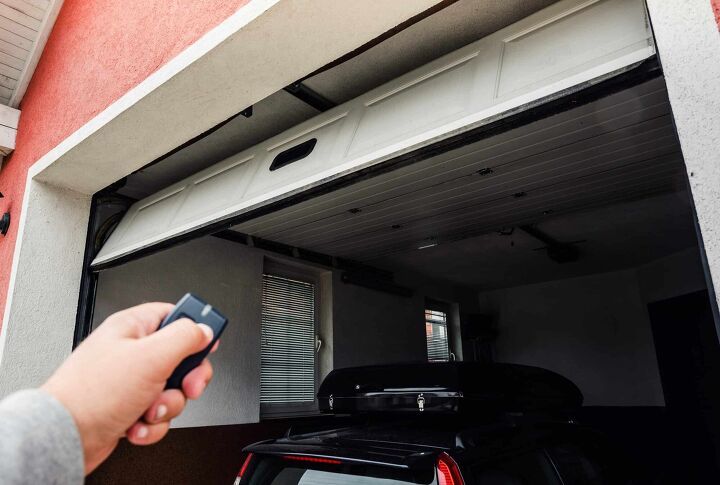
Sometimes it gets frustrating. Having to hold down the garage door opener to make sure that the door closes all the way. You might remember when you didn’t have to hold the button down the whole time. Why is your door opener acting up all of a sudden?
If you have to hold down the garage door opener to close your garage door, the motion sensors make sure the sensors are working properly. If the indicator lights are on, simply clean the sensors, check the glass is not scratched, and realign the sensors. If the indicator lights aren’t on, replace the sensors.
If you always have to hold the button down, the sensors may incorrectly think there is always an obstruction. This could be due to misaligned or dirty sensors. We’ll help you diagnose issues with your motion detectors. We’ll also help you fix them to have your garage door opener back to normal.
Do You Need Garage Door Opener Installation or Replacement?
Get free, zero-commitment quotes from pro contractors near you.

How Do Garage Door Motion Sensors Work?
Modern garage doors use a motion sensor to detect objects. The motion sensor works through a beam of light near the bottom of the door that is broken by obstructions. The intent is to protect small children or animals from being crushed by the door as its closing.
The beam of light is created with a transmitter on one side. The transmitter is aimed and detected by a receiver on the other side of the door. When an object interrupts the beam of light, controls stop the process of opening or closing the garage door opener.
Sometimes issues prevent the transmitter from shooting the beam of light directly into the receiver. When this happens, you’ll have to hold down the button to override the automatic controls. This could be caused by the transmitter and receiver not aligning properly. Alternatively, the glass of one or the other could be dirty or scratched.
If the garage door isn’t opening correctly, your garage door spring may be broken.
Signs Garage Door Sensors are Bad
If you suspect that your garage door sensors are faulty, there are troubleshooting steps you can take to determine the root of the cause. There are a few signs to look for that will help you identify the underlying issue with a garage door sensor. That way, you can understand the proper solution and whether you’ll need to fix the problem yourself or seek the help of a professional.
- Dirty Lenses: In some cases, fixing your garage door sensors can be done with a simple cleaning. The sensors can become faulty when the lenses have dirt or grime blocking the view of the garage door opening. If your garage is especially dirty, you’ll want to perform regular cleanings of the lenses.
- Light Indicators: The easiest way to know if your garage door sensors are out of alignment is by checking if the exterior LED light blinks when you try to shut the door. Green lights indicate that the sensors are working, whereas, red means that the sensors a misaligned.
- Damaged Wires: The wires that connect the garage door sensor system may undergo wear and tear from everyday use, pests, and weather conditions. Inspect the wires for any indications of tampering, chew marks from pests, or water damage. If so, they may need replacing.
Cleaning Garage Door Motion Sensors
On either side of your garage door should be a small box that has an electric eye on it. If the glass is dirty it may block the laser from transmitting from one side to the other.
Take a soft, damp cloth and gently clean the glass on each side. Be careful not to use any abrasives which can scratch the glass. If the glass is scratched, then the issue may persist.
When the glass is damaged, you’ll need to replace the motion sensor pair.
How To Align Garage Door Sensors
Once you’ve cleaned the motion sensors, check if you still have to hold down the button. If you do, the next step is to make sure the sensors are properly aligned. Here’s how to align the garage door sensors:
Step One
The sensors should be installed with a bracket on towards the bottom of the garage door. Unscrew the brackets and inspect the assembly.
Step Two
If there is any damage to the enclosure or wiring, you will need to replace the unit. Make sure that the power to the garage door opener is shut off before disconnecting the sensors. Even those most sensors are low voltage, short circuits can still hurt you.
Step Three
Check the mounting brackets and the rails they screw into. Make sure the frame hasn’t been bent by someone pulling their car in or out. If you see any bent pieces, try bending them back into shape or replace them. Mount the electric eyes back on to the mounting brackets.
Step Four
If the sensors are working, you should see a beam of light or laser projecting across your garage. Make sure that the end of the beam lands on the receiver. After you’ve ensured that it’s properly aligned, tighten down any remaining screws or bolts to lock it into place.
Step Five
To make sure the solution worked, try to click the button on your controller once. If the garage door closes without you having to hold the button down, then you properly diagnosed the issue!
Replacing Faulty Sensors and Wiring
If the indicator lights at the sensors aren’t working, you may have faulty wiring that needs to be replaced. Here’s how to tell if the wiring is faulty:
Step One
Start by raising the garage door with your controller. Use a ladder to remove the cover from the garage door opener. It’s normally up in the ceiling on the garage door track.
Step Two
Unplug the garage door opener power cord from the power outlet. Remove the removable cover from the opener. You should be able to see the terminals where the low voltage wiring where sensors land. If the wires are loose, tighten them down. You may need to use a screwdriver to tighten the terminals.
Step Three
Plug the power outlet back in. If the sensor lights don’t come on, the wiring itself may be faulty. Even faulty low voltage wiring can be dangerous. If the live wire touches a dry piece of wood or insulation, the wire could cause a fire. If a child or pet touches the live wire, they can be severely shocked.
Replacing Damaged Garage Door Opener Wiring
Try to inspect the wiring from the opener itself all the way down to the motion sensors. Damaged wiring may be pinched, frayed, or completely disconnected.
Loosen the terminal screws at the overhead unit to remove the wiring connections. Then, start at the ceiling and pull out the wires from the opener all the way down to the sensors. Disconnect the ends of the wires from the motion sensors.
To replace the wiring, generously measure the distance between the opener and the motion sensors. It’s better to over measure than be short a few inches on the wire.
Make sure to buy double-stranded, insulated, low voltage wiring. Learn more about different gauges of wiring from our post here. Strip about ½” of insulation from each end of the wires.
Reattach the terminals on the motion sensors. Then. run the wiring up the same path as before, landing on the terminals on the garage door opener.
Replacing Faulty Motion Sensors
If you’ve inspected the wiring without finding anything and the sensor lights won’t come on, then you may need to replace the motion sensors themselves. Replacing the sensors is pretty straightforward. Purchase new sensors from your local hardware store. They typically cost about $20-40.
Unplug the garage door opener, then remove the connections from the old sensors. You may need to untwist the wire or unscrew the terminals to release the wires. Install the new wires by reconnecting the old wires. Plug the new garage door opener back in and test the functionality.
Overriding Safety Features on Your Garage Door Controller
Holding down the button on your controller for your garage door opener overrides safety features. If you have to hold down the button to operate your garage door, the motion sensors aren’t working properly. If you aren’t watching, you may not realize that you are closing the door on an object or person.
Luckily, replacing the wiring or sensors can be an easy weekend project that you can do yourself. The fix may be as easy as cleaning or aligning the sensors. These easy fixes take far less effort than always holding that button down all the time.
Do You Need Garage Door Opener Installation or Replacement?
Get free, zero-commitment quotes from pro contractors near you.
Related Questions
Why are my garage door sensors not lighting up?
If the LED on your garage door’s receiving sensor isn’t glowing steady, the cause is generally an open or shorted wire. To correct this issue, you need to replace the current wire. If after replacing the wire the sensor still isn’t glowing steady, the safety reversing sensors probably need replacing.
What does the orange light on a garage door sensor mean?
The LED lights on garage door sensors will vary based on the manufacturer. However, if you have a Craftsman garage door, an orange light usually indicates that there is a loose wire connection.

We are a team of passionate homeowners, home improvement pros, and DIY enthusiasts who enjoy sharing home improvement, housekeeping, decorating, and more with other homeowners! Whether you're looking for a step-by-step guide on fixing an appliance or the cost of installing a fence, we've here to help.
More by Upgraded Home Team