


Easily Install Crown Molding (On Cabinets That Go To The Ceiling)
Crown molding is one of the easiest ways to turn a regular interior into one that feels stately, upscale, and traditional. This is the kind of upgrade you’ll find in older apartments in New York City, Victorian homes, and country homes that have that extra allure of a day gone by. Do you love that retro look? Who doesn’t?
To easily install crown molding around the cabinets on your ceiling, you’ll first need to make sure that you have the necessary tools. After that, you will need to file off the front and side stiles of your cabinet. Then, you will need to prep the baseboards and attach them in place. After the baseboards are attached, you can then connect your crown molding! It’s that easy.
If you want to get a nice touch of old school living to your home, you probably have been thinking of installing crown molding on your ceiling. Believe it or not, crown molding installations can be a simple DIY project for the right person. In this guide, we will walk you through the steps so that you can get this job done quickly and efficiently.
Do You Need to Hire Cabinet Installers?
Get free, zero-commitment quotes from pro contractors near you.

There Are Multiple Ways To Install Crown Molding
Crown molding installations can be done in a wide range of different methods, including the one mentioned below. When doing your installation, make sure to have a friend who can help you hold the molding level when you’re installing it.
It’s important to remember that crown molding also comes in a wide range of different sizes and shapes. Sometimes, the molding that you get won’t be able to be installed through these means and actually touch the ceiling. If this happens, you might need more extensive molding to get it to reach the ceiling, or you might need boards that are larger than your typical 2 x 4.
It’s also worth pointing out that some types of molding installations are specialized in unique molding looks. If you see other methods of crown molding installation on the net that would work better with your molding type, by all means, use it.
Understanding Specialty Molding
If your crown molding has a specialty cut or is cut on an angle, you’re going to need to continue searching for separate instructions. This molding guide is made for crown molding that works to be flush against your cabinetry stiles.
Before You Begin: Take Inventory
Before you can install your crown molding on your cabinet, you’re going to need to make sure you have the right amount of supplies. You will need:
- Three 2×4’s
- Three 1×4’s
- Crown molding
- Baseboards
- A measuring tape
- A pencil
- A miter saw
- Carpenter glue
- Hammer and nails
- A pin nailer
Step-By-Step Instructions To Install Your Crown Molding
Are you ready to get your molding on? Awesome! This setup is best done when you’re still installing the cabinets in your kitchen. When using these instructions, make sure to adjust them to your cabinets’ surroundings and your cabinets’ positions.
For example, if your cabinets have more extra dips or bends in their architecture, make sure to cut your 2x4s and molding accordingly. If only two sides of your cabinets are going to be visible to people in your kitchen, don’t worry about a third side.
Step 1: File The Front And Side Stiles Of Your Cabinetry
- Measure your front stile and attach your 2 x 4. Measure the front stile of your cabinet and cut a 2×4 in that length. Attach it to the front stile using carpenter’s glue and a nail gun. Do the same for the side stiles, using another 2×4 cut of wood.
- Measure the length of your cabinet and attach your baseboard. Next, you’re going to need to grab 1×4 cuts of wood. Measure your cuts to fit your cabinet’s length and then glue it into place, right over the 2×4.
- Measure the sides of your cabinet and set the wood. Next, grab two more 1×4 wood pieces, and measure them out to match the sides of the cabinet. Place these two pieces of wood over the 2x4s above the sides of your cabinet.
This should give your cabinetry extra “fill” close to the ceiling and also provide more stability for your cabinets. This will be the foundation of where you’re going to be attaching your molding.
Step 2: Prep The Baseboards
- Cut your baseboards at a 45-degree angle. To get working on your baseboards, measure the lengths of each side of your cabinet, and cut a 45-degree angle (also known as a miter cut) on one side of each baseboard you’re going to use on your cabinet. Tada! You have the baseboards for the side cabinet.
- Mark where the baseboards go on the front of your cabinet. Then, measure the front of your cabinet. Cut off one side, and then mark where the baseboard would need to meet the edge of the sideboard.
- Cut the baseboard. At a 45-degree angle, cut the baseboard where it begins to where the edge ends and extends to where the outside of the cabinet’s other baseboard tip ends.
Step 3: Attach Your Baseboards
- Dry fit your baseboards. Dry-fit one of your side baseboards and your front baseboard together. You want to make sure that they are able to fit together snugly and that the side baseboard is all covered.
- Nail the pieces together. Use a pin nailer (or similar tool) to nail the two pieces together.
- Attach the other baseboard as well. Use the same method to attach the other side baseboard into place.
- Secure your baseboards. Dot the 1x4s on their respective sides with carpenter glue, and glue the boards into place. Secure your baseboards with nails to ensure that your molding has the added stability; it’ll need to stay in place.
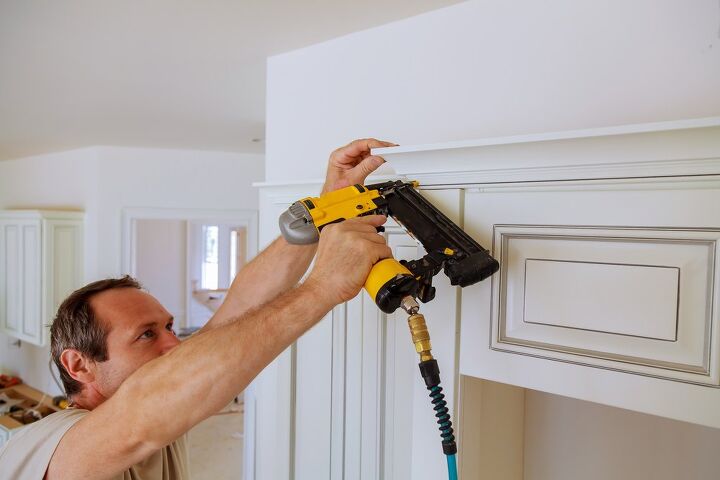
Step 4: Install The Crown Molding To Complete The Project
Remember how you learned to measure out everything and give your baseboards that 45-degree angle fit? You’re going to need to do that again, this time with your crown molding.
- Dry fit your crown molding. Grab your crown molding and dry-fit the front and side of your crown molding together.
- Attach the molding. Then, use a pin nailer to bind the two together. Attach your molding to the top of your cabinet, making sure that the 45-degree angles fit together.
- Sand down your patchwork. When fitting your molding together, align the bottom of your molding to the top of the cabinet. Secure it in place with nails, and then top any nail dents off with drywall hole patching. Sand down the patching, and then you’re good to go.
What If Your Cabinets Don’t Go All The Way To The Ceiling?
In some homes, the cabinets may not reach all the way to the ceiling, and you might still want to install crown molding on them. But how exactly does that work? It’s just as simple.
- Gain some height using 1 x 2 wood pieces. The first thing you will want to do is build some height on your cabinets. You will set the 1 x 2 pieces on top of your cabinets, aligned with the edge. It’s a good idea first to dry-fit them before permanently attaching. The height will give the crown molding a place to rest against.
- Attach the wood to the cabinets. Using some wood glue and a nail gun, attach the 1 x 2’s to the tops of the cabinets. It’s a good idea to put the glue on your cabinet and then set the wood on top. However, if it’s too hard for you to see the top, placing the sealant on the wood is fine too. Then, secure them with a nail gun.
- Measure the cabinets. It’s a good idea to measure them twice, as you want to be as accurate as possible and not waste material.
- Cut your molding. Now it’s time to cut your molding. You will want first dry fit it fo course. Then cut your coding at a 45-degree angle. Make sure that both of the angles fit well together. Now it’s time to attach your crown molding to the pieces of wood you just installed.
- Glue and tape the molding. Since you can’t nail it or secure it to the ceiling, you will need to glue the angles together and then put tape over it to hold it in place while the glue dries. Wait for about 3 to 4 hours, and remove the tape.
- Fill the seams with caulk. Take some caulk and fill the seams. Scrape the extra caulk away as you go.
- Paint the crown molding to match your cabinets. After about 45 minutes, you can paint your molding. Make sure to paint the caulked areas as well to have everything match.
Do You Need to Hire Cabinet Installers?
Get free, zero-commitment quotes from pro contractors near you.
Final Thoughts
I’ll be the first to admit that installing cabinets isn’t something that everyone should try to do, especially if you’re new to woodworking. If you’re not feeling confident enough to add the molding on your own, there’s absolutely nothing wrong with calling in a pro. It’s better to be safe than sorry! Although, it’s a good idea to call around to at least three places before choosing one. That way, you get the best bang for your buck.

We are a team of passionate homeowners, home improvement pros, and DIY enthusiasts who enjoy sharing home improvement, housekeeping, decorating, and more with other homeowners! Whether you're looking for a step-by-step guide on fixing an appliance or the cost of installing a fence, we've here to help.
More by Upgraded Home Team


![10 Best Electric Lawn Mowers - [2022 Reviews & Top Rated Models]](https://cdn-fastly.upgradedhome.com/media/2023/07/31/9070486/10-best-electric-lawn-mowers-2022-reviews-top-rated-models.jpg?size=350x220)

![10 Most Dangerous Neighborhoods in Baltimore [Updated]](https://cdn-fastly.upgradedhome.com/media/2023/07/31/9075655/10-most-dangerous-neighborhoods-in-baltimore-updated.jpg?size=350x220)


