How To Tighten A Belt On A Craftsman Lawnmower

Although there are multiple crucial components inside a riding lawnmower, one of the most vital is the blade drive belt. This piece is responsible for turning the blades, so your machine would be little more than a tractor without it. If you own a Craftsman lawnmower, you will have to learn how to maintain your belts so that they last longer.
Over time, belts will start to crack and loosen, which can affect the mower’s performance. Typically, you can tighten the belt to squeeze a little more life out of it. However, on a Craftsman machine, there is no way to do this. Instead, you will have to replace the whole thing.
Although there are certain lawn mowers which allow it, you cannot tighten a drive belt on a Craftsmen lawn mower. Instead, you will need to replace it. To replace, remove the cutting deck, and pull the belt off the pulleys. Replace with a new belt and reattach the deck to begin using again.
Do You Need a Mower Repair Service?
Get free, zero-commitment quotes from pro contractors near you.

What You’ll Need to Change a Belt on a Craftsman Lawnmower
Fortunately, this job is relatively easy and doesn’t require any specialized tools. Technically speaking, you could replace your blade drive belt without any tools, but that will depend on the age and condition of your lawnmower. We recommend having the following items on hand, just in case.
- Work Gloves
- Pliers
- Smartphone Camera
- Flashlight
- Wood Blocks
- Hydraulic Jack
Step by Step Guide to Changing a Belt on a Craftsman Lawnmower
Step One: Position the Mower
Since you will be removing the cutting deck, you need plenty of space around the machine. Also, it helps to be on a hard, flat surface like concrete so that you can clean up any grass or debris that falls off of the deck. Ideally, you can work in a garage or on your driveway if it is flat.
Be sure to let the mower cool off (if necessary) and disconnect the spark plug before starting any work. Doing this will prevent any accidental startups within the engine.
Step Two: Lower the Cutting Deck
You will have to disengage the blades before doing this so that it is easier to remove the deck. We also recommend placing wooden blocks underneath it so that you can relieve the tension on the arm springs. You will have to pull these springs and various pins out, so having the deck sitting on an elevated surface makes this process much smoother.
Step Three: Remove the Cutting Deck
Refer to your owner’s manual to see where there are springs and cotter pins. In some cases, you might have to use pliers to get them out. Usually, if the mower is relatively old or you haven’t done any work on it, the pins can get stuck.
We also recommend inspecting each piece for any dirt or rust. Be sure to clean any dirty components before putting the cutting deck back on.
There should be two front rods and two rear retaining arms. Each of these sections is held in place by either a pin or a spring (or both). You will also have to remove the PTO arm to disconnect the deck completely. Use a flashlight to make sure that nothing else is attached to the deck that may prevent you from pulling it free.
Finally, you may have to use a jack to raise the mower. Doing this will make it easier to slide the deck out.
Step Four: Locate the Belt and Pulley System
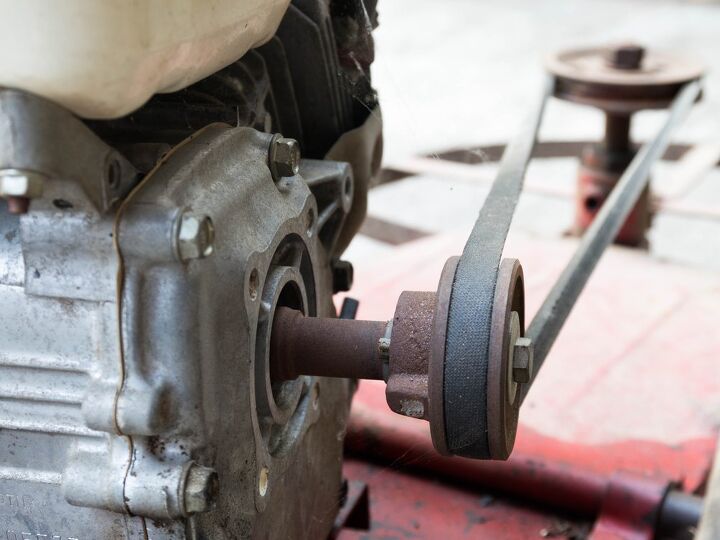
Although the blade drive belt has a simple function, it is wrapped around multiple pulleys. This piece also attaches to the engine, where the crankshaft drives the blades. With some Craftsman lawnmower models, you will have to remove the belt from the shaft before you can remove the cutting deck.
If you are having trouble pulling the deck out, the belt is likely the cause.
Before pulling the old belt off, we suggest taking a photo (or two) of the current belt orientation. Doing this will make it easier to put the new one on and ensure that you don’t get it wrong. Because drive belts operate at such high speeds, any problems can cause cracks or fraying almost immediately.
In some cases, there may be a diagram printed on the deck itself for reference.
Step Five: Remove the Old Belt
Because Craftsman blade drive belts are not tightened with nuts and bolts, you should be able to pull it off relatively quickly. This lack of an adjustment system is why you have to replace the whole thing instead of tightening the pulley. We always recommend wearing work gloves when doing anything inside your lawnmower, as they will keep your hands clean and prevent any nicks or scraps along the way.
Step Six: Install the New Belt
You have to make sure that the belt is oriented correctly before wrapping it around each pulley. There is a flat side and a V-shaped side. The V side will face the inside of the two larger pulleys, which are called mandrels. The flat side of the belt will face the inside of the two smaller pulleys. When you’re finished, the belt should resemble a T.
There are belt guides on each pulley that should keep everything in place. However, be careful not to jiggle the belt loose when reattaching the deck.
Step Seven: Re-Install the Cutting Deck
Slide this piece underneath the mower and reattach each arm with the cotter pins. Don’t forget to reattach the PTO arm as well since that is connected to the clutch. You will want to wrap the last belt loop around the engine crankshaft last. If you try doing it first, it will be harder to reposition the cutting deck correctly.
During this step, the wooden blocks will help again. Since they will elevate the deck, you can attach the arms with less tension on them. Once the deck is connected, adjust the height to ensure that everything is working correctly.
Step Eight: Test the Mower
Whenever you finish any job on your lawnmower, it’s crucial to test the machine immediately afterward. This way, you can be sure that you installed the belt correctly and that there are no problems. We also recommend cutting a section of your lawn while adjusting the deck height so that you know if there is a problem.
Tips and Tricks for Working on a Craftsman Riding Lawnmower
As we mentioned, this job is relatively easy, and we’ve illustrated some ways to make it go smoother. Here are a couple of extra tips to get done faster.
- Inspect Your Owner’s Manual – Reading this packet will let you know where each connecting arm is so that you don’t miss any of them when removing the cutting deck.
- Place the Pins in Order – Rather than tossing each cotter pin to the side, we suggest marking them and placing them in order. This way, it will be easier to put them back the right way.
- Clean Your Cutting Deck – Since this piece is already detached, you might as well use this opportunity to clean it out. Chances are that it’s full of grass and dirt, which can affect your mowing capabilities.
Signs That Your Belt is Coming Loose
Typically, most lawnmower owners don’t inspect any internal components on their machines until there is a problem. Thankfully, belts will let you know that they are having issues almost immediately, thanks to these warning signs.
- High-Pitched Squealing – Since the belt moves at such high speeds, the piece will make a lot of noise if it is in the wrong place. A loose belt will rub against parts that it is not supposed to, which will create a loud noise.
- Burning Odor – As the belt moves against other surfaces, it will generate a lot of friction, which will lead to burning and potentially smoking.
- Reduced Cutting Power – Because the belt drives the blades, a loose one will not work as efficiently. If you have to make several passes to get an even cut (and your blades are fine), the belt could be to blame.
Do You Need a Mower Repair Service?
Get free, zero-commitment quotes from pro contractors near you.

Related Questions
Is there really no way to tighten a belt on a Craftsman lawnmower?
Unfortunately, no. This is a deliberate design option by Craftsman. While tightening belts can extend their lives for a little while, they will fail sooner rather than later. So, Craftsman forces owners to replace the belt instead.
How often should a lawnmower belt be replaced?
There is no universal answer to this question, but many repair shops would recommend every two to three years if you use your mower regularly. Commercial lawnmower belts should be changed annually since they experience much more wear and tear.
Related Guides

We are a team of passionate homeowners, home improvement pros, and DIY enthusiasts who enjoy sharing home improvement, housekeeping, decorating, and more with other homeowners! Whether you're looking for a step-by-step guide on fixing an appliance or the cost of installing a fence, we've here to help.
More by Upgraded Home Team





![The 5 Best Angle Grinders – [2022 Reviews & Buyer's Guide]](https://cdn-fastly.upgradedhome.com/media/2023/07/31/9071326/the-5-best-angle-grinders-2022-reviews-buyer-s-guide.jpg?size=350x220)


![10 Best Electric Pressure Washers – [2022 Reviews & Guide]](https://cdn-fastly.upgradedhome.com/media/2023/07/31/9070600/10-best-electric-pressure-washers-2022-reviews-guide.jpg?size=350x220)


