How To Stop Water Coming In Under A Door Threshold
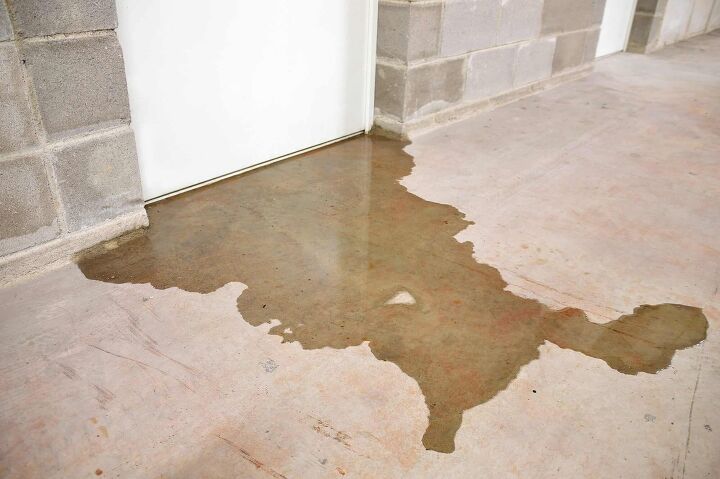
If you live in an area with frequent rain, you know the importance of preventing leaks. It’s easy to weatherproof your roof and windows, but just as easy to forget your doors. A door threshold is meant to weatherproof the bottom of your door, but it can’t do its job if not correctly installed.
If water is coming in under your door threshold, it is likely anchored improperly. You can easily anchor the threshold by utilizing caulk, sealant, and screws. If this doesn’t seem to be the problem, you can do additional weatherproofing to your door.
Related Content: What Is A Door Threshold? | How To Weatherproof A Sliding Glass Door
Don't want to do it yourself?
Get free, zero-commitment quotes from pro contractors near you.

Anchoring Your Door Threshold
If the source of your leak seems to be your door threshold, it is essential to anchor it. You should anchor the door threshold to the door sill. If your door doesn’t have a sill, anchor the door threshold to the material below it.
To anchor your door threshold, you will need the following materials:
- A broom
- Soap and water
- A cordless drill
- Drill bits (You will likely need different varieties depending on the materials you are drilling through).
- Leak Stopper Clear Patch
- A caulk gun
- Screws
- Some paper towels or a rag
- Leak Stopper Rubber Flexx Sealant
To re-anchor the door threshold, follow these steps:
Step 1: Clean the Area
Before you go about reattaching the door threshold, clean the area around it. If a storm has caused water and debris to trickle inside, take extra care to get rid of this.
The caulking and sealant will not stick to the threshold and ground if the area is dirty. For good measure, scrub the dirt from the door sill and threshold to remove any grime buildup.
Step 2: Drill Pilot Holes
Drill pilot holes through the threshold. Place pilot holes every six inches or so on the threshold. This will allow it to easily attach to whatever is below it, whether it is concrete or a door sill.
Depending on the material of the threshold, you may need to use different drill bits. Wood uses a fairly standard drill bit, but metals like steel require a titanium or cobalt drill bit.
Depending on the material below the threshold, you may need to use a masonry bit for concrete, stone, or brick. If you have a wooden sill, a regular drill bit will work just fine. Place these pilot holes in the same spots as the pilot holes in the threshold.
Step 3: Apply Caulking
Add Leak Stopper Clear Patch between your threshold and what is below it. You can purchase this clear patch for less than $7 on Amazon. This product is a sealant, preventing leaks and cracks under your threshold.
It dries clear, so you don’t have to worry about the goopy white mess regular caulk leaves. It also doesn’t yellow so that it won’t affect the aesthetics of your door area.
Step 4: Insert Screws
Insert screws along the pre-drilled pilot holes. Use a cordless screw gun to screw these through the threshold and into the ground or door sill. Try to make the screws as flush with the threshold as possible.
Step 5: Remove Excess Caulk
After inserting the screws, some of the caulking will seep out from under the threshold. With a paper towel or rag, wipe away the excess caulk.
Step 6: Final Seal
After removing the excess caulk, spray with Leak Stopper Rubber Flexx Sealant. This costs about $10 from Amazon or a local hardware store.
Rubber Flexx acts as a liquid rubber. This, combined with the Leak Stopper Clear Patch, should help to stop threshold leaks in their tracks.
Shake the can for thirty seconds to a minute. Spray along the same edge to which you applied the caulk. Spray the sealant along the inside edge of the threshold as well to prevent leakage. Once the sealant has dried, apply a few more coats for good measure.
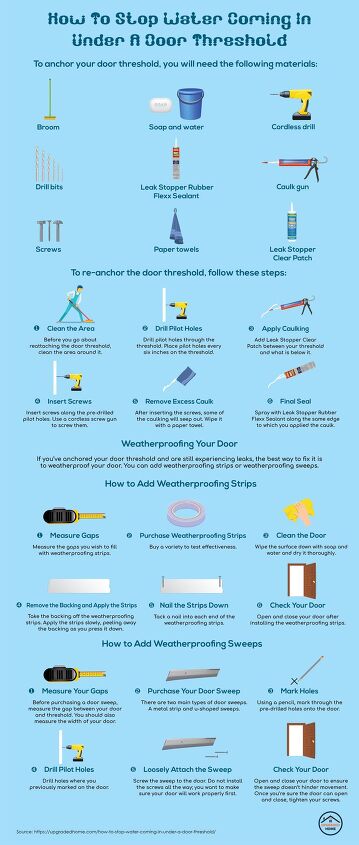
Weatherproofing Your Door
If you’ve anchored your door threshold and are still experiencing leaks, this is a problem. The best way to fix your leak problem is to weatherproof your door. You can add weatherproofing strips or weatherproofing sweeps.
How to Add Weatherproofing Strips
Weatherproofing strips are a popular way to stop drafts and leaks from entering your home.
Step 1: Measure Gaps
To ensure your door can open and close, measure the gaps you wish to fill with weatherproofing strips.
Step 2: Purchase Weatherproofing Strips
There is a wide variety of options available, and many are relatively cheap. If you are unsure what will work best for your home, buy a variety to test effectiveness. Pay close attention to width and thickness and consult your measurements.
Step 3: Clean the Door
The adhesive on the weatherproofing strips won’t work if the surface is dirty or damp. Applying the weatherproof strips to a dirty surface will cause them to fall off prematurely. Wipe the surface down with soap and water and dry it thoroughly.
Step 4: Remove the Backing and Apply the Strips
Take the backing off the weatherproofing strips a little at a time. Apply the strips slowly, peeling away the backing as you press it down. These strips can be applied to both the bottom of the door and the sides to optimize weatherproofing.
Step 5: Nail the Strips Down
Tack a nail into each end of the weatherproofing strips. This will help to hold them down, should they start to peel back for any reason. Use brass weatherstrip nails. You can purchase these on Amazon for around $5.
Step 6: Check Your Door
Open and close your door after installing the weatherproofing strips. If the door cannot open or close properly, locate the strip causing the problem and remove it.
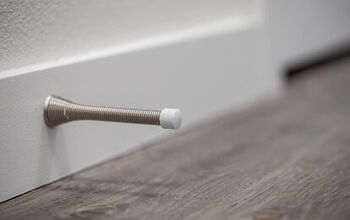
How to Add Weatherproofing Sweeps
A door sweep can help weatherproof your door by attaching to its bottom. A door sweep bridges the gap between the bottom of the door and the threshold.
Step 1: Measure Your Gaps
Before purchasing a door sweep, measure the gap between your door and threshold. You should also measure the width of your door. This precaution prevents you from buying an ill-fitting door sweep or one that stops you from opening the door.
Step 2: Purchase Your Door Sweep
There are two main types of door sweeps. One is a metal strip that can be screwed, nailed, or stapled to the bottom of a door. The other type is u-shaped sweeps that slide under aluminum or metal doors. Either option is suitable for an exterior door.
Step 3: Mark Holes
Place your door sweep against the edge of your door. Using a pencil, mark through the pre-drilled holes onto the door.
Step 4: Drill Pilot Holes
Drill holes where you previously marked on the door.
Step 5: Loosely Attach the Sweep
Screw the sweep to the door. Do not install the screws all the way; you want to make sure your door will work properly first.
Step 6: Check Your Door
Open and close your door to ensure the sweep doesn’t hinder movement. If it does, remove the sweep and move it up about 1/8 inch.
Step 7: Tighten Your Screws
Once you’re sure the door can open and close, tighten your screws. Make sure they are tight enough that the sweep doesn’t move around with the door.
Don't want to do it yourself?
Get free, zero-commitment quotes from pro contractors near you.
Related Questions
Can door thresholds help with drafts?
Yes! Along with preventing water from seeping into your home, door thresholds have many purposes. A door threshold can act as a weather shield during times of heavy winds or snow. Thresholds prevent drafts by stopping air from flowing in and out of your house. This quality helps you save money on your electric bill, as you won’t be wasting heat or air conditioning.
What are some other benefits of door thresholds?
Thresholds are also a great way to stop pests from entering your home. With even a small gap between your door and the ground, unwanted bugs and creatures can make their way inside. Thresholds shrink critters’ entry space. If your threshold remains unanchored, pests, drafts, and water can find a way in. This is why it’s essential to anchor that threshold!

Stacy Randall is a wife, mother, and freelance writer from NOLA that has always had a love for DIY projects, home organization, and making spaces beautiful. Together with her husband, she has been spending the last several years lovingly renovating her grandparent's former home, making it their own and learning a lot about life along the way.
More by Stacy Randall


![10 Best Electric Pressure Washers – [2022 Reviews & Guide]](https://cdn-fastly.upgradedhome.com/media/2023/07/31/9070600/10-best-electric-pressure-washers-2022-reviews-guide.jpg?size=350x220)