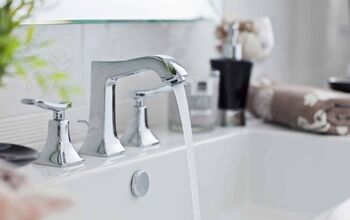
How To Remove A Stuck Faucet Handle (Quickly & Easily!)


Stuck faucet handles are just part of the normal wear and tear a house will experience. Regardless of whether you have Moen, Delta, Kohler, or Pfister appliances on your sink, all faucets will deteriorate with time and use. Faucets are subject to faulty cartridges, mineral deposit build-up from the water, and natural reactions such as corrosion and oxidation. Knowing how to remove a stuck faucet handle will finally come in handy.
When dealing with a faucet handle that is stuck, your best option is to remove it. Even if you plan to keep your current faucet hardware, you’ll first need to remove the stuck faucet to scrub away any build-up to restore it to full use. You will also need to remove a stuck faucet handle to repair any valves or cartridges. You will especially need to remove a stuck faucet handle if you plan to install new hardware.
To remove a stuck faucet handle, first close or cover the drain to avoid losing any screws or small parts. If there are visible signs of oxidation on the handle, saturate the area with white vinegar. Spray lubricant such as WD-40 on obvious points of friction. If the faucet handle is still stuck, find the set screw and use an Allen wrench to turn counterclockwise. Using a slot screwdriver, pry open the cover of the faucet handle and remove the inside screw.
Do You Need a Faucet, Fixture, or Pipe Repair or Replacement?
Get free, zero-commitment quotes from pro contractors near you.

Removing a Stuck Faucet Handle
Before beginning, you may want to turn off your water supply. Although not necessary for this DIY job, turning off the water could save you the extra hassle in the case of an emergency leak. Additionally, you may find that removing the faucet handle is more accessible when in the ON position.
Check below your sink. Locate the handle, usually an oblong knob, and turn clockwise to close completely. Turn on the faucet to ensure that the water is off.
Tools You Will Need:
- Allen wrench
- Hammer
- Washcloth
- WD-40 or plumbers grease
- White vinegar
- Flathead screwdriver or slotted screwdriver
The tools you will need will largely depend on the type of faucet you have. Some faucets may only require a quick unscrewing, while others may need a deep cleaning.
Step One: Cover the Drain
Close the drain to avoid losing any screws. If a stopper is not available, lay a washcloth across the sink basin.
Step Two: Check for Damage
Often, a stuck faucet handle can be the result of natural causes, such as mineral build-up or corrosion. Check the faucet handle for damage. If there are visible signs of oxidation such as rust, black powder, or degraded metals, treat the area with white vinegar.
You can soak a washcloth in vinegar and wrap it around your faucet handle, or fill a Ziploc with vinegar and attach it to your hardware using rubber bands or tape. Let rest for 20-30 minutes. White vinegar dissolves hard water and calcium deposits along with unwanted bacteria. If there is a large amount of build-up, you may need to use sandpaper or a steel brush to break down heavy corrosion.
Step Three: Lubricate the Handle
Once you have treated any corroded parts, lubricate the faucet handle. You can use a silicone-based lubricant like faucet grease, or WD-40 will work as well. Use the nozzle attachment to spray any hard-to-reach faucet parts. Lubricate any seams, openings, or attachments generously.
Step Four: Locate the Set Screw
Locate the set screw. On older models, the set screw may be hidden underneath a cap. Check under the “hot” and “cold” labeled caps or any other detachable cover. Using your slot screwdriver, carefully pry the cap open. On faucets without detachable covers, you may find may find a recessed set screw on the side of the faucet handle.
Once you’ve found the set screw, use the Allen wrench to turn it counterclockwise. Remove the set screw and set it aside.
If there does not seem to be a set screw, you may need to hold the faucet handle as you unscrew the base counterclockwise. Don’t force anything. Some faucets will require you to unthread the faucet handle from the nut or bonnet.
Step Five: Pull Up to Remove Faucet Handle
After removing the set screw, you should be able to separate the faucet handle easily. Pull up hard on the handle to remove it.
If the faucet handle still doesn’t budge, try heating it with a hairdryer. The heat will cause the metal to swell, loosening the bond created by the corrosion. The metal may be hot, so exercise caution when attempting to remove the handle. Remember, do not use the hairdryer on areas that you have recently applied oil, as it could be flammable.
A stubborn faucet handle could benefit from a few simple taps of your hammer. Cover the faucet handle with a washcloth and firmly tap with your hammer. A quick jolt could be all that you needed to shake off the last of the mineral build-up. Try lubricating any moving handle parts and tap again.
Optional Step: Remove Cartridge
Once you have removed the faucet handle, loosen the nut bonnet securing the cartridge. Unscrew the cartridge and remove it along with any springs or screws.
Common Causes for Stuck Faucet Handles
Corrosion
Corrosion is a naturally occurring process that happens when a material (usually a metal) has a chemical reaction with its environment. When all the atoms on a metal surface oxidize, the metal will gradually break down. Rust is a kind of corrosion. In this case, the faucet handle is exposed to water and air, causing a chemical reaction. The chemical reaction then eats away at the faucet parts and causes them to corrode.
Oxidation
Like corrosion, oxidation is a chemical reaction. To oxidize means to combine with oxygen. Oxidation takes place when the faucet handle comes in contact with the air and loses electrons to oxygen. Once your faucet handle has oxidized, it may be hard to remove due to build-up.
Faulty Cartridge
A faulty cartridge can be caused by a number of things. The cartridge could be clogged or the rubber O-rings could be worn out. A faulty cartridge may result in a leaky sink or low water pressure.
Degrading Gasket
If there is visible black powder build-up on the faucet handle, you could be dealing with a degrading gasket or worn-out O-ring. Gaskets and rings are rubber washers that create a seal to hold back the water. Since these parts are constantly exposed to water, gaskets are often the first part of a faucet to give out.
Mineral Deposit Build-up
If your house has hard water, the minerals in the water can build up and form hard deposits of calcium and limescale. Mineral deposits will bond to the faucet hardware and make the handles sticky.
Alternative Solutions
Faucet Handle Puller
Faucet Handle Pullers are available for those super stuck faucet handles. They function much like a corkscrew by attaching to the hardware with adjustable arms and allowing you to unscrew a bonded faucet handle from the valve stem. You can find a faucet handle puller for less than $15 at your local hardware store.
Additional Recommendations
O-Rings
When reassembling your faucet handle or installing a new one, use plumber’s grease to lubricate the O-rings. Rubber O-rare especially susceptible to mineral deposits and can become bonded to the faucet metal. To get the most out of your faucet handles, lubricate your O-rings!
CLR
Some plumbers recommend using Calcium, Lime & Rust Remover for tough build-up. Soak the affected area. Leave on for 2-5 minutes. Make sure to use CLR in a well-ventilated area.
Take Pictures
No matter how good your memory is, it doesn’t hurt to play it safe! Take pictures of your faucet handle and parts as you disassemble it, and take note of any brands or serial numbers in case you need a replacement faucet handle.
Related Questions
What if my faucet handle doesn’t have any screws?
If there is not a set screw on your faucet handle, pull up to remove the faucet. Depending on the brand, you may need to pry the handle with a flathead screwdriver. On older tap handles, the set screw can sometimes be found inside the handle, underneath the plastic cover that marks “cold” or “hot.”
How do I remove a single-handle faucet?
If your faucet is controlled by a single handle, the set screw is likely hidden under a plug button or decorative plastic cap. The plug button is sometimes the brand or “hot/cold” indicator. Remove the plug button with your slotted screwdriver. Loosen the set screw by turning counterclockwise. Remove the handle from the valve stem, unthreading any caps or nuts to reveal the valve.
Do I need to replace my faucet cartridge?
Standard faucet cartridges last 20-30 years, so chances are you don’t need to replace your cartridge just yet. If your faucet cartridge is clogged, try cleaning the O-rings. For a more thorough repair, remove the faucet cartridge and soak it in vinegar.
Do You Need a Faucet, Fixture, or Pipe Repair or Replacement?
Get free, zero-commitment quotes from pro contractors near you.
Wrapping Up
In conclusion, you don’t need a plumber to fix your sticky faucet handle. Once you’ve identified the culprit, whether it be mineral deposits or a faulty cartridge, you can quickly resolve the problem with a bit of elbow grease. Thoroughly clean your faucet handle and clear away any build-up or corrosion. Locate and loosen the set screw. Using force, pull up on the faucet handle to remove.
HK Sloan is a freelance writer currently covering DIY Home Improvement, Health, and Lifestyle. Sloan is passionate about improving situations for less, whether it be working on mind, body, or home.
More by HK Sloan