How To Remove A Showerhead That Is Glued On (Do This!)
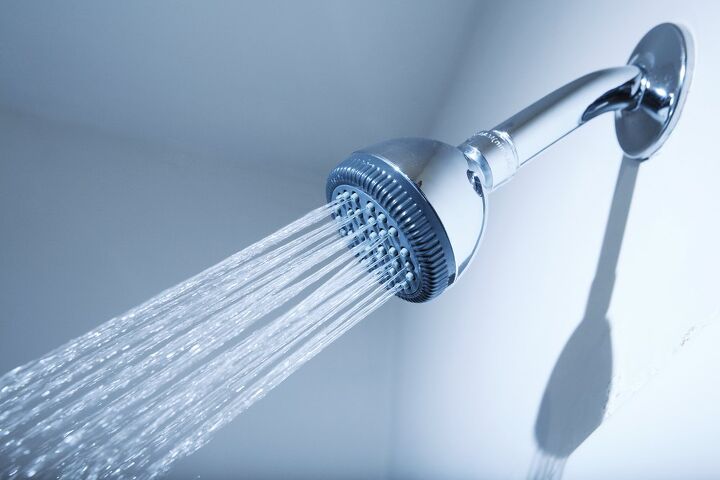
Finding a showerhead that is glued on is rare. Almost all showerhead installations in the US use threaded fittings to connect the showerhead arm and the showerhead. What you think is glue is probably a combination of the plumber’s Teflon tape and mineral buildup from your water.
Removing a showerhead that appears to be glued onto the showerhead arm can be a challenge. Mineral buildup on the threads and the aging Teflon tape used to prevent leaks can combine to create a bond almost as tough as any glue. Removing the stuck showerhead requires patience and a bit of strategically applied force.
In general, the best way to remove a showerhead that is stuck is to use a combination of demineralizing agents and the judicial use of tools to work the showerhead loose. A few simple steps in the process can make the job much easier once you understand what is happening and how to deal with the problems.
Do You Need a Faucet, Fixture, or Pipe Repair or Replacement?
Get free, zero-commitment quotes from pro contractors near you.

Understanding the Problem
Understanding what is causing the problem with your stuck showerhead is key to finding the easiest way to remedy the situation. It is rare to find a showerhead joint made by gluing either with a solvent weld cement for PVC or some other bonding agent. These are standard connections made with threaded pipe joints.
Plumbers use Teflon tape to seal these threaded joints and prevent any leakage or seepage back through the threads. Teflon stays viable for many years but can have some problems. Water can work its way back along the threads. As the water evaporates, it leaves mineral deposits behind. These deposits are usually calcium and can harden, making the threaded joint almost impossible to loosen.
Finding the Solutions
Typically, there are three solutions that a homeowner can try to loosen a showerhead that sticks to the showerhead arm. In most cases, a combination of these techniques works better than relying on a single plan. The three most common solutions to a stuck showerhead are:
- Brute Force – The old standby method is to use brute force to loosen the stuck showerheads. This method usually involves two good-sized wrenches and muscle power. In many cases, this method works. You can force the stuck threads loose and free the showerhead. The downside is that you either break or damage the showerhead and the showerhead arm. Any time must replace additional damaged parts it is far from a perfect solution.
- Chemical means – Usually, the biggest problem is the calcium or mineral buildup on the threads that connect the showerhead to the showerhead arm. Many products are available to remove or soften this mineral buildup making it much easier to remove the stuck showerhead. Some of these products use harsh, environmentally unsafe chemicals. However, there are some products that you can use that are natural and do not present the hazards of the other chemicals
- Heat – In many instances, a little heat applied to the joint carefully will soften or loosen the mineral buildup on the threads. Heat may also cause the fittings to expand and then contract as the heat is applied and removed. This expansion and contraction can help loosen the minerals in the threads that cause the problem.
The challenge is to find the best combination of methods to loosen your stuck showerhead. The goal is to remove the showerhead without any further damage and install your new showerhead without any leaks or further damage.
Getting Ready to Remove the Stuck Showerhead
Before we start the steps to remove your stuck showerhead, there are a few things you should do to prepare.
- In general, you should remove everything from the bathtub or shower to clear your workspace.
- We always suggest turning the water off to the shower before you start any plumbing repair. You may need to turn the water off to your entire house to accomplish this step.
- Use a sheet or tarp to protect your bathtub or shower pan from damage should you drop a tool or part.
- Gather all the tools and parts you need to finish the repair before you start.
Once you have your workplace prepared, your tools gathered, and your new showerhead in hand, you are ready to begin removing that stuck showerhead.
Step 1: What You Need
The first step in any project is gathering the tools and materials you need to complete the repair. Having everything together before you start prevents delays and frustrations throughout the project. To remove a stuck shower head, you will need at least the following:
- Your new showerhead
- It would be best if you had the correct sized wrenches for the fittings. We suggest adjustable wrenches or open-end wrenches of the correct size. You should avoid trying to use pliers on these fittings. You can do more damage with pliers than you might imagine.
- Purchase a roll of plumbers or Teflon tape for installing your new showerhead.
- If you choose to dissolve or loosen the mineral buildup, you will need a plastic bucket large enough to go up around your showerhead to hold the cleaning agent.
- One of the best demineralizing agents available is white vinegar. Many people keep this in their pantry and use it in other ways around your home. If not, a gallon of white vinegar from the grocery store is perfect.
- To heat a stuck showerhead, you can use a small propane or butane torch. These small torches have many uses around your home and are available at most home improvement stores.
Once you have your tools and parts assembled, you are ready to tackle removing that old showerhead.
Step 2: Give it a Try Before Anything Else
Before you do extra work, use the wrenches that match the fittings on the showerhead and showerhead arm. Apply pressure in the appropriate directions on the wrenches and check if the showerhead will begin to turn. Gradually increase the force watching the showerhead carefully for any signs of stress, cracking, or damage
Working the wrenches back and forth as if you were alternately tightening and loosening the fittings may help break the minerals free in the threads. Slow and easy is the key here. You are looking for incremental changes and hot a sudden freeing of the joint.
Step 3: Getting into the Threads
If a little force doesn’t do the trick, we suggest a little chemical persuasion. Soaking the showerhead and threads in a vinegar solution will often soften the mineral buildup to allow the threads to turn.
Pour enough white vinegar into a plastic bucket to cover the entire showerhead and joint connecting to the showerhead arm. Be prepared to hold the bucket in place for several minutes. You may notice bubbles appearing from the showerhead and the fitting if you can see them in the bucket. Bubbles are normal as the acetic acid in the vinegar begins to react chemically with the minerals.
Give the vinegar time to work its way into the threads. You can set the bucket aside every few minutes and use your wrenches to try to loosen the joint.
Step 4: Apply a little Heat
This step only applies if your showerhead and showerhead arm is metal. Do not apply heat to plastic parts. Heating PVC pipes and showerheads can gas off dangerous fumes, and the plastic may ignite.
If you are satisfied that all the plumbing parts on your showerhead are metal, you can use the plumber’s torch to heat the fitting area of the showerhead gently. Don’t apply the torch directly to the fitting for long periods. A better method is to sweep the flame over the fitting repeatedly to raise the temperature slowly. The goal is to heat the mineral buildup, not melt the pipe.
After a few minutes of gentle heat, use your wrenches to try to turn the threads again. Use the same method as in Step 1 to work the joint free.
Step 5: Repeat for Success
If the mineral buildup on your showerhead is severe, you may need to repeat the steps above. Patience is the key to give the vinegar and heat time to work properly. Eventually, the seized pipe threads should loosen, and you can unscrew the old shower head from the showerhead arm.
Step 6: Clean and Install
Once you have removed the old showerhead, you are ready to install your new showerhead. Before you install the new showerhead, clean the threads on the showerhead arm thoroughly. Be sure you remove any old Teflon tape that may still adhere to the threads. Apply a layer of new Teflon tape and screw your new showerhead in place.
Do You Need a Faucet, Fixture, or Pipe Repair or Replacement?
Get free, zero-commitment quotes from pro contractors near you.
Stuck Not Glued
In most cases, what you assume to be glue on a showerhead installation is not glue at all. More than likely a combination of old plumbers’ tape and mineralization over time is the cause of the problem. A little patience and the right combination of force and some useful tricks usually has the old showerhead free in good order.

Dennis is a retired firefighter with an extensive background in construction, home improvement, and remodeling. He worked in the trades part-time while serving as an active firefighter. On his retirement, he started a remodeling and home repair business, which he ran for several years.
More by Dennis Howard