


How To Remove A Saddle Valve (Step-by-Step Guide)
Certain home appliances need cold water in order to work properly. These often include refrigerators, freezers, and humidifiers. To ensure that those appliances are working as intended, a saddle valve may be used.
If you’ve never heard of a saddle valve before, you’re not alone. They may not even be usable in certain parts of the country. However, if you do have an older saddle valve installed at home, learning how to work on it is important.
To remove the saddle valve, you first have to turn off the water line before cutting the pipe the valve occupies. Make the cut at the spots right before and right after the saddle valve. With the saddle valve removed, you can replace it with a tee fitting and a stop valve.
Removing and replacing your saddle valve could save you from some headaches and costly repairs down the line. Read on to find out how you should deal with the saddle valves that you may have installed at home.
Do You Need to Hire a Plumber?
Get free, zero-commitment quotes from pro contractors near you.

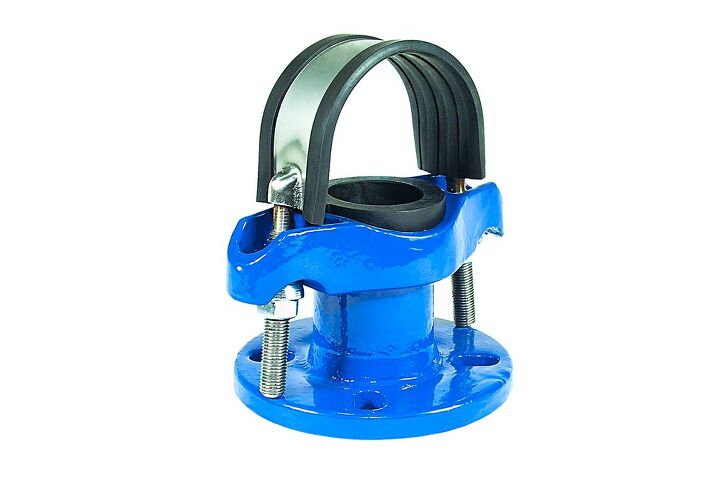
What Is a Saddle Valve?
The saddle valve is a component used to direct the flow of water to specific appliances. Notably though, saddle valves are made specifically for setups where only a low-pressure stream of water is required.
Saddle valves are tasked with supplying cold water to different appliances around your home. More often than not, these valves are used in water lines connected to refrigerators. For instance, they can help the freezer component of your refrigerator create ice. If you have an older humidifier setup at home, it may also be relying on a saddle valve to secure water.
You can usually find these saddle valves connected to copper water lines. In some cases, they may be connected to stainless steel or vinyl pipes. What doesn’t change is that they are always installed over the designated cold water pipes.
These saddle valves are different from the other valves used for plumbing because they are capable of creating their own openings.
You can tighten a saddle valve after mounting it over a pipe. After tightening the valve, it will pierce the pipe and create the opening for the water. They are more convenient in that regard, but that added functionality presents issues of its own.
Why Do You Need to Remove Saddle Valves?
The number one reason why you should think carefully before using a saddle valve is leaking. You may think that these valves are capable of creating tight seals, but that’s not the case.
Due to the fact that saddle valves are not permanently connected to pipes, they can fall off after some time. Once they fall off, the holes they created will be opened up further and you’ll be left dealing with a leak. In all likelihood, it’s going to be a major leak too.
Wear and tear tends to make falling off an inevitable outcome for saddle valves. You can bank on having leakage-related issues if you don’t do something about the valve. Even the pipes the saddle valves were previously attached to will probably have to be replaced. They won’t be able to transport water properly after being pierced.
You’re also taking on a contamination risk by leaving the saddle valve in place. The water flowing through your home is not supposed to be in contact with anything other than the pipes. Introducing a saddle valve disrupts that system and also creates an opening for additional contamination.
The openings created by saddle valves may also not suffice for your home appliance. You cannot rule out the possibility of blockages forming if the water flow is too weak.
The bottom line is that using a saddle valve is risky. If you can remove and replace it, you should seriously consider doing so.
The Process of Removing a Saddle Valve
In this section of the article, we’ll talk about how to locate and remove the saddle valve. We’ll also discuss how to replace the saddle valve with a new stop valve to keep the water line operational.
Step 1: Prepare the Necessary Tools
You’ll need more than a few tools to remove and replace a saddle valve.
For removing the saddle valve itself, secure a pair of pliers and a pipe cutter. To replace the saddle valve, you’ll need a 1/2-inch copper tube, a 1/2-inch copper tee, and a push-fitting stop valve. Soldering will also be required in this project. For that, prepare a torch, solder, soldering flux, a fitting cleaner, and some emory cloth.
Step 2: Find the Saddle Valve
To get started on the project, go to the back of your fridge and look for the waterline. Continue following that water line until you eventually spot the saddle valve.
Step 3: Turn Off the Saddle Valve
After finding the saddle valve, turn it off to stop the flow of water. You want to turn the handle of the valve clockwise to shut it off. If you’re having a hard time shutting off the valve, you can use the pliers to grip the handle better.
This is also the time when you should drain the pipe to keep the water from going all over the place.
Step 4: Cut the Saddle Valve Out of the System
Grab your pipe cutter and aim for the spots just before and just after the saddle valve. Make the cuts to remove both the valve and that section of the pipe.
Step 5: Clean the Pipes and Tee Fitting
Take the emory paper now and start rubbing it over the edges of the pipes that will be soldered. You should also use the cleaner to clean any debris away from the copper tee.
Step 6: Put the Copper Tee into Position
After cleaning, you can now place the copper tee into the space previously occupied by the saddle valve. Secure the connections as best you can before proceeding to the next step.
Step 7: Apply the Soldering Flux
Pick up the container of soldering flux and use the included brush to apply it over the pipes and the fitting. You only need to apply the soldering flux over the edges that will be in contact with one another.
A thin layer of soldering flux will be enough, but if you used too much, just brush the excess away.
Step 8: Solder the Connections
With the torch in one hand and the solder in another, you can start reinforcing the connections. Aim the solder and the torch over the connection points to seal them up completely.
Step 9: Attach the Copper Tube to the Tee Fitting
You should have one end of the copper tee open at this point. That is where you need to place the copper tubing.
Remember to clean the edge of the copper tube before connecting it to the fitting. Once connected, simply apply the soldering flux and the solder to lock the tube into place.
Step 10: Connect the Stop Valve and Water Line
Turn your attention now to connecting the stop valve to the new setup. Get your pliers first and extract the piece of plastic inside the valve.
After removing the piece of plastic, you can now attach the stop valve to the previously open copper tube. Since you’re using a push fitting, it should connect to the tube with no issue.
Step 11: Link Your Water Line to the New Connections
You can now go ahead and connect the water line to the other end of the stop valve. Test out the new connections by turning on your water. You should be good to go from there.
Do You Need to Hire a Plumber?
Get free, zero-commitment quotes from pro contractors near you.
Related Questions
Why Is It Called a Saddle Valve?
Saddle valves are named as such due to their appearance and how they fit over pipes. They really do resemble saddles that are placed over horse’s bodies. You may also sometimes hear them being referred to as needle valves or self-piercing valves.
Can You Install a Saddle Valve Yourself?
Installing the saddle valve itself is easy enough and that’s why people like it in the first place. Do note however that saddle valves are not legal everywhere.According to DRF Total Property Solutions, there are different local ordinances that prohibit the residential use of saddle valves. Make it a point to check with the laws in your area before buying one.Saddle valves are not recommended for most homeowners because of the issues we highlighted earlier in this article. The chances of leaking and contamination are simply too high. Consider using alternatives instead of saddle valves whenever possible.
Is There Any Scenario Where Using a Saddle Valve Is a Good Idea?
The only time you should consider using a saddle valve is if you want to test an appliance out right away. If you want to know if your refrigerator or humidifier is working properly, a saddle valve can help.Even in that scenario though, you should only proceed with using the valve if you can monitor it easily. If the valve has to be mounted over a pipe that’s hidden, go with the other options instead.Failing to address a leaking saddle valve as soon as possible can cause serious damage to your home. Don’t let it out of your sight if you decide to use it.

We are a team of passionate homeowners, home improvement pros, and DIY enthusiasts who enjoy sharing home improvement, housekeeping, decorating, and more with other homeowners! Whether you're looking for a step-by-step guide on fixing an appliance or the cost of installing a fence, we've here to help.
More by Upgraded Home Team


![Cost To Drill A Well [Pricing Per Foot & Cost By State]](https://cdn-fastly.upgradedhome.com/media/2023/07/31/9074980/cost-to-drill-a-well-pricing-per-foot-cost-by-state.jpg?size=350x220)


