How To Make Soffits For Metal Studs
Over time, as quality lumber supply lessens, we will likely experience a dramatic shortage and metal studs will begin to replace their wood stud counterparts. While wood studs are definitely more common in general construction, there are a number of benefits associated with using steel studs in a home.
Metal studs are impeccably straight and you won’t experience any splitting or shrinking with these materials. They’re also very lightweight, simple to store, and are resistant to rot, fire, insects, and mold growth.
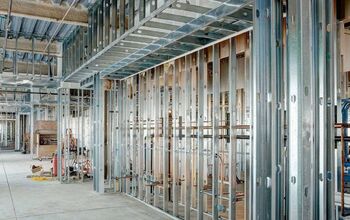
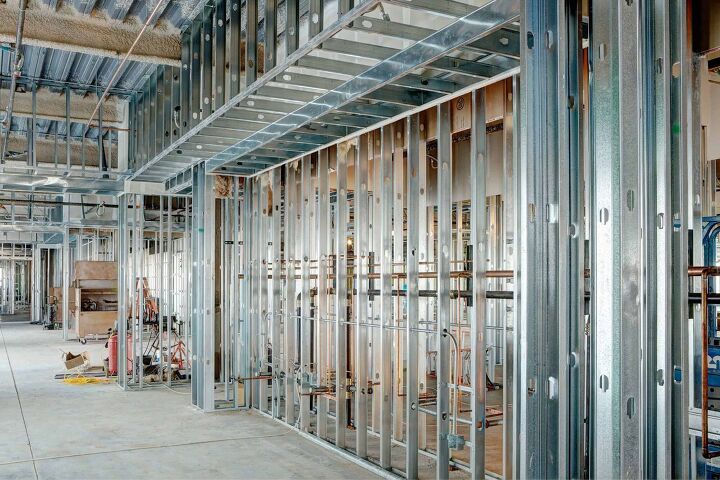
However, since the use of metal studs is less common, you’ll likely find yourself wondering how to make soffits for metal studs. To construct a soffit using metal studs, the trick is all in the framing. Also, the easiest way to work with metal studs is to implement a ladder framework. Simply connect them together using self-tapping screws and then lift them into position.
We’ll explore the proper techniques for building a soffit using metal framing. The tips outlined below will help guide you through the entire process, as well as shed some light on the overall advantages associated with using metal studs in home construction.
Do You Need Wall and Ceiling Contractors?
Get free, zero-commitment quotes from pro contractors near you.

What is a Soffit?
Before we begin the tips and steps to construct soffits with metal studs, it’s important to understand what a soffit actually is. Commonly found on ceilings, a soffit is a component in construction that is erected to hide ductwork, pipes, beams, wires etc. Essentially, they are a framed box made of steel or wood that encapsulates a visibility unattractive element.
Once the framing is built, soffits are finished off with either plaster or drywall. While they most often exist in basement ceilings, they can also be used as a decorative feature on vaulted ceilings or above cabinetry.
Most often, 2×4 lumber is used in soffit construction. However, steel is an increasingly desirable option. Two, or more, box-frames are generally made first according to the necessary dimensions and then they are mounted to the ceiling joists or wall.
Wood Studs vs. Metal Studs
Many homeowners and contractors are beginning to understand the draw of implementing metal studs into a home’s construction. Overall, they offer a number of benefits when compared to wood studs.
Metal studs are resistant to so many things that often plague conventional lumber framing such as, rot, shrinking, splitting, fires, mold growth, and insects. Aside from this, you’ll find that installing metal studs in your home are much more cost-effective than wood, saving you roughly 30 percent in total costs.
Possibly the only downside is that you may experience framing with metal studs to be a slower process. However, this mostly has to do with the fact that these materials, tools, and techniques will be unfamiliar to you. Once you grasp the concept, the process will flow effortlessly and you’ll discover metal studs to be very user-friendly.
Additionally, unlike their wood cousins, if you make a mistake you can simply unscrew the metal parts and begin again without causing any damage or wear to the materials.
Tips for Working with Metal Studs in Soffits
In many areas of the world, the use of metal studs for framing in soffits, interior walls, and additions is becoming much more broadly accepted. However, due to the general unfamiliarity with the techniques, using metal studs in soffits can be relatively complex. Examine the following helpful tips and notes for working with metal studs.
- Ladder Framework. By far the easiest way to work with metal studs is to first connect them to a ladder framework. Use self-tapping screws to fasten the pieces together and then lift them into place on your ceiling for the soffits. Constructing metal studs within a ladder framework will add strength and permanence.
- Cutting sides to create angles. One of the major advantages of metal stud work is the fact that the entire length can be used without the need for having to cut them to size. When connections must be made to other surfaces, you can simply curve the ends and attach them. To achieve this, use a pair of tin snips to trim the sides of the metal stud. This will allow you to bend the stud to whatever necessary angle the project requires.
- Metal studs are versatile and lightweight. As a general note, using metal studs for interior framing and soffits is very popular due to the fact that they are easy to maneuver and very lightweight. Hanging metal soffits from a ceiling can be easily achieved by only one person.
Do You Need Wall and Ceiling Contractors?
Get free, zero-commitment quotes from pro contractors near you.
Necessary Tools for Metal Studs
In order to build the metal framework for your soffits, you likely already have most of the necessary tools. For this project, you’ll need a measuring tape, a pair of straight-cut aviation metal snips, a drill with a 2-inch extension holder, and a four-foot level or plumb bob.
Although not absolutely necessary, C-clamps can be helpful for temporally fastening studs to the tracks, and sheet-metal locking pliers will help you to be able to create tight bends in the tracks.
Step One: Cutting the Metal Studs and Tracks
After you’ve gathered all the essential tools, measurements and know the pieces that you will be cutting for your framing, you can begin making the cuts. Use your straight-cut aviation snips for cutting the individual metal tracks and studs.
The fastest method for cutting metal studs is to make cuts in both sides, score and then bend appropriately. In this case, you may greatly benefit from using either a chop saw or circular saw with blades specially designed for cutting this type of material.
However, you can use the snips to cut both sides of the stud and follow up by scoring a line on the back. Then, bend the stud back and forth a few times until the two pieces are released. With this method, you will have no stray metal shavings or burrs on the cut ends.
Step Two: Building the Ladder Framework
With the pieces cut to size, it’s time to start building the soffit by laying out and securing the framework. The best method for constructing soffits, whether metal or lumber, is to first build the ladder framework on the ground.
Use your measurements as a guide in building the ladders and then continue on with the box frame. In general, the cross-sections should be in place every 16 inches for drywall installation. Arguably the most difficult part about using metal stud work is the cutting and constructing the box frame uses much of the same techniques as traditional lumber studs.
Step Three: Install the Box Frame
Once you have your ladder framework complete and your metal box frame built, enlist the help of a friend to position it on the ceiling. Use some clamps to hold the frame in place and attach it to the ceiling using 1-1/2-inch self-tapping drywall screws.
Step Four: Cut and Install the Drywall
With the most difficult steps behind you, all that’s left is to hang the drywall to finish off your soffit. To help simplify this process, use a pencil to mark on the wall where the location of your metal studs are. This will allow you to know exactly where to place the screws when installing the drywall.
Transfer the measurements of your box frame over to the drywall sheets and cut accordingly with a utility knife. Once cut, use drywall screws to install the drywall onto the metal framework.

Jessica considers herself a home improvement and design enthusiast. She grew up surrounded by constant home improvement projects and owes most of what she knows to helping her dad renovate her childhood home. Being a Los Angeles resident, Jessica spends a lot of her time looking for her next DIY project and sharing her love for home design.
More by Jessica Stone