


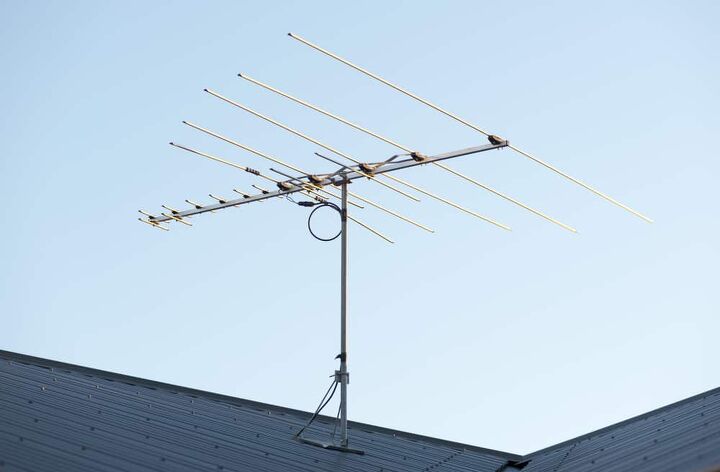
How To Install An Antenna On A Roof (Quickly & Easily!)
You should bear several things in mind when thinking about buying an antenna for your property. Budget is, of course, a consideration, as is the decision of whether to install it yourself or use a professional. Also, you need to know the optimum position on your particular roof, and of course, the correct way to carry out the installation.
To install an antenna on your roof, you will need first to establish the 12-foot mast. Then, assemble the antenna on the ground before attaching it at least 10 feet above your roof’s highest pitch. Then, make sure it’s secure in place before you check to see if it works.
In this article, we will go through the installation process step by step. Even for a DIY beginner, this is a relatively easy task. As long as you take the time to do it as recommended, there’s no need to pay a professional contractor.
Do You Need Antenna Installation or Replacement?
Get free, zero-commitment quotes from pro contractors near you.

How To Install An Antenna On The Roof
Although installing an antenna on the roof is not complicated, it’s essential to follow several steps to ensure the job is done safely and correctly. We’re going to include all the details below, so you’ll know exactly what your need to do.
Step 1: Assemble Your Tools And Materials
For this task, you’ll need a variety of tools. Get them all within easy reach before you start work, as this will save time and effort. As a minimum, you should gather:
- The new antenna
- A 12-foot mast
- The mounting kit
- A 75 to 300 ohms transformer
- A UV resistant outdoor coaxial cable
- A splitter
- Various drill bits
- Wood or masonry screws
- A grounding block
- One digital converter per TV that you’re going to connect
- An antenna rotator
- A hammer drill
- A signal booster
- A variety of ty-wraps
Step 2: Attach The Wall Mount
If you’re going to use the wall mount, this is the first thing to attach to the building. Start by drilling pilot holes for the bolts that will secure the braces in place. Don’t drill the brick itself. A better choice is to drill the mortar, as it’s softer and therefore more comfortable.
Ensure that you leave a space of around 12 to 14 inches between the top and bottom braces to prevent the mast from swaying in the wind. If you’ve made the holes too big to hold the bolts in place, hammer some plastic expanders into the holes and re-screw the bolts so they’re tight.
Step 3: Assemble The Antenna On The Ground
First, read the instruction manual to understand the components supplied with your purchase. Then, secure all bolts and nuts before connecting the transformer to the antenna.
If the antenna is supplied with a coaxial connector outside the plastic casing, attach the antenna’s external coaxial cable. In specific models, you may find that transformer is a built-in component.
Step 4: Choose The Right Location
This is an essential step, so take your time to get it right. Ensure you select a location well away from electrical cables or tree branches. Also, the antenna needs to be a minimum of 10 feet above the peak of your roof.
Step 5: Attach The Antenna
At this stage, you will require some help from a volunteer to hold the antenna while you tighten all the u-bolts in the braces. While the nuts supplied with the mounting kit will have washers, it’s still important to tighten them, so they don’t work loose over time.
Step 6: Adjust The Rotator Cable
When the antenna is mounted, use the Ty-wraps to attach the cable to the mast. The rotator, if you have one, requires a loose loop of around 2 feet. This is because the coaxial cable can be pulled when the rotator turns the antenna as it searches for more signals, and stretching of the cable is something to avoid at all costs.
If you see that the coaxial cable looks unsightly, try hiding it behind guttering or think of another way to minimize its visual impact.
Step 7: Connect The Coaxial Cable To The Grounding Block Or The Splitter
For example, a four-way splitter can be used to connect three coaxial cables to a grounding block. From there you can connect to any room in the house with further cables.
Can I Use My Old Antenna And Still Enjoy High Definition On My TV?
The short answer is, “yes, you can.” HDTV will work perfectly well with a VHF/UHF antenna. As per the Antenaweb site, VHF will receive channels in the range 2-13.
What Do VHF And UHF Stand For?
- The Very High Frequency (VHF) band is the section of the television broadcast frequency that covers channels 2 to 13.
- The Ultra High Frequency (UHF) band is the part that covers channels 14 through 83. These days, many TV channels that broadcast in digital use UHF(14 and higher.
There’s no technical reason for this in terms of digital broadcasting. In fact, it is due, principally, that UHF channels tend to be the ones available in most markets.
Once the transition to digital is complete, TV stations won’t require the ability to broadcast in analog. When this time comes, there’s a possibility that they’ll utilize their existing analog VHF channels for digital.
Are All Digital Stations On UHF Channels?
Antennas that only receive UHF stations and models that pick up both VHF and UHF signals are available. However, if you’re not likely to use VHF 2-13 range channels, purchase a UHF only model.
Do I Really Need To Purchase And Install An Exterior Antenna?
The answer depends on your location in relation to the TV stations you want to tune into. A set-top antenna might be sufficient but can also be unreliable, needing regular adjustment. Overall, a fixed antenna on your roof or wall will save you time and hassle.
If you know you’re only going to watch digital channels, there are antennas made specifically r this, but in fact, any good quality VHF/UHF antenna will work. You’ll be able to watch your favorite channels without problems.
Choosing An Antenna: Indoor vs. Outdoor
When choosing your antenna, it’s a good idea to know what type will suit your needs the best. You do have the option of indoor antennas as well as outdoor. There are advantages and disadvantages to both, which we list below.
Indoor Antenna Advantages
- They’re easy to install. Just take them out of the box, and connect.
- Specific, high-quality models will provide excellent receptivity, no matter where they’re located in your home.
Indoor Antenna Disadvantages
- Lower end models may have limited or patchy receptivity.
- It may be they can only be used in one specific part of your home to get a signal. It’s even possible that they will only work in a particular piece of a room, meaning that you have to rearrange your furniture to accommodate this.
- They can be easily knocked out of position, so they need to be readjusted frequently.
Outdoor Antenna Advantages
- They offer greater receptivity of digital signals, although antennas that receive UHF stations only and ones that receive both VHF and UHF are both freely available.
- Once in place, typically on the highest point on a structure, the reception will be stable, and you can forget about them.
- There are many different ways to install an outdoor antenna: gable install, roof, wall or, chimney. There are various installation kits available in almost every hardware store.
Outdoor Antenna Disadvantages
If you save yourself the expense of a technician, you’ll need to be very conscious of the safety risks of installation and take all necessary precautions.
- First, you’ll need to use ladders and possibly walk on your roof, so there’s a risk of falling.
- Ensure your ladders are in good condition, don’t exceed the maximum weight, and always have a helper to ensure the ladder is stable.
- Secondly, you’ll need to use power tools, which carry a risk of electrocution, especially in wet conditions. The antenna will also need to be grounded so it won’t attract lightning.
Do You Need Antenna Installation or Replacement?
Get free, zero-commitment quotes from pro contractors near you.
Wrapping It Up
Choosing an outdoor antenna will significantly benefit your home by providing incredible reception; however, the installation process can be involved. If you’re not comfortable doing this yourself, you can always hire a professional or ask a friend for help. Just make sure you’re careful and that you have a sturdy ladder to make it up to the roof safely.

Heather is a passionate writer who loves anything DIY. Growing up, she learned everything from home repairs to design, and wants to share her tips with you. When she's not writing, she's usually hiking or searching for her next DIY project.
More by Heather Robbins


![12 Washing Machine Brands to Avoid [with Recall Data]](https://cdn-fastly.upgradedhome.com/media/2023/07/31/9075781/12-washing-machine-brands-to-avoid-with-recall-data.jpg?size=350x220)


