


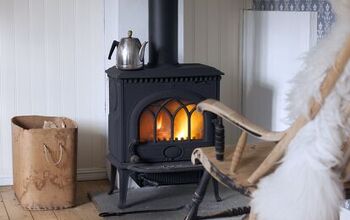
How To Install A Wood Stove Pipe Through A Metal Roof

Wood-burning stoves can save you hundreds of dollars every winter. We all know that running the heat can make quite the dent in our wallets. One of the last stages of installation when it comes to a wood stove is putting in the chimney.
You’ll want to make sure that it’s safely coming out through the attic and your roof for proper ventilation. Working with a metal roof can be a little more complicated, but that’s why you’re here. To install a wood stove pipe into a metal roof, you’ll need to cut a hole, apply flashing, and secure the pipe.
There’s a lot that goes into making your home safe during the installation of a wood stove. Below we’ll chat all about how to install the pipe correctly through a metal roof. There are also helpful tips and tricks throughout, plus a handy cost chart to help you with your budget.
Do You Need Gas, Pellet, or Wood Stove Installation?
Get free, zero-commitment quotes from pro contractors near you.

Installation Tips
Just like most home improvement projects, installing a wood stove pipe through a metal roof can come with some challenges. Many homeowners have faced the following issues, and I wanted to include them to help you avoid repeating their mistakes. Let’s take a look at what made the list.
Retrofitting an Old Chimney
If you’re working with an older chimney, you’ll likely notice that it’s far too large for today’s wood stoves. This means that more air will draw out than the amount of heat it produces. To put this into simpler terms: you’ll end up burning more wood than you need to during the winter.
What you could do is install a liner stovepipe in the chimney to act as the middleman. This pipe should be as long as the entire chimney but never bigger than the exhaust opening. The heat coming from a wood-burning stove is different from a regular fireplace, and an old chimney may not work properly.
Setting Height Requirements
Depending on your preferences, you may think a short chimney looks better than a longer unit. It’s crucial to keep in mind that a shorter chimney may not supply enough of a draft for a wood stove. You can hire someone to find out the perfect stovepipe height for your home.
Horizontal Stovepipes
Another thing people seem to run into is having too much horizontal stovepipe with their wood-burning stove. A venting system will work most efficiently when it’s running vertically. Don’t cut corners and run the pipe out of a window or through a wall.
Speaking of, putting a stovepipe along an outside wall on your home is a bad idea as well. While it is a safety issue, you’ll also run into efficiency problems too. A wood stove will best heat a home if the pipe is installed along an interior wall.
Having a Windy Stovepipe
It’s understandable that some homeowners will need to add a couple of curves to the stovepipe. This can quickly be overdone and should be avoided if possible. A venting system should be straight to help prevent the build-up of a fire-causing chemical called creosote.
How to Install a Wood Stove Pipe Through a Metal Roof
When it comes to installing a wood stove pipe, it’s important to lookup local and national building codes. There may be specific rules and regulations you need to adhere to when working with a metal roof.
Things like clearance and pipe height are something they may need to approve. Consult your local building department to make sure you’re following guidelines. When you’re in the clear, here are the step-by-step instructions to get the job done with ease.
Step One: Positioning the Stove
If you haven’t already, put the wood stove in the exact spot, you expect to install it. If it’s already installed, you’re a step ahead and make your job much easier. Place one section of the chimney pipe at the stove connection to use as a guide.
Step Two: Making Your Mark
Then, take a plumb bob from the ceiling to help mark the center of the pipe on the roof’s sheathing plywood. Drill a pilot hole where you made the mark and be sure to go through the metal roofing. This is done to make a physical hole where the chimney’s center should be.
Step Three: Creating a Diameter
If you have access to a drawing compass, the third step will be a breeze. Take it and mark the outside diameter of the hole you need for the chimney. Do this on the exterior surface of your metal roof. Again, be sure you’re watching out for the manufacturer’s specifications, as well as any building codes.
It’s common for there to be at least two inches of clearance between the pipe’s surface and the surrounding material. Having it too close can pose a fire threat once the chimney is in use.
Step Four: Cut the Hole
Next, take your jigsaw and use a combination blade to create a hole in your roof as well as the plywood. Take the flashing and put it over the hole you just made. Move the flashing down a few inches and make a line with a pencil, locating where the top of the edge is.
Using sharp snips, cut across the flashing where you placed the line before moving onto the next step.
Step Five: Inserting the Flashing
Once you’ve cut a line, you’ll be able to put the top edge of the flashing under the roofing and roofing paper. Slide it all the way over the chimney pipe hole. Run a ½-inch bead of exterior grade caulking by raising the roof a bit.
This should go around ½-inch above where the end of the roof meets the flashing’s surface. Do this again, but under the perimeter edge of the base and press down to adhere to the flashing.
Step Six: Putting Together the Chimney
Get the instructions that came with the chimney and put it together carefully. After it’s complete, insert the chimney through the roof hole, including the flashing’s collar. Take the bottom or lower end of the chimney and put it onto the wood stove’s flange.
Step Seven: Double Checking Your Work So Far
Step seven is focused on double-checking everything up until this point. Look to make sure the chimney is secured onto the flange. Also, check to see if it’s plumb above the roof’s surface.
The flashing should be in place with caulk, and then, you can take roofing screws to keep the flashing where it belongs. Make sure that the screws are inserted on the side of the flashing, but don’t put them into the bottom edge.
Step Eight: Finish Up
You’re almost done! Install the chimney cap as per the directions on the instruction guide. Take a small amount of caulk and put it on each side of the flashing. Add it around any gaps of the collar to prevent any moisture or water from getting in.
Cost of Installing a Wood Stove
Total Cost of Having a Wood Stove Installed
| Wood Stove Installation | Price |
| National Average | $2,486 |
| Minimum Cost | $400 |
| Maximum Cost | $5,500 |
| Average Cost | $1,210 to $4,437 |
Where Your Money is Going
| Material | Average Price |
| Wood Stove | $400 – $2,500 |
| Stove Pipe | $300 – $3,500 |
| Hearth Pad | $200 – $500 |
| Wall Coverings | $60 – $500 |
| Labor | $250 – $800 |
| Total | $1,210 – $8,300 |
Do You Need Gas, Pellet, or Wood Stove Installation?
Get free, zero-commitment quotes from pro contractors near you.
Related Questions
Which way does the stove pipe go?
The correct way to put in a wood stove pipe is with the crimped end facing down. Moisture will appear as the chimney pipe begins to cool. Putting the crimped end facing up will cause the joints to leak and can eventually lead to erosion and rust.
How do you vent a metal roof?
Ventilation and insulation are key things to have when dealing with a metal roof. No matter if it’s a small shed, a garage, or an entire house. You should install intake vents at the bottom of the roof, while also having escape vents at the top of the roof. These allow airflow to safely come and go within the structure due to a continuous natural draft. Not having a metal roof ventilated properly can lead to structural damage, as well as damage to the things under the roof.
Do you need a double wall pipe for a wood stove?
Having a double-wall pipe is a must when you have a wood stove. If you have a single-walled pipe, the surrounding area would heat up from the exterior of the pipe and ignite. By using at least two pipes, you’re allowing the heat to spread out more, preventing the pipes from getting hot enough to cause a fire. Check out our guide: Single Wall vs. Double Wall Stove Pipe: What Are The Differences?

Kirstin is a passionate writer who loves helping people learn new things when it comes to home improvement. When she's not behind a keyboard, she enjoys DIY projects, crafts, spending time with her pets, and making videos. She hopes that with all she writes, someone is finding a solution to their home improvement needs.
More by Kirstin Harrington


![Cost To Drill A Well [Pricing Per Foot & Cost By State]](https://cdn-fastly.upgradedhome.com/media/2023/07/31/9074980/cost-to-drill-a-well-pricing-per-foot-cost-by-state.jpg?size=350x220)
