


How To Install A Ceiling Fan Without Attic Access
Ceiling fans are great additions to homes. The additional air circulation can certainly make your home more comfortable. A well-chosen ceiling fan can also add charm and elegance to your décor. The problem is that you can’t hang a ceiling fan anywhere. If you don’t have attic access above the ceiling, how do you hang a ceiling fan?
Installing a ceiling fan where there is no access to the attic can be a challenge. However, there are ways to accomplish this project. If there is an electrical circuit where you want the fan, the job is relatively simple. Most homeowners can manage this project easily.
Installing a ceiling fan is not as simple as removing the light fixture and hanging the fan. There are some considerations before the fan goes up. This step-by-step guide should help you navigate the installation of a ceiling fan with no attic access.
Do You Need Ceiling Fan Installers?
Get free, zero-commitment quotes from pro contractors near you.

What You Will Need
Preparation is the key to any successful project. Gathering the right tools and materials will make the installation of your ceiling fan go smoothly and help eliminate frustration.
Have Your Ceiling Fan on Hand
Before you begin any part of the project, have your ceiling fan on hand. The instruction manual that comes with the fan will have important information about mounting the fan and the necessary electrical wiring. Familiarize yourself with these instructions before going any further.
A New Electrical Box – Self Bracing
Without access to space above the ceiling, you must use a brace style electrical box mount. These systems fit through a standard hole for an electrical box and expand to brace between two ceiling joists.
If there is no access to the attic space to attach a regular electrical box to a joist, a brace box is your only alternative. The brace box instructions will have a list of materials and tools and the instructions for installing the brace.
Cutting, Drilling, and Wiring
The job of installing a ceiling fan without attic access means that you will be doing all your work below. A good ladder is a must for working at ceiling height. You will need a sheetrock saw to make the hole cutout. You may also need a screwdriver or wrench. A wire stripper/cutter combination tool will help with the wiring.
Out with the Old and In with the New
If you are replacing an existing light fixture with a ceiling fan, you must be sure that the electrical box will handle the weight of the ceiling fan. If the electrical box attaches to the sheetrock with tabs and is not attached to a joist or other support, you should replace the box. These steps should help you with the actual installation.
Step 1 – Work Safely
Before starting any work on an electrical device or circuit, you must make sure that you turn off the circuit breaker in the service panel. You should never work on a live electrical circuit. A live electrical circuit in a home has the potential to deliver a deadly shock. Don’t take the chance.
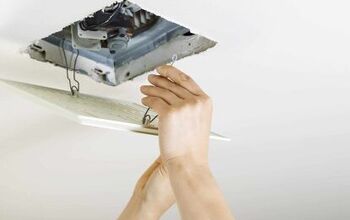
Step 2 – Remove the Old Fixture and the Electrical Box
Take down the old light fixture and unhook the wires. Replace the wire nuts on the bare wires in the electrical box and set the light fixture aside.
There are several ways old boxes attach to the sheetrock. Some boxes have tabs that spring out to hold the box in place. Other boxes have screws that swing tabs out to engage and tighten against the sheetrock.
Step 3 – Find the Ceiling Joists
Reach up into the hole in the ceiling and feel around until you locate the joists above the sheetrock. Make a mark on each side of the hole indicating the direction of the ceiling joists.
Step 4 – Install the Brace
Different manufacturers of brace mounted electrical boxes have their mounting methods. Read the directions carefully. Most mounts install by removing the electrical box from the brace and spreading the brace to wedge against the joists.
With the box removed, insert the brace through the hole in the. Follow the manufacturer’s directions for tightening the brace against the joists.
Step 5 – Re-Attach the Electrical Box
Before re-attaching the electrical box to the brace, push out one of the tabs and open a hole. Thread the wire into the box through the punch-out.
Place the new electrical box back in the hole and tighten the mounting screws provided. The new electrical box should fit flush with the ceiling and not have any movement.
Step 6 – Install the New Fan
You are now ready to hang your new ceiling fan. Follow the directions in the installation manual that came with your fan. There is a wide variety of different ceiling fan mounts and it is important to hang the fan correctly to ensure safe use.
Step 7 – Making it All Work
Attach the white wires from your ceiling fan to the white wire in the electrical box. Do the same for the black wires and push the wires back into the electrical box.
Put the trim ring of the new fan up around the fan mount and tighten it. The trim ring will leave a clean, finished look on the ceiling.
Step 8 – Turn on the Circuit Breaker and Test Your Fan
Turn the circuit breaker on the fan circuit in the service panel to the on position. You can check the operation of the fan and lights. If everything is operating as it should, it’s time to clean up and have a cold drink. Congratulations on a successful project.
There is No Light Where I Want to Hang A Fan
When there is no light where you want to hang a fan, there is probably no electrical circuit there as well. Hanging a ceiling fan in an area where no electrical service for the fan is available requires a new electrical circuit.
No attic access to the area complicates the installation. Adding electrical circuits to your home is a job best left to a professional electrician. This is especially true when there is no attic space above the ceiling.
Once a qualified electrician has run a new wire and installed the proper electrical box, the installation of the fan should follow the fan manufacturer’s recommendations. If the electrician is already on-site, the additional cost of installing the fan is probably minimal.
Where Does the Blue Wire on the Fan Connect?
If your new ceiling fan has a light kit, the blue wire connects to the lights. Connect the blue wire to the black wires in the electrical box. If your old fan had a separate switch that operated the lights on the fan, there should be an extra wire in the electrical box. In most instances, the blue wire will connect to the extra wire.
To make matters a bit more complicated, there may also be a wire in the electrical box for a wall switch to control the fan. Consult the instructions that came with the fan to wire the connections for remote switches. If there is any doubt, your electrician can trace the circuits and wire the fan properly.
My New Ceiling Fan has a Green Wire, But There are no Green Wires in the Box
The green wire on your new ceiling fan is the ground wire. Most new homes have a ground wire in the system as a backup to the circuit breaker. The green wire will conduct electricity away from the ceiling fan in case of a short circuit or other problem.
Older homes may not have this ground wire in the circuits. You could elect to have your home rewired to include a ground wire, but this is prohibitively expensive. You can omit the green wire when installing your new ceiling fan.
The new ceiling fan will work fine with the green wire. However, you do forego some of the extra protections that a ground wire will afford.
Do You Need Ceiling Fan Installers?
Get free, zero-commitment quotes from pro contractors near you.
It is a Matter of Light and Comfort
Adding a ceiling fan to your home can dramatically increase your comfort and the convenience of having a light fixture as well. If the new fan is going where no light or fan has existed before, the project may be a bit more complicated but is still doable. Remember to work safely and always seek professional advice if you have problems. Good luck.
Related Guides

Dennis is a retired firefighter with an extensive background in construction, home improvement, and remodeling. He worked in the trades part-time while serving as an active firefighter. On his retirement, he started a remodeling and home repair business, which he ran for several years.
More by Dennis Howard


![Finishing Basement Without Permit [Is It Really Illegal?]](https://cdn-fastly.upgradedhome.com/media/2023/07/31/9070078/finishing-basement-without-permit-is-it-really-illegal.jpg?size=350x220)


![Standard Dining Room Table Dimensions [for 4, 6, 8, 10 and 12 People]](https://cdn-fastly.upgradedhome.com/media/2023/07/31/9074335/standard-dining-room-table-dimensions-for-4-6-8-10-and-12-people.jpg?size=350x220)


