How To Flatten A Wall For Tiling
It’s very common for walls in the home to be somewhat uneven. The case may be that the plaster is rough and bumpy or the wall could have simply bowed or settled over time. If you decide to place tile over an area of wall that is not entirely flat, the corners of the tiles could stick out slightly from the rest.
This issue where tile corners pop up is referred to as “lippage,” and it can destroy even the most professional tile installations. You can eliminate this problem and flatten your wall for the tile by either hanging a new backer board or drywall, or use a putty knife to scrape your way down the wall and smooth it out the best you can.
No matter how uneven your wall is, there is a solution for effectively installing tile. We’ve outlined all the necessary steps you need to take in order to ensure that your uneven walls are prepped and ready for tile.
Do You Need to Hire Tile Installers?
Get free, zero-commitment quotes from pro contractors near you.

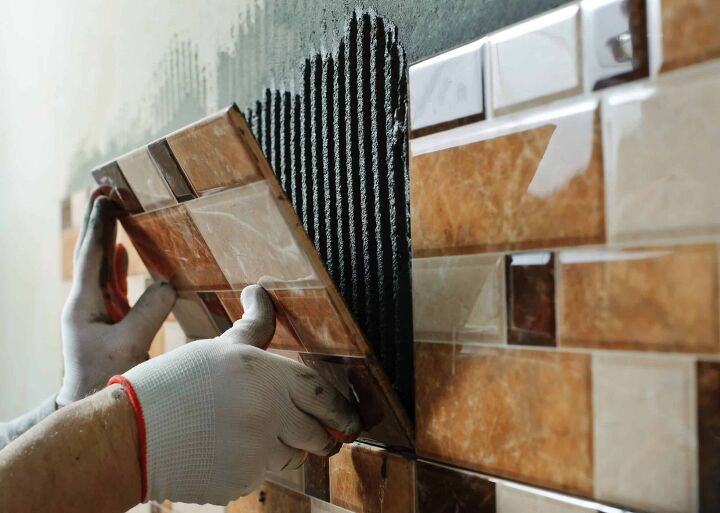
How to Prep Your Walls for Tile
Preparing walls for tile is relatively simple with the right knowledge, mindset, and tools. Tiling can be done over a wide variety of textures and surfaces but in order to ensure a successful final result, proper wall preparation is a vital first step.
- Remove any old fittings from wall hangings such as nails, screws or pins
- Repair or remove any loose plaster
- If present, tear down pre-existing wallpaper
- Inspect for and repair cracks or damage to the walls
- Flatten the surface if uneven
- Sand the surface so the adhesive can bond
- Clean the wall of moisture, grease and dust
- Select the appropriate primer and prime prior to tiling
All of the above tasks should be done prior to the install of the tile to provide the proper environment for the adhesive to bond.
How To Check If A Wall is Uneven
Installing tile on an uneven wall can lead to a number of complications. Before you begin the steps to fix a wall that is uneven, you need to verify that it is, in fact, not level enough for tile. The easiest way to spot irregularities is by taking a long, flat piece of lumber and sliding it across the surface of the wall.
Adjust your perspective as you are moving the piece of wood over the wall. This will help you to accurately detect any bumps, swollen areas, or dips in the wall. According to experts, bumps that are between 3 and 6mm are still feasible. However, anything above that and you’ll need to take steps to level it out.
Walls that aren’t leveled during the application of tile could potentially lead to the adhesive losing grip. Tiles that aren’t properly secured to the wall could collapse your entire installation.
How to Flatten a Wall for Tiling
If you’ve determined that the wall where you’d like to install tile is not appropriately level, there are a few solutions to correct this. To eliminate any potential issues with the installation, such as lippage, you can hang new drywall or backer board prior to tiling. This will ensure a level working surface for the tile adhesive to bond.
Another option for flattening an uneven wall is to use a putty knife and scrape down the wall, eliminating any bumps or uneven areas. Spackle and joint compound surfaces can be sanded. Pick up a sanding sponge from your local home improvement center and sand as much of the surface as you are able.
To create a smooth surface, you can also use a large format tile mortar. Using a notched trowel, spread the mortar along the wall and work in large sections until you have one continuous flat surface. Opt for a mortar that takes longer to dry so that you have plenty of time to make sure the wall is as level as possible.
Tiling on Specific Surfaces
Before you begin tiling, it’s important that you understand the particular surface material that you are working on. Whether it’s drywall, concrete, plywood, or another type, they all require the appropriate preparation before tiling can start. For example, wooden surfaces should involve a layer of polyurethane paint and fresh plaster may take up to 30 days to dry.
Additionally, blockwork, brick, and cement surfaces are almost entirely uneven. If you want to tile one of these surfaces, you cannot just simply sand it down or scrape it until it’s even. In these instances, you need to choose and install the suitable type of tile backer board.
Backer boards work great for areas that experience moisture because they are waterproof. One of the best options for backer boards, that are installed in a bathroom, is marine plywood tile backers.
Choosing the Right Adhesive
In addition to leveling uneven walls, choosing the proper adhesive for the surface is essential to an effective tiling job. There are a variety of different types of adhesives out there and choosing the wrong would could affect the outcome of your entire project. The following are the most common types of adhesive used for wall tiles:
- Traditional powdered adhesive – This option is generally what professionals use to install tiles. It comes in a dust form and must be mixed with water before use. Depending on the type, some powdered adhesives are meant for tiles, while others may be intended for stonework.
- Ready-mix adhesives – This type of tile adhesive does not require any mixing and comes ready to go in the packaging. It’s mainly used for DIY projects, as professionals prefer the above option.
- Rapid set multi-flex adhesive – This adhesive is another popular favorite among some tiling experts. It’s known for its extremely fast dry time and offers the option of readjusting the position of tiles during installation.
Quick Tip: Whether you’re installing bathroom tile or tiling a kitchen splashback, you should always use a water-resistant adhesive.
Related Questions
Can you tile over painted surfaces?
In general, painted walls are not suitable for tiling. However, with the proper preparation, it can be done. In order to tile a painted wall, you need to remove any signs of paint that isn’t tightly adhered to the wall. Fix uneven areas by sanding and make sure the wall is clean and free of dust or heavy particles. You may also have to use a particular type of adhesive if you choose to tile over a painted surface.
Can you tile over pre-existing tile?
As long as the wall is sturdy, free of mold and mildew, completely level and does not have any warping or improperly placed tiles, you can tile over existing tiles. For adhesive, epoxy tile adhesive is the best option because it can adhere to the tile that is already in place.
Can you tile on top of wallpaper?
Similar to painted surfaces, you can only tile over wallpaper if it is an older home and the wallpaper is tightly bonded to the wall. To test this, try to remove it first and if it is too difficult to take off, you can tile on top of it. However, if you possible, stripping and sanding is always the safest option.
Do You Need to Hire Tile Installers?
Get free, zero-commitment quotes from pro contractors near you.
Wrapping It Up
If you are planning out a new tiling project, it is essential that your walls are properly prepared before you begin. For uneven surfaces, depending on your individual situation, you can choose to scrape and sand, install backer board or fill with mortar. Regardless of the unevenness of your walls, there is a way to apply tile on top of it.
Related Guide

Jessica considers herself a home improvement and design enthusiast. She grew up surrounded by constant home improvement projects and owes most of what she knows to helping her dad renovate her childhood home. Being a Los Angeles resident, Jessica spends a lot of her time looking for her next DIY project and sharing her love for home design.
More by Jessica Stone