How To Build A Manger Out Of Pallets (Do This!)
Pallets have become the duct tape of the DIY world. You can do anything with a couple of pallets – and building a manger is no exception. In fact, anyone can construct a manger relatively quickly out of a couple of discarded wooden pallets.
You can build several different styles of manger’s when using pallets. Many people chose to make three sides and a roof. For easy storage, you can attach hinges to the four pieces. That way, when January hits, you can fold down your manger scene easily without losing any parts.
This article will give you everything you need to know about building a manger out of pallets. Not only is this a fun way to showcase the birth of Jesus, but it also has some great practical benefits.
We will cover all this and more in the sections below.
Reasons to Build a Manger Scene from Pallets
Pallets are an excellent choice for a manger scene. Here are three reasons we recommend using them to build your nativity set this Christmas.
- Authentic look
- Shields nativity from the wind
- Recycles old pallets
Authentic Look
When you use old pallets to make a manger, it almost looks like you handcrafted the structure piece by piece. When people think of the stable where Jesus was born, they think of a weathered old barn. And that’s where the pallets shine.
Without any effort, the pallets are already weathered, and the boards are already in place. It gives you a great look very easily. If you know someone with a nativity scene who needs a manger and stable to go around it, they would be thrilled to have you build them one out of pallets.
A Pallet-Manger can Sheild the Nativity Scene from Snow and Wind
Great looks aren’t the only reason to build a manger out of pallets. How many times have you seen a whole nativity scene scattered over someone’s yard? All too often, one of the wise men falls on his side, or baby Jesus is buried in the first snow.
When you build a manger out of pallets, you solve all this. You will no longer have to spend your December clearing the snow off Joseph or picking Mary up out of the snow.
Building a Manger Out of Pallets is Resourceful
Using pallets for your manger is a fun and festive way to reduce waste. It’s a great reminder that our garbage has more uses than we might think.
If you love to save money reusing and recycling, see this article on the price of recycled glass countertops vs. granite.
Alright, let’s get into the build.
Several Different Pallet Designs for a Manger
There are many ways you could configure pallets to create your manger scene. If you wanted to be simple, you could take four pallets and attach them in a stable configuration: a back wall, two sides, and the roof.
Also, if you plan to build a manger than can be used by children, you can cut the pallets down and just build the three sides of the stable. You can then use two by fours as posts and lay a brown blanket or tarp over the posts as a roof.
Today, we will explain how to build a manger with a sloping roof and hinges, so it’s easy to deconstruct. The sloped roof will give your manger scene a very cozy look, while also shedding the snow.
Let’s get into the build.
Steps to Build a Manger out of Pallets
Here we go through the steps to build our manger out of pallets. Before you get started, make sure you have some safety glasses handy. Also, gather all necessary equipment – this will save you time and frustration.
Here’s a list of things you will need:
- Four pallets
- Six durable hinges
- Screws
- Tape measure
- Saw
- Drill
- Extra two by fours for framing
Once you’ve gathered the needed supplies, it’s time to get to work on your manger.
Here are the steps:
- Measure and cut your pallets to size
- Use two by fours for framing if needed
- Attach hinges
After you finish building your pallet manger, see our article on how to build a pallet wall.
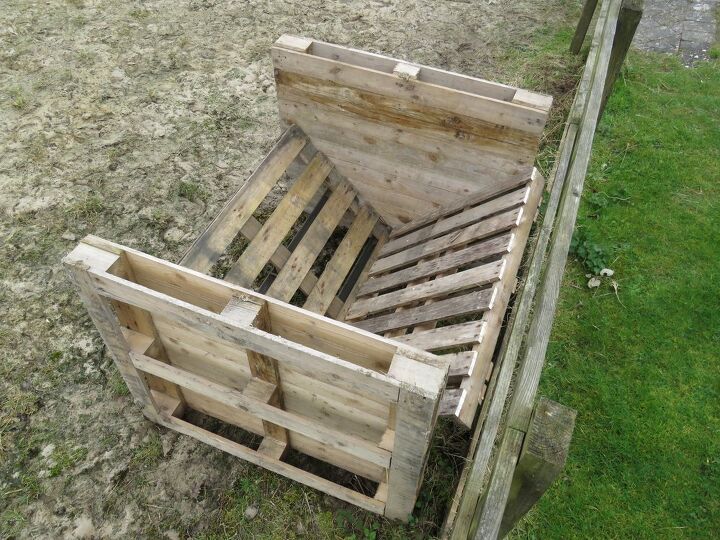
Step 1: Measure and Cut Your Pallets
Measure back wall
A typical pallet is 48 by 40 inches. That’s 4′ by 3′ and four inches. Here are the dimensions we want for our manger.
We want to keep it four feet long for the back wall, but we will cut it three feet wide. This difference will allow us to create an upward slope for the roof. Dimensions for the back wall: 48 inches long, 36 inches tall.
Measure Both Side Walls
Now for the side walls. We want to create a slight slope. We also need to cut the walls to be half the width of the back wall. Cutting them in half will allow us to easily fold them up when the season is over.
For the sidewalls, first cut the full 48 inches by 40-inch pallet in half. After the cut, you should have a pallet that is 40 inches tall and 24 inches wide. However, we are not done yet. We need to add the slope.
Since our back wall is 36 inches tall, we will slope our roof from 40 inches in the front to 36 inches in the back. To do this, mark the 36-inch point on your sidewall. Then, make a pencil line sloping up to the 40-inch mark. This incline will give you a nice slope.
Be sure to mirror the side walls with each other. If you cut them to be identical, one side won’t fit correctly, and you’ll need to make more modifications to the pallet.
Measure roof
Now for the roof. For this piece, keep in mind the size of our base. At this point, it will be 24 inches by 48 inches.
We will make the roof slightly larger – this will give us some overhang in the front. Also, making the top wider than the base will compensate for the slight increase in width due to the slope.
Dimensions for the roof: 48 inches long and 36 inches wide. The same as the rear wall. Remember, you can alter the dimensions to fit the look you prefer.
To cut out the roof, follow the same steps as the rear wall: mark and cut.
Step 2: Frame with Two by Fours if Needed
After cutting pallets, you may need to add support in some areas. That’s where the two by fours come in. The supports strengthen the edges. You don’t want any flimsy pallet planks.
However, this can depend on where you made your cuts on the pallets and how old your pallets are. Very old pallets will probably need reinforcing. Also, if people will ever be inside your manger scene, the structure must be stable.
Step 3: Attach the Hinges
Now that you have everything cut and framed, it’s time to put it all together. You can be creative about how you attach the pieces. Just be sure everything is secure. We are going to use hinges. Hinges allow us to fold and conveniently store the manger.
First, we suggest you buy some relatively large, heavy-duty hinges. These hinges are going to help support your structure, so you want them to be stout. Use at least two hinges to connect each piece to the back wall. That’s a total of six hinges. Here’s how you join them.
Attach the hinges on the roof so that the roof can easily fold down behind the wall. The top folds to the back to leave room for your sidewalls to fold in the front. Attach one piece at a time and ensure that it folds smoothly before moving on to the next.
If needed, attach two by fours inside the pallets, so the hinges are connected to solid wood.
And that’s your finished pallet manger. You can now enjoy the festivities of the season while knowing your nativity looks better than ever, and that is safe from the snow.
Related Questions
Most pallets are safe for use. However, it is smart to trace the origin of your pallets, as there have been reports of some coming into contact with various toxic chemicals. To mitigate this risk, carefully inspect pallets before using them. If possible, figure out where they came from.
How Do You Keep Pallets From Rotting?Mainly, keep them off the damp ground for long periods. You can also paint the pallets to give them greater weather resistance – this is especially true if you are using the pallets for a creative purpose.
How Long Does a Pallet Last?With optimum care, a pallet could last up to 10 years. However, this will largely depend on the environment. A pallet that is not cared for could begin to rot very quickly. If you are using pallets for something around your home, it may be a good idea to paint them. Also, keep them off the ground as much as possible.

Gideon is a writer and hobby woodworker. He enjoys working on projects small and large-everything from crafting boxes and benches, to replacing carpet and landscaping a yard.
More by Gideon Zielinski