Dryer Won't Spin But Just Buzzes? (Possible Causes & Fixes)

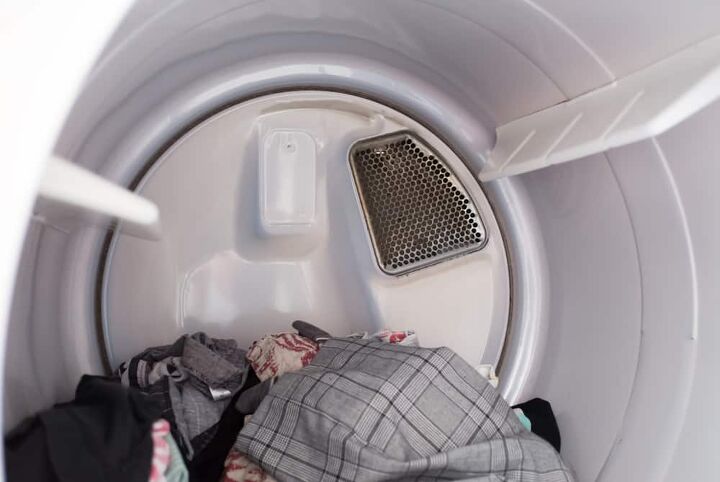
It’s frustrating to go and take out a fresh load of laundry from the dryer only to be met with a large, sopping wet mess. You heard it buzz and thought the clothes were dry, but for some reason, your dryer isn’t spinning. So what does it mean? What could be wrong with your appliance?
If your dryer won’t spin, but only buzzes, there could be a slew of possible issues such as worn-out drum rollers, roller axles, bearings, glides, or a broken drive belt. These are easy to fix on your own, without the hassle of hiring a professional.
It’s essential for you to have clean, dry laundry, which is why we put this guide together for you. We’ve included the steps you can take to diagnose each problem. This way, you can get your dryer up and running and dry that laundry before it begins to grow stagnant.
Do You Need Appliance Repair Services?
Get free, zero-commitment quotes from pro contractors near you.

Performing The Initial Inspection
It’s an annoying yet all too common problem: You’ve loaded your soaking laundry into the dryer, only to realize that the appliance is refusing to spin. There are several reasons this might happen, so the first thing is to investigate and determine the origin of the problem.
Check The Power Supply First
First of all, check that your appliance is connected to the main electricity. If it is, take a look at your circuit breaker box to make sure that the two circuit breakers are both switched on. Reset them if required. Once you’ve ruled out an issue with the plug and circuit breakers, the next thing to check is the dryer’s door switch.
Is It The Switch?
When the dryer door is shut, a plastic peg allows the switch to start the dryer’s action. Typically, you’ll hear a click. Inspect the peg. If it’s broken or damaged, you’ll either need to straighten or replace it. But, if the peg shows no signs of wear and tear, the culprit is most likely the switch, so you’ll need to replace it.
If you’ve walked through all of these problems and ruled them out, then there may be something else going on. Below, we’ve listed several possible issues that could be wrong so you can check them out and fix them if necessary.
Worn Drum Rollers
Most dryer models have two drum rollers positioned on the rear of the drum. Certain dryers have them in the front. When the rollers can’t spin freely, this overloads the motor, causing the dryer to stop. To check whether the drum rollers are worn, take the belt out of the dryer, and rotate the drum by hand. If the drum doesn’t turn easily, check whether the rollers are worn.
When the rollers don’t turn freely (in gas and electric dryers), the drum glides will support the front of the drum on each side. Depending on the model and make of dryer, these glides will be made of nylon, plastic, or Teflon. They create a smooth surface for the drum to rotate, but when they become worn over time, the resulting metal on metal contact will produce a scraping sound.
Worn Roller Axles
When the drum’s roller axles become worn or damaged, the drum rollers can’t rotate smoothly, and this stops the dryer from working. Examine the drum roller axles at the same time as you’re checking the rollers.
If the axles are in good shape, the drum rollers will spin easily, without wobbling. Wobbling rollers signify that the axles should be replaced. Other possible indications of damage would be that the dryer starts making unexpected noises or stops drying correctly.
Examine Roller Axles
- Remove the supports. Once you’ve completed the previous steps, remove the supports which hold the drum roller axle. Then remove the roller shaft. Depending on the situation, bear in mind that it may be necessary to replace the roller.
- Attach the new roller. If you are replacing the roller, attach it to the roller shaft, and rotate the roller shaft until it screws into place on the dryer.
- Secure the supports. Make sure that the roller can turn smoothly before re-securing the supports and replacing the remaining components. Some models need you to open the vents and gain access to the back of the dryer in addition to lifting off the front panels.
- Remove the drum. When the drum itself is taken out, you’ll be able to see the roller shaft. At this point, you’ll be able to determine whether it should be replaced or whether you could attempt to repair it or other parts such as the drum supports.
Worn Drum Bearing
The drum bearing holds the rear of the drum. When it becomes worn, it places additional strain on the motor, causing it to stop working. To diagnose this issue, detach the dryer belt, then rotate the drum manually. If the drum resists turning or makes a grinding or squealing noise, it means the bearing is worn, and you’ll need to replace it.
In specific models of gas or electric dryers, the back of the drum is held by a bearing. This may be a ball and socket or a shaft joined to a sleeve bushing. A damaged rear bearing will create a squeaking noise, and you’ll need to replace it.
Inspect The Drum Bearings
- Remove the power source. Disconnect the dryer and make sure no water or laundry is remaining inside the drum.
- Check for noise while the drum is rotating. Rotate the dryer drum with your hand, and see if it makes any unusual noises. Hold the front edge of the drum, and try to move it upwards, then towards you, and then towards the rear of the dryer. If it’s easy to move the drum in each direction, a replacement drum bearing may be needed.
Worn Drum Glides
Drum glides are small plastic components that support the drum- it slides on the drum glides as it turns. When the drum glides deteriorate due to wear and tear, the drum can get stuck. This places additional strain on the motor, and as a result, it shuts down. Examine the drum glides for wear and replace them if needed.
Inspect The Drum Glides
- Unplug your dryer. First, unplug the dryer from the mains.
- Gain access to the glides. Take off the dryer cabinet to access the drum glides. Typically, you’ll find them on the front bulkhead, on the top, or at the base. Examine the glides for any signs of wear.
If any of them appear damaged, you’ll need to purchase a set of replacement drum glides. It’s advisable to replace them all at the same time.
Broken Drive Belt
A broken dryer belt is the most usual reason for a dryer to fail. To identify this issue, rotate the drum by hand. The belt should offer some resistance. When the drum turns easily and loosely, it means that the belt is damaged or broken. Remember to disconnect the dryer and take the lid off so you can examine the belt and determine its condition.
Examine The Drive Belt
- Turn off the power and open the panel. To examine the drive belt, open the access panel. Specific models require you to place the washer on its side to reveal the belt on the bottom. Begin by removing the rear cover, and locate the belt.
- Determine what type of model you have. If you can’t see it (or at least the place where it should be, because if the belt has broken, it may be hidden from view), but if you can see the floor, it means that your appliance is a direct drive model that doesn’t use a belt. However, if the floor isn’t visible because of a steel base plate, determine whether the motor extends below the base. If it does, the belt will be accessed from under the appliance.
- Protect your floor. If you’re going to turn the appliance onto its side, protect the floor and the washer’s surface by placing a piece of cardboard or similar underneath. A washer is a heavy object, so ensure you have a volunteer to help lower and lift it back into place. Also, there’ll probably be some water left inside the appliance, so have some towels or sponges ready to mop up any spills.
- Check your belt. When you’ve accessed the belt, check it for the correct tension. Press it halfway down the longest straight part. It shouldn’t ‘give’ more than half an inch. Examine the belt for frays, cracks, or other signs of wear and damage. If you see any of these, replace the belt. If the belt is in good condition but has just become loose, tighten it by shifting the motor.
Cost To Hire A Professional
Expect this kind of repair to cost around $170 on average. Prices range between $105 and $240, including parts and labor at $50 to $150 per hour. This estimate includes the most common dryer repairs, but of course, the total will depend on the exact nature and extent of the problem.
Do You Need Appliance Repair Services?
Get free, zero-commitment quotes from pro contractors near you.

Wrapping It Up
A dryer with a drum that won’t turn can be annoying, but the fix is relatively easy. By following the advice in this article, you will be able to diagnose the issue and fix it so that your dryer will work as if it’s brand new. However, if none of these problems seem to be the cause, it may be time to think about calling a professional to assist you. Or, you could always use it as an excuse to buy a new, updated dryer.

Heather is a passionate writer who loves anything DIY. Growing up, she learned everything from home repairs to design, and wants to share her tips with you. When she's not writing, she's usually hiking or searching for her next DIY project.
More by Heather Robbins


