Bathroom Vent Leaking Water When It Rains? (Do This!)
Water dripping into your bathroom from anywhere there isn’t supposed to be water is cause for concern. This concern is especially true of bathroom vents, which typically lead through the roof to the outside. A leak from a bathroom vent when it rains should be investigated and repaired as soon as possible.
Your bathroom vent can leak water if the vent cap on the roof or vent cover is damaged. Loose flashing and shingles on the roof can cause water to leak through your bathroom vent as well. Moisture from warm water can condense in your bathroom vent and leak out.
Depending on the type of damage, the repairs are similar. Under most circumstances, repairing a vent cap or flashing is easy for the do it yourselfer. Following a few simple steps to diagnose and then repair a leaking bathroom vent is in your best interest. Such a repair can save thousands of dollars in other damage and work if the leak goes unattended.
Do You Need Ducts or Vents Installation or Replacement?
Get free, zero-commitment quotes from pro contractors near you.

Finding the Leak – The First Challenge
Where the water comes through the ceiling into the bathroom isn’t always a good indicator of the leak’s origin. Water has a way of finding strange and circuitous ways to get into a home. Finding the source of a leak often involves a bit of detective work.
Step 1 – Turn off the Power
Before doing anything else, switch the power to the vent off at the breaker box. Don’t risk a shock or worse by working on the vent when the power is on. Even if the wall switch is off, you could risk being electrocuted if the wall switch is accidentally turned on.
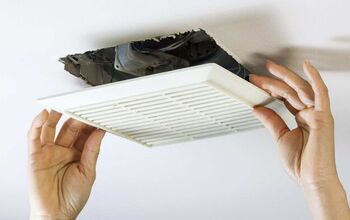
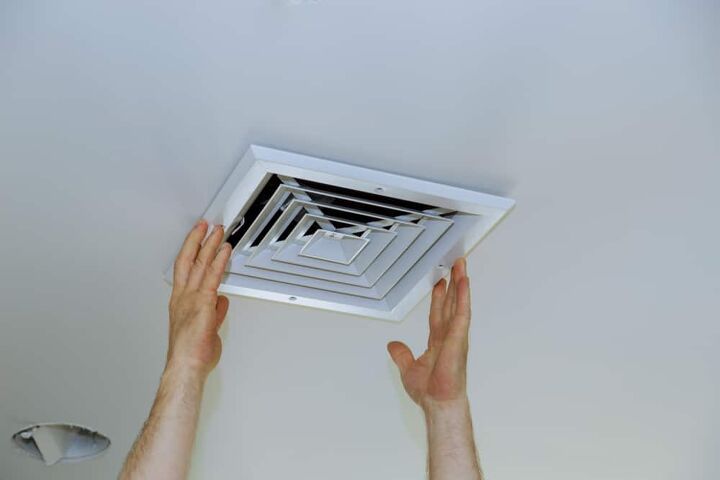
Step 2 – Remove the Cover from the Vent
You will need a ladder or step stool to remove the plastic cover on the vent. Some vents use screws to hold the plastic cover in place. On other models, the plastic cover clips into position. Lay the plastic cover aside.
Step 3 – Examine the Vent Fan
Q water leak will leave traces. These traces may be faint if the water leak is a recent event. However, these traces should be visible. Look for:
- Staining or rust on the metal parts of the vent, especially on the connection to the vent pipe
- Look for wet or stained wallboard or paint. Water leaking around the vent pipe will leave visible remains on the ceiling.
- Check the ceiling around the vet for sagging or soft spots. Water leaking will often pool around vents or light fixtures.
- Watch for drips. If you can examine the vent when it is leaking, you may be able to see the water as it comes into the bathroom
Step 4 – Look For Water In Vent Pipe
If there are signs of water coming into the vent through the vent pipe, you probably have a damaged vent cap on the roof. Further diagnosis involves examining the vent cap. The requires a trip to the roof.
Step 5 – Inspect Bathroom Vent
Water staining the wallboard or inside the vent assembly indicated a leak through the roof. Waer entering around the vent could be from a damaged vent flashing.
However, the leak could be almost anywhere else, and the water found the easiest accessible entry point at the vent in the bathroom ceiling. A trip into the attic space is the next requirement.
Step 6 – Replace the Vent Cover in the Bathroom
After you have examined the vent space for an indication of water, replace the plastic vent cover.
Warning – If there is a leak in the vent assembly, do not turn on the breaker to the vent. The possibility of someone getting a dangerous electrical shock is present if the breakers are on. Leave the vent unpowered until the leak can be addressed and repaired.
Step 6 – Check the Attic
In the attic, start at the bathroom vent. Examine the areas around the vent for water staining or dampness. It may be possible to follow the damp trail of the leak from the vent assembly backward.
Often if the leak originates in broken or damaged flashing, the water leak will be down the outside of the vent pipe. Once you have determined the location where the water is entering, it is time to assess how best to approach the repair.
Look up where the vent pipe goes through the roof into the vent cap. There should be no visible light or gaps around the vent cap, the vent pipe, or the roof. If you can see the light around the vent cap, you have a problem.
Step 7 – Access the Roof
If you are comfortable with ladders and high spots, you can probably examine your roof vent and flashing yourself. Use a good ladder and have a friend stabilize the bottom while you climb. Wear good shoes with traction soles to prevent slipping. Find the suspected vent and examine it carefully.
Step 8 – Inspect the Vent Cap
Check the overall condition of the vent cap. It should not have any cracks, splits, or separated seams. If the vent cap seems in reasonable shape, move down and check for a tight fit at the roof. The vent cap should not wobble or twist. Any damage or movement of the vent cap may require the attention of a professional roofer to repair.
Step 9 – Check the Flashing Around the Vent Cap
Your vent cap should have metal flashing around the base that extends out beneath your roofing material. This flashing keeps water from wicking back under the shingles and onto the decking or into the attic. If the flashing is loose or missing, rain may be blowing into your attic space.
Another Possible Culprit – The Non-Leak Leak
Bathroom vents should move the moist air in your bathroom outside. In some cases, the warm moist air movement in the bathroom into an unheated attic space may cause a non-leak leak.
As the warm moist bathroom air moves up and into a cold metal vent pipe, the moisture may condense. The condensation collects on the inside of the cold pipe. Gravity pulls the water down the pipe, and the dripping begins.
The cold drip of water that hit you on the head may have been part of your lovely warm shower just minutes ago. Condensation is a natural phenomenon and can happen even in warm weather.
Preventing the Non-Leak Leak
The easiest way to help alleviate the non-leak leak is to insulate the vent pipe. Wrapping the vent pipe with insulation will help prevent the condensation that occurs inside the pipe. Adding pipe insulation to a vent is relatively easy and straight forward.
Vent pipe insulation is available at most home improvement stores. The application is easy and usually only requires a utility knife and a roll of HVAC tape.
Repairing a Broken Vent Cap or Flashing
Should you find a broken or damaged vent cap, repair it as soon as possible. The same holds for a leaking vent cap flashing. Water inside your home in places not intended can lead to other, more expensive problems.
Repairing or replacing a broken vent cap of flashing is often a job best left to professionals. Several factors figure into this recommendation.
- The height of the roof. Many homeowners don’t have the proper equipment to deal with two or three-story roof structures.
- The slope of the roof can be a challenge. Extreme roof pitches require specialized support gear and equipment to work safely.
- The roofing material is a factor. The roofing material may require a trained roofing technician. Using a trained technician is critical if the roof is under warranty. Work by anyone other than a trained specialist may void the warranty.
- Local codes and ordinances may require permits and inspections for any work performed on the roof. Check with your local building and codes department for more information.
Do You Need Ducts or Vents Installation or Replacement?
Get free, zero-commitment quotes from pro contractors near you.
The Leak That Was
Investigating and diagnosing a leak in your bathroom vent is critical. Knowing the source of the leak and the problem is important to decide how to remedy the problem. Eliminating the leak prevents future costly damage and repairs and keeps your and your family safe.

Dennis is a retired firefighter with an extensive background in construction, home improvement, and remodeling. He worked in the trades part-time while serving as an active firefighter. On his retirement, he started a remodeling and home repair business, which he ran for several years.
More by Dennis Howard