What Is The Best Glue for Outdoor Carpets?
Outdoor carpeting can make for a perfect addition to sun porches and small patio spaces. The key to proper carpeting is to ensure that it has been adhered properly. Using an indoor-grade adhesive won’t hold up to exposure to the elements. This is why using an outdoor-grade carpet adhesive is so important.
The best flue for outdoor carpet is Robert’s 6700. This is followed by Weldwood all-weather carpet adhesive and Liquid Nails. Robert’s 6700 is non-flammable, solvent-free, and is specifically designed for carpet installation. Weldwood carpet is waterproof and provides strong adherence with no smell. Liquid Nails can be used for a variety of different outdoor carpet material.
Are you looking for carpet installers?
Get free, zero-commitment quotes from pro contractors near you.

Can Outdoor Carpet Get Wet?
When we think of carpeting, we tend to think of the plush indoor variety. While indoor and outdoor carpeting are similar in their aesthetic, there are major differences. The first is that indoor carpeting is not meant to hold up against constant exposure to the elements.
Outdoor carpet is constructed differently. First of all, it is typically UV stable. UV stable carpeting is built to stand up to constant exposure to the sun. Outdoor carpeting will wear down at a much slower rate than standard indoor carpeting would.
Outdoor carpeting is also resistant to mildew and mold and is generally water resistant as well. This means it can stand up to rain and snow with no issues of breaking down due to the moisture.
1. Liquid Nails
Liquid Nails is a brand of adhesive that has a strong initial grab, doesn’t stain, has little to no odor, and is water-resistant. The latter in particular is a must for any outdoor carpeting as it will get wet at some point.
Liquid Nails is great for urethan, rubber, and polypropylene-backed outdoor carpeting as well as artificial turf that is polypropylene-backed. If you plan on installing vinyl carpeting, do not use this adhesive. Liquid Nails will provide reliable, durable adherence that will last for a long time and have little noticeable impact visually.
2. Weldwood All-Weather Outdoor Carpet Adhesive
Another trusted name in outdoor carpet adhesives is Weldwood. This all-weather outdoor adhesive is great regardless of the region. There are some outdoor carpet adhesives that are only good in areas that don’t get a lot of rain and don’t face inclement weather on a regular basis.
Weldwood’s outdoor adhesive is solvent-based and provides durable, strong bonding for both artificial turf and outdoor carpeting. Provides an easy, strong initial adherence with little to no smell. It is also waterproof, holding up to even regular heavy rains with no problem.
3. Roberts 6700 Adhesive
Found at the Home Depot, Roberts 6700 adhesive was designed specifically for carpet installation, both indoor and outdoors. It is solvent-free, which helps to reduce health risks that can be caused by using solvent-based products. It also results in a lower overall environmental footprint, important in these times.
Roberts 6700 is also non-flammable. Using flammable adhesives not only run the risk of fire, they can also be a health risk by the fumes that they give off. This adhesive has a strong bonding agent that has little to no impact on health the way that solvent-based adhesives can.
Installing Carpeting on Concrete and Concrete Steps
Laying carpet on a flat, rectangular surface is generally pretty easy. It is when stairs and curves get introduced into the equation that things become more complicated. Stairs in particular can be quite difficult to accurately and evenly cover.
Thankfully, carpet can be laid over concrete steps over the course of a weekend. It is quite similar to laying vinyl flooring, so having done that will give you the experience that you need to lay carpeting outdoors.
Step One: Patch Up the Concrete
Newer concrete installations won’t have this problem, meaning you can probably skip this step. But older concrete steps can be missing pieces and will need to be repaired before any carpet installation can be performed.
Mix up a batch of concrete according to manufacturer specifications and patch up any major cracks or holes, allowing enough time to dry before moving on to carpet installation. This is to not only provide a cleaner aesthetic, but to provide a completely flat, even surface for the carpet to adhere to. Stepping on a hole that has been covered with carpet can potentially lead to injury.
Step Two: Smooth Out the Concrete and Spread the Adhesive
Equip any safety equipment that you have, primarily glasses. Using a grinder, smooth out the high spots that will be created during the patching process. Again, the carpet needs to have a level surface to adhere to and the high spots can create unsightly lumps that are ugly and can become a tripping hazard.
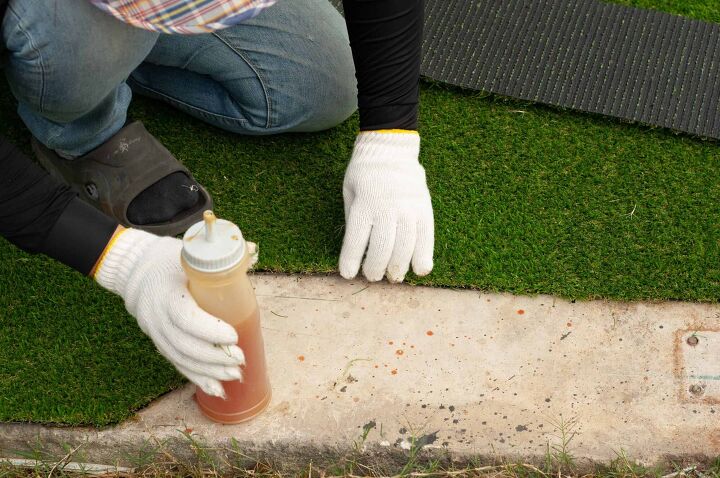
When you are satisfied with the levelness of the steps, it is time to spread the outdoor adhesive. Spread it on the molded edges and treads of the steps. Do this using a notched spreader to get even coverage of the adhesive.
Step Three: Aligning the Edges
When the adhesive has been laid out, use the edge of the carpet to line up with one side and the back of the step. Carefully unroll the carpet over top of the adhesive and use your hand to smooth it out. When smoothing, start from the middle of the step and work out to the edges. This is a great way to take any pockets of air out from underneath.
Next, fold the carpet over the molded edges (if there are any) at the front of the step. If the carpet extends too far, use a utility knife to trim it down. When you are comfortable with the size of the swatch, press the carpet down onto the adhesive that is on the front edge of the step.
Step Four: Trimming
When the carpet has been laid down, make sure to trim the carpet so that it matches up with the width of the tread. If you feel comfortable doing this, a utility knife is all that is required. When in doubt, use a straight edge to get a clean cut.
When the trimming process has been finished, wipe down any extra adhesive that could have spilled out from the edges. You’ll need to get an adhesive solvent that is made specifically to clean up extra, unwanted adhesive.
After Installation Tips
Once you’ve finished installing your carpeting using the outdoor adhesive, you want to ensure that you allow for ample drying time. For best results, restrict foot traffic and moving any heavy objects for at least 24 hours. Also, avoid any exposure to water until the glue has cured. It will usually take between three and five days for the outdoor adhesive cure completely. However, if the maintained temperature while drying is lower than 56 degrees Fahrenheit, a longer curing time is required.
In regards to clean up, warm soapy water can be used to clean wet adhesive off of flooring and tools. If the adhesive has already dried, follow the steps outlined below.
Removing the Old Carpet Glue
If you are in the process of replacing old outdoor carpeting, that facilitates the need to remove the old carpet adhesive. Using a utility knife, cut through the carpet. You’ll want to form a few strips that are a couple feet wide.
Loosening the adhesive involves whacking at the edges with something sharp, typically a scraper though the more inventive among us can use a shovel or angled flat edge. Generally speaking, getting enough of the adhesive up allows for ample grip and can allow for pulling up the adhesive and strip of carpeting all in one move.
Make sure to clean up any small pieces of adhesive that may remain. A scraper can be enough to get the job done but a solvent may be needed to get up the most stubborn pieces. Ensure that every bit of the old adhesive has been removed to create a level, flat surface for the new adhesive and carpet to be laid.
Are you looking for carpet installers?
Get free, zero-commitment quotes from pro contractors near you.
Other Options for Securing Outdoor Carpet
Adhesives intended for use on outdoor carpet aren’t the only method for keeping these materials in place. Here are some alternatives for securing outdoor carpet and rugs:
- Potted Plants: This option works great as a less abrasive, temporary solution and allows you to move the carpet around when needed. Simply take a few large potted plants and arrange thing around the carpeting. You can also supplement with heavy pieces of furniture.
- Furniture Weights: One of the best ways to anchor an outdoor rug is to position the legs of your furniture on the carpet at all times. If your furniture isn’t heavy enough, you can try using furniture weights.
- Woven Mats: Woven sea grass mats are more robust, heavier, and may protect against winds better than a traditional outdoor rug. The weight of them is often enough to secure them in place.
- Carpet Pads: No-slip carpet pads can be found at most home improvement stores and work great on both concrete and wooden surfaces. They will also hold up to extremely cold and extremely hot temperatures.
Whether you choose to use an outdoor adhesive, carpet pads, potted plants, or furniture weights, there are a number of different ways to keep your outdoor carpet in place all year round.

Ryan Womeldorf has more than a decade of experience writing. He loves to blog about construction, plumbing, and other home topics. Ryan also loves hockey and a lifelong Buffalo sports fan.
More by Ryan Womeldorf


![10 Best Scroll Saws for 2022 [Ultimate Reviews & Buyer's Guide]](https://cdn-fastly.upgradedhome.com/media/2023/07/31/9070684/10-best-scroll-saws-for-2022-ultimate-reviews-buyer-s-guide.jpg?size=350x220)

![How Much Weight Can a 4×4 Support Horizontally? [It Depends!]](https://cdn-fastly.upgradedhome.com/media/2023/07/31/9070333/how-much-weight-can-a-44-support-horizontally-it-depends.jpg?size=350x220)