


What Is PVA Glue And What Type Is Best For Your Project?
Glue, or adhesives, are essential in our homes and workshops. From repairing a small trinket or keepsake to building a fine piece of furniture, we use glues. Glues a so commonplace that we often overlook their importance in our everyday life. PVA is a class of glues that we take for granted. So, just what is PVA glue?
PVA, or polyvinyl acetate, comes from the polyvinyl ester family of chemicals and is a thermoplastic. PVA was discovered in 1912 and has become one of the most widely used glue types in the world. PVA glue is made by polymerizing vinyl alcohol.
You may not recognize the terms polyvinyl acetate or PVA. However, the chances are that you have one or two bottles of PVA glue in your home or shop. PVA glue uses vary and range from school, home, and hobby to industrial applications on huge scales.
PVA Glues – The Branches of the Family
Since the discovery of PVA glue, chemists have continued to tinker with the formula. The result of the tinkering is different PVA glues with slightly different characteristics. These differing characteristics allow joining different materials with the PVA glue.
Normal PVA Glue – White School Glue
White PVA school glue is known to almost anyone in the US. White PVA glue is a staple in elementary school classrooms and sells under various brand names, most commonly as Elmer’s glue.
White PVA glue is popular for several reasons.
- Non-toxic
- Washable
- Easy to use
- Inexpensive and readily available
However, there are some considerations for your project to make before using white PVA glue.
- White PVA glue is not waterproof and will be affected by humidity
- White PVA glue will deteriorate with age, turn yellow and become brittle
Despite these drawbacks, white PVA glue has its place and its uses.
Aliphatic PVA Glue – Yellow or Carpenters Glue
Technically, aliphatic PVA glue and white PVA glue are chemically the same polyvinyl acetate materials. The addition of additives to the basic PVA glue increases its resistance to humidity and give greater holding power.
Aliphatic glues, because of the extra additives, tend to be dry harder than white PVA glues. This extra hardness allows woodworkers to sand yellow glue joints without the clogging problems associated with white PVA glue. Hence, yellow PVA glues are known as carpenters glue.
Cross-Linking PVA Glue – Water Resistance When You Need It
This PVA glue version is highly resistant to water, making this form of PVA glue suitable for long term outdoor use. Also, cross-linking PVA glue is more resistant to heat than other PVA forms.
Cross-linking PVA glue, like Gorilla Wood Glue, is suited to sanding without clogging the sandpaper, making it an excellent woodworking choice. When building windows and doors exposed to weather extremes, cross-linking PVA glue is a great choice.
Why Use PVA Glues – The Who, Where, and What
PVA glues have characteristics that make them ideal for many different applications where materials need to be joined or rejoined together. Understanding these characteristics of PVA glues will help you decide which type of PVA glue is best for your project.
Porosity is a Key – Making Better Bonds
PVA glues work better on porous materials to allow the PVA glue to soak into the material. As the glue dries, the glue forms a much tighter and stronger bond between the two parts glued together.
This property works best on materials such a wood, paper, cardboard, or cloth.
Solubility and Use
PVA glues are water-soluble. This property gives you some advantages when using PVA glues. Many carpenters and hobbyists know that adding a bit of water to their PVA glue helps create thin, even coats.
Thin, even coats of glue mean less squeeze-out, better overall contact, and consequently, easier clean up when the glue has set.
The downside of water solubility is permanence. PVA glues tend to dissolve when exposed to water after the glue joint has dried. Overcoming water solubility is best achieved by using a specialized formulation of PVA glue.
PH, Flexibility, and Paper
One of the most frequent uses of PVA glues is binding paper. One of the key issues in arts or preservation and archival of paper is pH. Paper doesn’t like acid. PVA glues are non-acidic, making them ideal for restoration and archival purposes.
PVA glues tend to remain flexible over long periods. Flexibility is a characteristic of PVA glues essential to the bookbinding industry.
Safe to Use
PVA glues are stable and relatively non-toxic. These glues do not emit any noxious fumes as they cure. The glue itself will not leach through the skin.
However, PVA glues are not ingestible. The upside is that PVA glue is neither visually appetizing, nor does it taste good. These characteristics work together to make PVA glues safe for kids.
Where Do You Commonly Find PVA Glues Used
PVA glues are everywhere. Some of the places that you encounter PVA glue may surprise you.
- Furniture manufacturing. – PVA glues reinforce most of the joints on your wood furniture. PVA glues, especially the yellow carpenter’s version, create tight bonds perfect for wood furniture. Manufacturers love the inexpensive cost of PVA glues and the easy cleanup these glues afford.
- Bookbinding and Archival Work – Bookbinding requires gules that won’t attack the paper’s integrity, remain flexible over many years, and is cheap to use. PVA glues fit all these bookbinding requirements.
- Packaging and Packing – Almost all the packaging used to protect products when shipping use PVA glues.
- Envelope adhesives – Every time you wet that adhesive strip on an envelope, you are prepping a PVA glue. Envelopes take advantage of the water-soluble characteristic of PVA glue. A thin layer of PVA glue re-dampened will again become sticky.
- Wallpaper adhesives – Most modern wallpaper adhesives are PVA based for the same reasons PVA glues are popular for bookbinding. The PVA glue is non-acidic and won’t attack the wallpaper.
What is the Best Way to Apply PVA Glue?
No matter the application, applying PVA glue uses the same methods. The steps to making a good PVA glue joint are not difficult.
Step 1 – Choose the Right PVA Glue
Before you begin your project, consider which PVA glue type is suitable for your use. Remember that white PVA glue will work almost anywhere but is not water-resistant, and some formulations may yellow over time and turn brittle.
The yellow carpenter’s versions of PVA glues are well suited to woodworking projects that will be used indoors and not exposed to weather or high humidity. Cross-linking PVA’s are best for outdoor projects where the highest level of water resistance is important.
Step 2 – Prepare Your Project
Any joint that you want to glue must be free of sawdust or other contaminants. The contact surface between the pieces you want to glue should be tight. If you are woodworking, wipe the joint area with a tack cloth. Keep the joint clean and dust-free while continuing to make the glue joint.
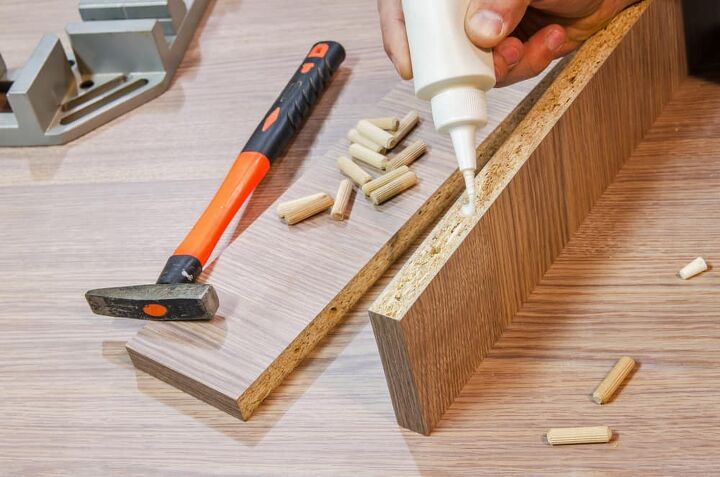
Step 3 – Apply the Glue to Both Sides of the Joint
Many people make the mistake of putting glue on only one side of the joint to be made. The second most common mistake is to make the glue too thick. Too much glue causes more problems down the road and can lead to a weaker joint.
Apply the PVA glues evenly to both sides of the joint. Apply the PVA glue in thin, even coats. Using a brush or plastic tool is the easiest way to get your PVA glue coats consistent and even.
Step 4 – Make up the Joint
Position the two pieces of work together. Don’t waste too much time. Thin coatings of glue dry quickly and will lose their ability to form a good bond. When making long joints, sliding the pieces back and forth a small amount can help even out the PVA glue and remove air bubbles.
Step 5 – Clamping is Required
No matter the glued material, it is important to keep the pieces held tightly together. Some clamp is essential to hold the glued surfaces together until the PVA glue can set and form the bond.
A rubber band is often a good option for holding the pieces together on small objects you repair. Tape is a good option for some small projects. Larger projects usually require some form of a mechanical clamp. C-clamps, bar clamps, and carpenters clamps are all useful on larger PVA glue joints
Step 6 – Allow the Glue to Form the Bond
Consult the glue instructions to determine how much time is required for the glued joint to bond together. There may be instructions on the minimum temperature and humidity required for a proper glue joint to form. Follow these instructions carefully to ensure the best PVA glue joint.
Step 7 – Clean up
Once the glue joint has cured, it is time to clean up the project. On wood projects, sanding is the usual means of removing any residual glue that may remain on the joint’s surface. On harder materials such as glass or ceramics, carefully scrape away excess glue with a razor blade.
PVA Glues – You Knew More Than You Thought
More than likely, you knew more about PVA glues than you thought. Most of us have been using PVA glues since we were children without ever understanding the technical terms. We hope that the information in this article helps you with your projects as you use PVA glues.

Dennis is a retired firefighter with an extensive background in construction, home improvement, and remodeling. He worked in the trades part-time while serving as an active firefighter. On his retirement, he started a remodeling and home repair business, which he ran for several years.
More by Dennis Howard


![10 Best Cordless Leaf Blowers – [2022 Reviews & Ultimate Guide]](https://cdn-fastly.upgradedhome.com/media/2023/07/31/9070789/10-best-cordless-leaf-blowers-2022-reviews-ultimate-guide.jpg?size=350x220)


