Split Jamb Vs. Flat Jamb: Which One Is Right For Your Project?
To the uninitiated, a door jamb is just a door jamb. There isn’t much difference, right? Wrong. There are two primary kinds of door jamb: a split and a flat. Knowing the difference between the two can ensure that you install the proper kind.
Flat jambs sit flush against the frame. Split jambs are best for situations where the rough frame is actually wider than what a standard opening would be. These jambs are split in half and the trim casing is actually already attached to the edges of the jab so there is no mitering required.
Do You Need a Window and Door Contractor?
Get free, zero-commitment quotes from pro contractors near you.

What is the Major Difference Between the Two?
There are some that feel as though flat jambs are more structurally secure. Also known as solid jambs, they are meant to take on more weight and hold up to that weight for longer periods of time. Split jambs can’t quite stand up to the same level of weight.
Split jambs make for a cheaper option, particularly if the rough frame is wider than the opening would normally be. For heavy-duty doors, however, a solid jamb is likely the way to go.
Installing a Solid Door Jamb
First, you need to be certain that you are matching up to the existing jambs as well as any decorative molding that is in the rest of the room. When matching, make sure that you measure the pieces necessary and transfer the dimensions to whatever area you are working on.
Next, measure the doorway that you plan to work on. Do this before you cut the plinth blocks, door jambs, and any other decorative moldings.
Cut Your Pieces to Size and Install the Jambs
Make sure that you get the straightest possible cuts. Use a table saw and make sure that the cutting fence is in place when making all but your shortest cuts. For the decorative pieces, you may need a miter saw so keep that in mind.
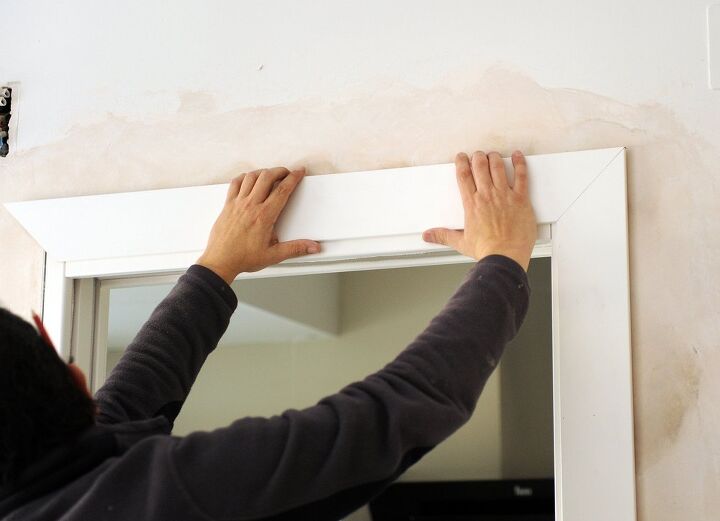
Next, it’s time to install your door jambs. Make sure the framing is as level as it can be and then place the side jamb in a vertical fashion on the right side of the doorway; it can rest on the floor. Make sure that you use 2-inch finishing nails to nail the jamb into the frame; make sure that it is flush to the walls when you do so.
When you finish doing that, move to the other side and repeat. Finally, you will nail in the header jamb piece. Make sure that all three pieces are as flush as they can be to both the frame and each other.
Securing the Plinth Blocks and Putting in the Trim
The next step is to secure the plinth block. This is traditionally used as an architectural element. It is meant to serve as a foundation at the intersection between the vertical casing and the baseboard. Cut back the baseboard the width of your plinth block.
When this is done, set the plinth blocks in and nail them at the bottom of your casing trim. After that, you will nail up the casing trim on the outside. These are usually a bit narrower than the actual plinth block and should reveal around ¼ inch of the side jamb.
Match up the top casing and the other side of the doorway and then nail it all into place. Make sure that everything is sitting flush and even; it is not ideal to have to pry nails and replace them.
The Final Steps
The next step in the process is measuring the distance between your decorative moldings on the other doors so that you can get an accurate placement on your new one. For any kind of angling, you’ll need to use a miter saw to get as accurate a cut as you can.
When you have cut your decorative pieces, you can begin nailing them up. Use a small putty knife and some wood filler as well as paintable caulk to fill in all those exposed joint lines or nail holes that you may have.
Lastly, you just need to sand, paint and prime. Make sure that you use a high-quality primer and give it ample time to dry. This will ensure the cleanest look possible.
Installing Split Door Jambs
The first thing that you need to do is determine which door you want and how it will swing (left or right). This will usually come down to which hand is your dominant hand. If you are right-handed, you want the knob on your right whenever the door opens to you. If you are left-hand dominant, switch it up. This can be great for bi-fold doors, too.
Then come time to plumb and square the opening. Make sure that the threshold of your door is completely level before moving forward. Whichever side of the opening has the hinge should be plumb and the corners of the opening should be absolutely square.
Place the Door into the Opening and Secure the Shims
It is important that you have help for this step in the process. In fact, have help if you can for any DIY project. Most doors are pretty heavy; lifting them on your own can be awkward. This can mean that you don’t get a proper installation and can also be quite dangerous should you drop the door.
Have that partner help you lift the door and center it into the opening. Make sure that you insert the bottom of the door first and then you can lift the top half of the door into place. Make sure that you seal your door with moisture penetrant if you are planning on painting or staining the door after its installation.
Now comes time to install the shims. Work from the inside, leaving the door open. Make sure that you block in and shim your jambs at the locations of the hinges using 8D finishing nails. If you have more hinges than a normal door, you’ll have to use more shims. Just a good rule of thumb to have.
As you go, check to make sure that the door is still plumb and perfectly square adjusting the shims as you go. Repeat these steps when you get the side of the door that has the lock, continuously checking for levelness as you go.
Nailing and Securing the Frame
Start six inches below the top of the frame and use 8d finishing nails. Make sure that the nails penetrate through the shim and jam, ensuring that the frame is square throughout. Move down to the bottom of the frame and put a third nail six inches from the bottom of your frame.
Repeat these actions on the lock side of your door frame. Make sure that you use a shim behind each nail. Trim them using a knife when you’re finished nailing everything into place.
Lastly, you can slide the second part of your frame into its final place. Again, make sure to nail through the jamb stop and make sure that everything is secure. You can secure them to the wall itself by using a pair of side-by-side nails every foot or so, starting from the top and moving down.
Do You Need a Window and Door Contractor?
Get free, zero-commitment quotes from pro contractors near you.
Finishing Up
Whichever option you choose, the key is to make sure that everything is properly secured and that it is sitting as level as it can. A crooked door is not only an eyesore, but it can prevent proper securing of the various elements of the frame and door.
Follow these step-by-step guides and you will be able to install either door in no time at all.
Related Guides

Ryan Womeldorf has more than a decade of experience writing. He loves to blog about construction, plumbing, and other home topics. Ryan also loves hockey and a lifelong Buffalo sports fan.
More by Ryan Womeldorf