How To Remove The Ice Dispenser Cover On A Kenmore Refrigerator
Kenmore is one of the most recognizable brands of kitchen appliances out there today. Their brand of refrigerators in particular are a fan favorite, earning the trust and admiration of consumers all around the world.
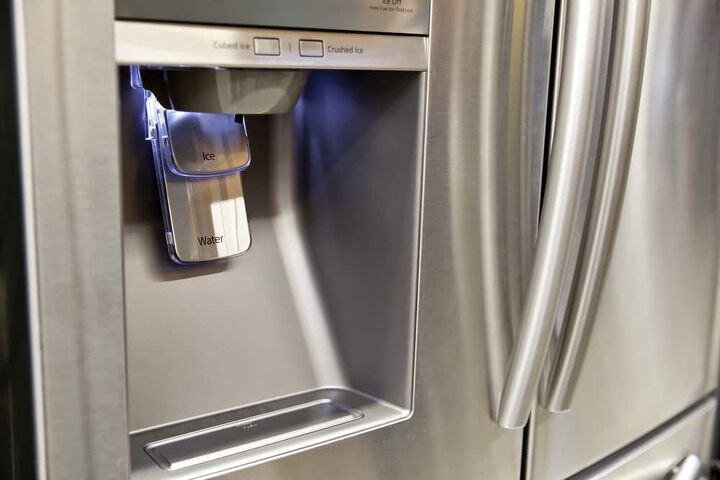
From time to time, you may need to get into the water fountain and ice dispenser assembly on the front of the refrigerator door. To do this, you will need to remove the front panel. The process is as simple as unplugging the fridge and prying off the panel. This step-by-step guide will show you how to get the job done.
Do You Need Appliance Repair Services?
Get free, zero-commitment quotes from pro contractors near you.

Why You Would Need to Get the Panel Off
You may be asking yourself why you would need to get the front cover off of your ice dispenser in the first place. There are a few different reasons that you or a technician may want to get behind that panel cover.
There are mounting screws right underneath the panel that allow for detaching of both the ice dispenser and the water fountain. That makes it much easier to clean the unit, extending its lifespan. Furthermore, that panel also holds the control panel assembly.
How to Remove Ice Dispenser Cover on a Kenmore Refrigerator
Step 1: Unplug the Refrigerator
Whenever you are attempting to do your own repair or maintenance on an appliance, think safety first. Always kill the power to the unit to start. The simplest way to do this is to pull the plug from the outlet.
If you want to really go above and beyond, you can go directly to the source. Cut the power to that breaker by going directly to your home’s breaker box. However you do it, remove the chance of electrical shock by turning off the power.
Step 2: Locate the Pry Notch and Pry
Now that you are ready to safely tackle the issue, it is time to look for the pry-notch. You can find the pry-notch on the underside of the plastic panel on Kenmore refrigerators. That pry-notch will give you the opportunity to pry off the panel without doing any damage.
All you need to do the job here is a flat-head screwdriver. Slide it into the notch and then use it to gently pry the panel away from the refrigerator. Work slowly around the entirety of the panel until it has been completely removed. Just make sure that you are careful to not scratch the panel as you work.
Step 3: Disconnecting the Control Panel Wire
With the panel off, you are free to perform the task that you set out to do. If you are working on the control panel, you can disconnect the control panel wire connector quite easily. All you need to do is squeeze the tab that is attached to the connector and gently pull it away from the wire harness attached to the refrigerator.
At the same time, you can take the control panel away from the refrigerator panel as well. Simply depress the tabs on the inside portion of the panel. You can also take the screws out depending on your model of Kenmore refrigerator, removing the panel when you are done.
Perform Regular Maintenance on Your Refrigerator
Any of the appliances in your home should be receiving regular maintenance. Regular maintenance allows you to stay ahead of potential issues in your appliance. Moreover, it is a great opportunity to keep the unit clean, avoiding common problems that a simple buildup of dust, dirt, and debris can bring on.
Clean after buying. It is also a good idea to clean out the water and ice dispenser on any fridge that you buy. During the initial setup, cleaning out the ice maker and water dispenser will rid the unit of any potential residue that may have been leftover from manufacturing. That can improve the taste initially and help familiarize you with the cleaning process going forward.
Clean on a regular basis. As part of the regular maintenance on your fridge, get in the habit of cleaning the dispenser on a fairly regular basis. A soft cloth and some mild detergent are all you need to get the job done. This will help to both clean and flush the system, preventing any bacteria or mold buildup in your system.
Shutting Down and Removing the Ice Dispenser/Ice Storage Bin in Your Kenmore Refrigerator
There are a few steps required to properly clean out your Kenmore refrigerator’s ice maker and dispenser. The process is relatively simple, but it can help to keep your refrigerator clean and free of bacteria and mold buildup.
- Kill the power. Safety first. Whenever you are doing maintenance or cleaning on an appliance, start by cutting the power to the machine.
- Turn off the ice machine. To properly clean the unit, you will have to turn the ice machine off and take out the storage bin. Depending on your model, there are two different styles of ice maker in Kenmore refrigerators. One will have a metal arm; you can raise it up to turn the ice maker off. Just take the front panel off of the ice maker, lift the arm up, and listen for a click. If there is no metal arm, there’s an on/off switch somewhere underneath the front panel.
- Remove the storage bin. Removing the ice storage bin is a little bit easier regardless of your model. Just lift it up and pull it out towards you. You should then be all set to clean the unit before returning it back into place.
Do You Need Appliance Repair Services?
Get free, zero-commitment quotes from pro contractors near you.
Cleaning the Ice Maker/Storage Bin in Your Kenmore Refrigerator
With both the ice maker shut down and the storage bin removed, you are ready to perform the cleaning aspect.
- Washing the bin. Use warm, soapy water to hand wash the storage bin. Make sure that you get any built-up residue on the surface of the bin. When you are done, dry it off with a hand towel or hand try; whatever your preference.
- Putting the bin back in. When you are putting the storage bin back into the dispenser, make sure that you push the bin all the way back in. The ice maker will not start if the storage bin is not seated properly. If your unit has the arm, lower it. If it has the on/off switch, initiate it to get the ice making cycle started again.
- Wiping the dispenser. You will need to soak a cloth in warm to hot water, wringing out all of the excess water before you start wiping things down. The freezing temperature inside can lead to your cloth potentially sticking otherwise.
- Extremely dirty ice makers. In the event that your ice maker is particularly dirty, you can unscrew it from the wall of the fridge. Use a cloth and/or a toothbrush to perform a more thorough cleaning. Just make sure you turn off the water supply before you pull out the ice maker or it can be quite messy.
How Do I Flush the Ice and Water Dispenser?
It isn’t a bad idea to clean the water and ice dispenser, too. The chute used to deliver the ice through the door of the refrigerator can be flushed out to effectively clean it. You can either unplug the refrigerator or lock the controls so that you can clean without activating the dispenser.
- Soap and water. Use soap and warm water on a cloth to wipe all of the surfaces down. For the tighter spots, a toothbrush should work just fine. Wipe everything down with a wet cloth, using a dry cloth to get all of the moisture up.
- Repeat on the other side of the chute. You will also need to clean the side that faces into the freezer when the refrigerator door is fully closed. Again, use warm, soapy water and a cloth or toothbrush to get into the crevices. With regular cleaning, this process should take less and less time to complete.
- Flush. Don’t forget to flush the water dispenser before you complete the cleaning process. Flushing the water dispenser should clear out any water that has been sitting in the unit during long periods of disuse.

Ryan Womeldorf has more than a decade of experience writing. He loves to blog about construction, plumbing, and other home topics. Ryan also loves hockey and a lifelong Buffalo sports fan.
More by Ryan Womeldorf