


Leaking Shower Valve Behind Wall? (Here's What You Can Do)
As homeowners, we are constantly on the lookout for issues. We want to be able to recognize them and implement a fix before they can potentially cause an issue. That means being on the lookout for a lot of different things.
If you notice leaking coming from behind the wall of your shower, it is a major red flag. You could be facing potentially higher water bills and even water damage that requires further repair. You may notice water dripping from the ceiling or pooling around the floor. It may even make its way up the walls. Water stains can also make the problem apparent.
Do You Need a Faucet, Fixture, or Pipe Repair or Replacement?
Get free, zero-commitment quotes from pro contractors near you.

What are the Signs of a Leak Behind the Shower Wall?
When there are leaks behind the scenes, particularly behind a will, it can be difficult to see. If you have an inkling something is wrong, you can at least explore the issue. But without the “evidence”, you may not know there is a problem to begin with.
1.) Dripping. One of the most obvious signs of leaking in your shower valve behind the wall is that there is either water on the floor or dripping from that wall. It is important to know that the spot where the leak is dripping is not necessarily indicative of where the leak is actually coming from.
- Water stains. When leaks are allowed to persist unchecked, they can begin to cause water damage where they permeate. Water stains can show up on ceilings, walls, and floors, starting small and growing in size as the leak persists.
- Sponge-like wall. Water damage can be major if the leak is left unchecked for long enough. If you notice that the tile on the shower wall is starting to feel sponge-like, that means it has been wet for a long time.
Any of these signs is an indication that something serious is wrong and needs to be remedied immediately to prevent further water damage.
How Do You Find the Exact Spot of the Leak?
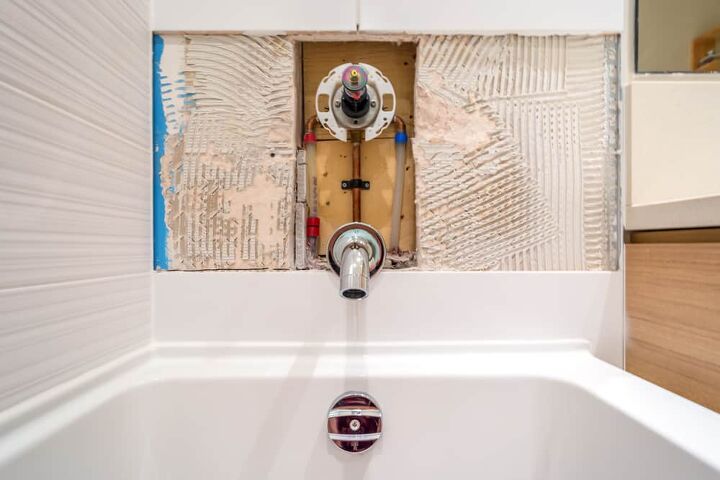
The problem with leaks behind your shower wall is that finding the exact location can be difficult. More often than not, the issue isn’t near the faucet even if it looks like it is. The best bet is to remove the shower plate. That will at least give you the kind of room that you need to explore the issue.
There are a couple of other things that you can do to find the source of the leak in your bathroom or shower wall.
Remove a portion of the wall. It may not be easy or pretty, but sometimes all you can do is remove a piece of the wall and hope that it helps in your search. It might seem like a pain, but it can be far less painful than the damage done by water.
Plumbing access panel. Depending on the age of your home, there may even be a plumbing access panel so that you can have more room to work with. It is generally located behind the shower wall and lets you inspect the pipes leading into your shower or tub.
How Much Damage Can a Leak Cause?
Water leaking from your shower and do serious damage to your bathroom and other areas of the home depending on the severity of the leak. Since most of the pipes into your home are found behind walls, that means the water can seep into the wall, causing serious issues.
When water is allowed to leak for too long, it can even start to turn the materials of the walls into a soft mush. With wood, it can even compromise the structural integrity of the wall and surrounding areas. And when water damage is evident, you will need to call in a professional plumber.
How to Find and Fix a Leak Behind a Shower Wall
Keep in mind that there generally is not an easy fix for something like this. Leaks are major issues and when they are hidden, it just makes the process that much more difficult. Still, there are a few steps that you can follow to correct the issue and limit the damage done by the leak.
Step 1: Look for the Signs
You can’t hope to implement a fix if you don’t know there’s a problem, right? If you notice evidence of a leak, do further investigating. It could be water stains or damage that makes things apparent. Maybe you notice that there is more water than usual when using the shower.
Whatever the case, do your best to determine whether there is an issue or not. If you are confident that there is a leak somewhere, then it comes time to find the leak.
Step 2: Find the Source
This is the toughest part of implementing a fix. When there are walls and other barriers in the way, it can be quite difficult to locate the source of the problem. There are two things to be done, as mentioned above: remove the shower plate or remove a portion of the wall.
If you’re lucky, you will have access to a panel that will allow for easier inspection. Should that be the case, simply remove the panel. Otherwise, you will likely need to implement the next step.
Step 3: Cut a Small Window
Don’t have an access panel and can’t find the source of the leak otherwise? You will need to cut an inspection window in the shower wall. If you have a stud finder, use it here. Locate the studs in the shower wall – most of them have studs on 16-inch centers.
Step 4: Check Behind the Wall
With leaking behind a wall, you should see water stains on things like the drywall, generally right around the source of the leak. Make sure that the stains aren’t from the bathtub drain by running a little bit of water in the tub and see if the tub drain is leaking.
Feel around the areas of the pipes as well. You may even notice a white/green color on certain kinds of pipes. This is due to oxidation as a result of water leaking on the outside of the pipe. It can be tougher to tell on pipes that aren’t copper.
Step 5: Run the Shower
Now that you have access behind the shower wall, the best course of action is to turn the shower on and see where the leak comes from. Leaks can happen in a number of places and it is important to narrow down the origin.
Though the issue could be in the pipes, namely around the joints, it can also originate from the shower arm and the shower valve as well. Being able to locate the source of the leak is the only way to get started on a permanent solution.
Step 6: Fix the Valve
Should you determine that the shower valve is the source of the issue, you will need to fix the valve to stop the leak. This can be a bit trickier than some of the other fixes out there. The good news is that most brands that make shower valves use a similar method when it comes to the installation.
It has a cold water in, hot water in, and a mixed water line that goes into the showerhead with another mixed water going into the tub. Some setups have a diverter valve that redirects water to the showerhead.
The simplest fix may be to turn the water off and replace the valve. If the body is the issue, the body will have to be cut out and replaced entirely. Just make sure that you cut the valve out far enough that you can piece it together when using a repair coupling.
Checking Your Shower Valves
Keep in mind that this is really only possible when performing renovations or repairing a current issue. Still, it may be worthwhile to take the time to get in behind your shower walls to inspect the pipes and the shower valve.
The valves, located where the knobs on your shower wall are, should be checked to see if they are in good condition. When valves start to go, you stare down the potential of a leak that may go unnoticed for longer than anyone would like.
A good sign that your valve is going bad, other than a leak, is when the temperature takes a while to warm up. Sure, it could be due to your water heater, but it is worth checking your shower valve when this happens.
Replacing the Shower Valves
When you determine that there is no other recourse than to replace the shower valves, there are a few options to be had for your new setup. The two main choices are thermostatic and pressure-balancing.
Pressure-balancing. This is the most common type of shower valve out there. They basically maintain constant temperature in the shower through the balancing of hot and cold water pipes. Basically, they adjust the flow where necessary in order to make sure that you don’t feel extreme changes in temperature.
Thermostatic. These are far less common. They do, however, offer a much greater degree of control when it comes to the balancing of your shower temperature. With this type of valve, you can set the temperature without the balancing act. Thermostatic uses materials that restrict and expand the flow of hot water to ensure that the water never gets too cold or hot.
Diverter or transfer valve. Depending on the kind of shower that you have, you may have to have a diverter or transfer valve installed. These change the flow of water and direct them to other fixtures like a shower head or hand-held shower head.
How Do You Tell if a Mixing Valve is Bad?
Mixing valves can be a valuable addition to any shower. But just like any of the other components in a shower, they can go bad from time to time. Being able to identify the issue can help you avoid issues and implement a fix sooner rather than later.
Should you notice the shower dripping even when completely turned off, it could be that the hot water mixing valve is going bad or doesn’t work at all. You may also notice that the ball of the mixing valve may not be seated properly, allowing the water to escape. In either event, consider replacing the mixing valve.
Do You Need a Faucet, Fixture, or Pipe Repair or Replacement?
Get free, zero-commitment quotes from pro contractors near you.
Who Makes the Best Shower Valves?
Part of the prevention of leaks in your shower valve is to purchase one of a higher quality. Those tend to wear down and break far less often than some cheaply-made shower valve. That said, there are a couple of brands that definitely stand above the rest.
Delta, Kohler, and Moen stand out among customers for their quality of shower valves. Reviews have been happy not only with the cost of these valves but their performance and durability as well. The great news is that they produce both pressure-balancing and thermostatic valves for superior selection and choice as well.
You may also find that getting a valve with a thermostat built-in makes for a more comfortable shower experience than ever before.

Ryan Womeldorf has more than a decade of experience writing. He loves to blog about construction, plumbing, and other home topics. Ryan also loves hockey and a lifelong Buffalo sports fan.
More by Ryan Womeldorf


![The 10 Best Table Saws - [2022 Reviews & Buyer's Guide]](https://cdn-fastly.upgradedhome.com/media/2023/07/31/9070645/the-10-best-table-saws-2022-reviews-buyer-s-guide.jpg?size=350x220)


![How To Reset A Whirlpool Cabrio Washer [In 5 Easy Steps!]](https://cdn-fastly.upgradedhome.com/media/2023/07/31/9076531/how-to-reset-a-whirlpool-cabrio-washer-in-5-easy-steps.jpg?size=350x220)


