


Lawnmower Primer Bulb Has Hole? (We Have A Fix)
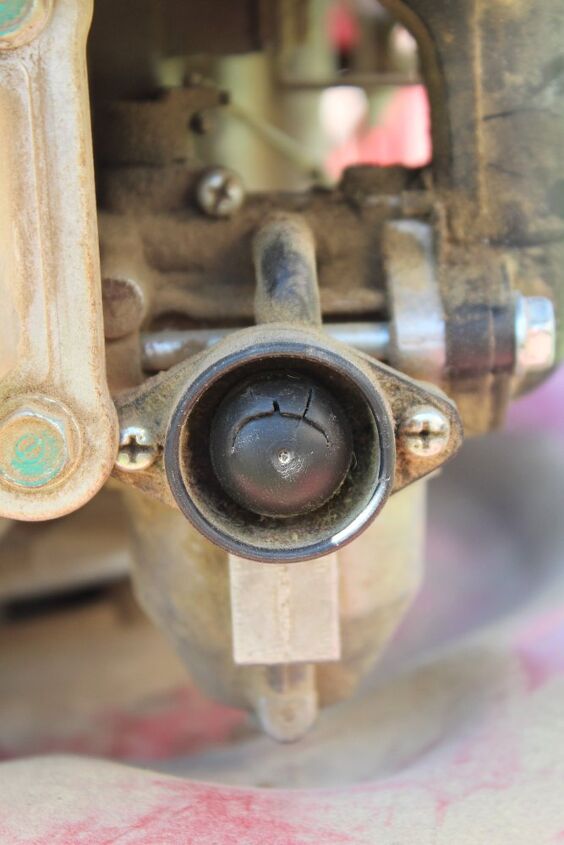
Primer bulbs are key components of most new gasoline lawnmower engines. The small plastic bulb plays a vital role in getting the fuel to the carburetor. You may notice that your lawnmower primer bulb has a hole.
There are two different styles of primers on newer gasoline-powered lawnmowers. Those with the primer bulb on the carburetor don’t have a vent hole. Those lawnmower engines that use an air vent system use a primer bulb with a vent hole. Air vent primers are usually not mounted on the carburetor.
Do You Need a Mower Repair Service?
Get free, zero-commitment quotes from pro contractors near you.

How To Replace a Worn Lawnmower Primer Bulb
It is not uncommon for unvented primer bulbs to develop a hole or crack after several seasons. Venter primer bulbs can also crack or become so soft they won’t return to the up position after being pressed. In either case, replacing a worn primer bulb is easily accomplished by following a few simple steps.
Step 1: Find the Replacement Bulb
Unfortunately, not all primer bulbs are created equal. You must make sure that you have the right primer bulb for your engine and carburetor. The best way to find the correct part is to check the owner’s manual that came with your lawnmower engine.
The user manual should have a complete parts list included. Check the parts listing and get the part number for the primer bulb. With this part number, you can be sure you are buying the correct primer bulb for your lawnmower engine.
Step 2: Empty the Gas Tank on your Mower
Since you will need to disconnect and reconnect the fuel line to the primer bulb, you must empty the fuel tank before you start. Otherwise, you risk a gasoline spill and a resulting fire. Be safe when you work.
Step 3: Gather Your Tools
A closer examination of your lawnmower engine and carburetor will give you a good idea of the tools you may need. Some primer bulbs stay in place with a pair of plastic spring tabs. The easiest way to remove and replace this type of bulb is with a pair of needle-nose pliers.
You may find that the primer bulb on your carburetor or mower is under a tension plate that is screwed down. Some manufacturers are now using Torx screwdrivers for these applications. In other cases, you will need the correct size Phillips screwdriver.
Removing the engine cowling and the carburetor is necessary to access the primer bulb and the fuel line connections on some lawnmowers’. An appropriately sized socket and driver make this task easier.
Step 4: Remove the Engine Cowling and the Starter Assembly
Remove the engine cowling and the starter assembly and lay them aside. We suggest that you use a magnetic parts bowl to hold the screws, nuts, and bolts. A magnetic parts bowl will keep all the small bits together and in one place.
Pay attention to the underside of the cowling where the starter coil engages the engine. There may be small cams or other parts that can shift or come loose.
Step 5: Remove the Air Cleaner
To get access to the carburetor, you must remove the air cleaner. On most small engines, the air cleaner assembly is held in place by a pair of screws on the inside bottom of the air cleaner housing. After you remover the air cleaner cover and the air cleaner, these screws should be visible and accessible.
Remove the air cleaner and set the entire assembly aside.
Step 6: Remove the Carburetor
There may be two to four screws or bolts holding the carburetor to the intake manifold. The number of bolts depends on the make and model of your lawnmower. Use the correct size wrench or socket to remove the bolts. Slide the carburetor from the intake manifold and carefully remove the fuel line.
Step 7: Remove the old Primer Bulb
You can now remove the old primer bulb. If the primer bulb on your engine has tabs, use the needle-nose pliers to squeeze the retaining tabs. You should be able to remove the old primer bulb.
On engines with a retaining plate around the primer bulb, remove the screws carefully to release the old primer bulb. There may be a small gasket under the primer bulb. You should remove the gasket as well and replace it with a new gasket.
Step 8: Install the new Primer Bulb
Make sure that the area where the new primer bulb will sit is clean. There should be no oil, dirt, or debris. Anything under the primer bulb seat can cause air leaks. Air leaks in the fuel system can cause your lawnmower engine to run poorly.
Reverse the steps you took to remove the old primer bulb to place the new primer bulb. Be careful not to damage the primer bulb or its housing. Tighten the screws on the retaining plate but done over tighten them to avoid damage.
Step 9: Re-assemble the Carburetor
Before you re-install the carburetor on the intake manifold, examine the gasket. Make sure that the gasket is intact and wasn’t damaged when you removed the carburetor. If there is any visible damage to the gasket, replace the old gasket.
Remember to put the fuel line back on the carburetor and the primer bulb before putting the carburetor back on the engine.
Step 10: Assemble the Air Cleaner
When you reinstall the carburetor on the intake manifold, you can re-assemble the air cleaner. Screw the housing of the air cleaner back to the carburetor. If there is a gasket between the air cleaner and the carburetor, examine it carefully. If there are any tears or damage to the gasket, use a new gasket.
This point is a good time to inspect the air filter on your lawnmower. If there is any question about the air cleaner’s age or condition, install a fresh, clean air filter in the air cleaner on your lawnmower.
Step 11: Re-install the Engine Cowling
Re-install the engine cowling and make sure that the starter assembly engages with the engine. The starter rope should pull freely.
What Does the Primer Bulb Do?
Primer bulbs with no hole and mounted on the carburetor pull fuel from the fuel tank and into the carburetor. The primer bulb is especially important if you routinely run the carburetor dry when you store your mower. The bowl on the carburetor will be dry, and the primer bulb fills the bowl.
The primer bulb does the same job on air-primer systems with a primer bulb with a hole. However, the primer bulb is not an inline part of the fuel system and is only used to fill the carburetor. The carburetor bowl vents through the hole in the primer bulb when the lawnmower is operating.
Lawnmower Starts but then Stops?
If your lawnmower will start but then dies, you probably have a problem with the fuel system or carburetor. There are several things you should suspect if this is the case.
- Cracked or leaking fuel lines
- Clogged air filter
- Clogged fuel filter
- A carburetor that needs adjusting
- A problem with the automatic throttle on the engine
- A clogged filter screen in the fuel tank
Check your lawnmower for any of these problems.
What is the Best Way to Start a Lawnmower?
The best way to start your lawnmower is by following the directions in the user’s manual that came with the mower. Different manufacturers have different steps for starting their lawnmowers. However, in general, you can start many lawnmowers using these steps.
Step 1: Make Sure the Area is Safe
Be sure that the area around and under your lawnmower is free of any objects that the mower might pick up and throw.
Step 2: Prime the Engine
Press the primer bulb the correct number of times. The number of presses can vary from 4 to 8 times. Follow the mower manufacturer’s directions exactly. Pressing the primer bulb too many times may overfill the carburetor and make the mower hard to start.
Step 3: Get in the Right Position
Where to stand depends a lot on your mower. Some mowers have the pull handle mounted on one side or the other. Many new mowers extend the pull rope to the handle so you can stand behind the mower.
Step 4: Pull the Rope
Pull the start rope smoothly. If your mower has a safety interlock, you may need to hold the interlock closed on the mower handle while pulling the starter rope. The engine should start after no more than two pulls.
Related Questions?
Under normal circumstances, gasoline should not leak out of your primer bulb. Even air primers that have a hole in the bulb should not leak gasoline. If you notice gasoline leaking from the primer bulb on your mower, shut the mower down and investigate the cause. Leaks from the primer bulb are a symptom of a bigger problem.
Do You Need a Mower Repair Service?
Get free, zero-commitment quotes from pro contractors near you.
A Hole or No Hole – It May Not Be a Problem
That hole you notice in your primer bulb may not be a problem. The hole may be an integral part of the function of your fuel system. In any case, a faulty primer bulb is not a major issue and is usually a quick and easy repair. We hope that the information and recommendations in this article help you resolve your lawnmower problems.

Dennis is a retired firefighter with an extensive background in construction, home improvement, and remodeling. He worked in the trades part-time while serving as an active firefighter. On his retirement, he started a remodeling and home repair business, which he ran for several years.
More by Dennis Howard


![How Much Weight Can a 4×4 Support Horizontally? [It Depends!]](https://cdn-fastly.upgradedhome.com/media/2023/07/31/9070333/how-much-weight-can-a-44-support-horizontally-it-depends.jpg?size=350x220)


![Standard Dining Room Table Dimensions [for 4, 6, 8, 10 and 12 People]](https://cdn-fastly.upgradedhome.com/media/2023/07/31/9074335/standard-dining-room-table-dimensions-for-4-6-8-10-and-12-people.jpg?size=350x220)

