How To Tighten A Kitchen Faucet Nut Under A Sink (Do This!)
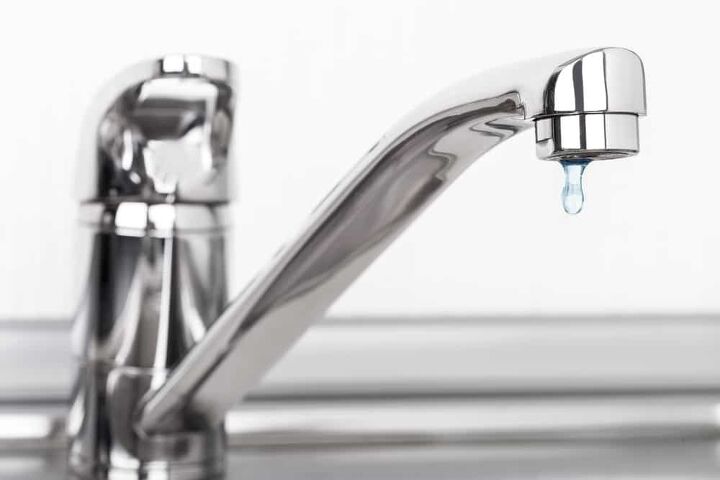
If you should notice a little bit of water leaking out from your faucet, don’t panic. The problem is actually a quite common one. Even better, the fix is a simple one that even the most amateur DIYer out there can handle.
The one caveat is that it requires accessing faucet nuts that are located under the sink. With a few handy tools, the process is simple. Just clear out the sink so you have room to work, adjust the faucet position, and tighten the nut. That’s all there is to it and you should notice that the water no longer leaks out from the loose faucet.
Want to learn more about what makes up a kitchen sink? Check out 36 Parts of a Kitchen Sink.
Do You Need a Faucet, Fixture, or Pipe Repair or Replacement?
Get free, zero-commitment quotes from pro contractors near you.

Why Is My Faucet Leaking?
To a total amateur, seeing water coming out of the base or handle of your faucet can be a scary proposition. The good news is that it is a fairly common issue. You likely will not have to replace the faucet or have a repairman out to handle the issue.
The leaking is more often than not due to a loose component. The nuts that hold the handle and the base in place can loosen over time. That is totally normal. Tightening the nuts is typically enough to get those components secured once again, taking away the avenue for water to leak out. You can also typically pinpoint the leaking to one specific area of the faucet, making it easier to identify the trouble spot.
How to Tighten A Kitchen Faucet Nut Under A Sink
Tools Needed
Before you can attempt to tackle the job at hand, you need the right tools. The good news is that you need just a trio of tools to do the job: a basin wrench, adjustable pliers, and a flashlight. The good news is that, even if you don’t have these tools, they can be had for cheap at your local home improvement store.
Keep these tools handy. Whether you face a leaking sink or not, those tools will likely come in handy at some point in time. Having them in your toolbox is highly recommended as they will no doubt be useful for small fixes here and there.
Headlamp. If you have a headlamp, all the better. When you are under the sink trying to work, it can be difficult to see. Having a flashlight may work just fine, but a headlamp will project light directly where you are looking.
Step 1: Clear Out the Space Beneath Your Sink
Since the solution requires getting underneath the sink, you will need to have space to work. If you are like most other people, underneath the sink can become cluttered with a variety of things. Garbage bags, cleaning supplies, and various miscellaneous items no doubt litter the cabinets.
Completely empty the space. Take the time to properly clear the space out. If you have a specific organizational tactic, arrange the items in a way that indicates how they were stored. Also, make sure to keep chemicals up and out of reach of any children or pets that may be in the home.
Do not leave anything underneath the sink. The space is restricted enough as it is. Give yourself as much space to work with as possible. Having more space means improved comfort and less distraction as you want to get the job done sooner rather than later.
Step 2: Adjust the Position of the Faucet
Depending on the design of your cabinets and sink, there may be a P-trap that blocks access. If that is the case, you will have to remove it. You can use your adjustable pliers to remove the nuts that hold the P-trap to the sink tailpiece and wall drain.
Adjust the faucet. When you have removed that piece, you should be finally able to access the nut. Use it to adjust the faucet so that it fits appropriately into place. Center it and make sure that it lines up well with the wall just behind it.
When you have the faucet well-fitted, secure the retaining nut beneath the sink. If you have someone that can help, all the better. They can hold the faucet steady while you tighten the nut. This is also where the headlamp will come in handy. It gets dark under the sink and proper lighting can make the job a lot easier.
Step 3: Tighten the Nut
You may be able to use your hands to tighten the nut, but don’t chance it. Even if the nut feels tight when using your hand, you likely will not be able to properly tighten the nut. That is where the basin wrench comes in handy.
Using the basin wrench. With the basin wrench handy, clamp it onto the jaw of the nuts. The elongated handle makes accessing tight areas like this much simpler. With a secure grip, turn the handle clockwise in order to tighten the nut.
Continue to tighten the nut until the faucet sits stationary and the kitchen night is completely tight. The key here is to not overtighten the nut. Nuts made of plastic can crack when they are overtightened. For metal nuts, overtightening can make it a gargantuan task to remove in the future.
Screws or hex bolts. If your sink’s faucet has screws or hex bolts instead, then a screwdriver with a longer handle will work just fine. A socket set is of great use when it comes to tightening bolts and will no doubt come in handy at some point in the future.
Do You Need a Faucet, Fixture, or Pipe Repair or Replacement?
Get free, zero-commitment quotes from pro contractors near you.
What Can Be Used as an Alternative to a Wrench?
That all sounds quite easy, right? But what if you don’t have the tools for the job on hand and don’t want to or can’t run out to the local home improvement store to pick one up? Don’t worry, that does not mean that you can’t get the job done.
There are more than a few alternatives around the house that can be used to get the job done. With a little ingenuity and creativity, you can use the following to tighten the bolts and get your faucet back in working order again.
Duct Tape
You would be surprised by the amount of applications that duct tape has. You may be even more surprised to learn that it can be quite useful when it comes to tightening the nuts on your kitchen’s faucet.
- Clear your space. Remember, having the proper space to work within is as important as anything else. In order for the duct tape to work, you need to have the proper space to apply it. That means maximizing the space beneath the sink so that you can have more room to maneuver your arms.
- Tear your strips. With the space cleared out, tear off your strips. You want to work with strips about a foot in length and make sure that you cut it in the center so you have two thin, 12-inch strips to work with. Stick one strip to the back of the other to create one really long, sturdy piece.
- Wrap around the nut. Take the strongest part of your new tape and wrap it around the faucet’s nut. Make sure that you leave a tail at the end of about 6-8 inches, pressing the tape firmly to ensure that it properly adheres to the nut.
- Pull the tail. Finally, pull on the tail of the duct tape in order to tighten the nut. When you are sure that the night can’t turn any further without overtightening it, you can remove the tape. Just test out the fixture to make sure that it is stable and no longer leaking before you put anything away.
Zip-ties and Coins
If you want to get truly MacGuyver-ish about it, you can get the job done with either a zip-tie or a couple of coins that are laying around the house. It may require a bit more effort than some of the other methods, but you can still get the job done.
Zip-ties. You may be surprised at the sheer number of things that can be secured using zip-ties. But they don’t stop at just tidying up cables or attaching hubcaps. All you need to do is position the zip-tie around the faucet’s nut and make it as tight as you can. Like the duct tape, you grab onto the tail of the zip-tie and pull. Keep pulling on the zip-tie until the nut feels secure.
Coins. If you are adamant about not heading to the store and don’t have anything listed above, then there is one last recourse: two coins. That’s right, a pair of coins (think quarter-sized) can come in handy far more often than you may realize.
All you have to do is position them on either side of the faucet nut. Then, using your index and middle fingers, put the coins between those knuckles. That is meant to give you enhanced grip as you turn. Then, twist the coins in the direction that will tighten the nuts. Keep turning until you can’t anymore and test the faucet to ensure that it is tight enough to stop the leaking.
More Related Guides

Ryan Womeldorf has more than a decade of experience writing. He loves to blog about construction, plumbing, and other home topics. Ryan also loves hockey and a lifelong Buffalo sports fan.
More by Ryan Womeldorf


![Finishing Basement Without Permit [Is It Really Illegal?]](https://cdn-fastly.upgradedhome.com/media/2023/07/31/9070078/finishing-basement-without-permit-is-it-really-illegal.jpg?size=350x220)
![10 Best Electric Pressure Washers – [2022 Reviews & Guide]](https://cdn-fastly.upgradedhome.com/media/2023/07/31/9070600/10-best-electric-pressure-washers-2022-reviews-guide.jpg?size=350x220)