How To Swage Wire Rope Without A Tool (Step-by-Step Guide)

When it comes to swaging wire rope, you commonly use a crimping tool to keep the cord from moving. But crimping tools can be upwards of $40, which is a hefty sum to invest when you only plan on using it for one project. Thankfully, this guide will help you understand how to swage wire without any special tools.
Because the entire purpose of a swaging tool involves applying pressure, you can use a hammer. Run the wire through two ends of your aluminum sleeve and hammer them down. Test the wire by pulling on it to see it can quickly come out of the sleeve. If it is firmly inside, you have successfully swaged wire without any unique tool.
While a hammer provides you with a quick and dirty option, there are a couple of details we can apply here to make sure you have a good appearance. We will also be going through some other techniques you can use to swage wire.
Do You Need Handyman Services?
Get free, zero-commitment quotes from pro contractors near you.

A Step-By-Step Guide On How To Swage Your Wire
- Measure and feed your wire through the metal sleeves
- Use a set of pliers or a hammer to press down the sleeves
- Pull the wires to test them
Step One: Measure And Feed Your Wire Through The Metal Sleeves
The metal sleeves of your wire, otherwise known as ferrules, will have one wire fed through one end of them. After this, form your wire into a small loop and feed them into the other end of your ferrule. Measure the section of wire beyond the ferrule to be sure that it matches on both ends. It would be best if you were sure that whatever you hook onto this loop can fit through it.
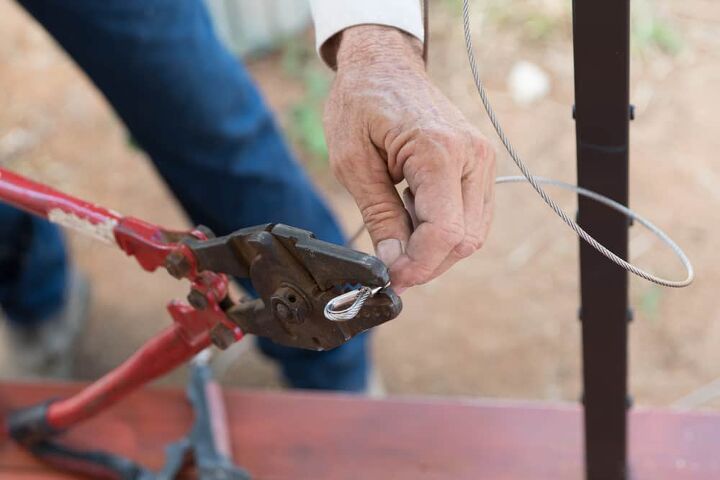
Step Two: Use A Set Of Pliers Or A Hammer To Press Down The Sleeves
You can press down smaller wire gauges or ferrules using a hammer or a set of pliers. Hammer the ferrules down on a metallic surface that you are willing to damage. Otherwise, use pliers to apply as much pressure as possible so the ferrules will grip the wire. Pliers will result in a higher-quality finish.
Step Three: Pull The Wires To Test Them
Finally, use your body weight to pull on the wires to test them. If your wire ropes feel snug and do not budge, you have swaged wire without any special tools.
Given that this process is somewhat brutal, you may find that the ferrule’s quality standards are not meeting your needs. If this is the case, you are going to need to purchase a hand swaging tool. We will detail some short steps on how to use this tool below.
How To Use A Hand Swage Tool Or Pliers?
A hand swage tool may set you back $30, but it is still a handy thing to have around the house. These instructions can also apply to most pliers when swaging your wire rope.
- Slip the wire through the ferrule: Your first step is to slip the wire through the ferrule. Ferrules are typically two-pronged aluminum sleeves that are very light. Slip it back through the sleeve so that you have a loop that fits your needs. Measure to be sure you have the amount of wire you need.
- Move the hand swage tool or pliers over the ferrule: Before clamping, move the pliers or hand swage tool until it is over the ferrule. You can do this easily by avoiding the section with the loop, as you don’t want to bump into anything.
- Clamp-on the ferrule until it feels firm: Squeeze down on the clamp until it feels firm. This process will require multiple presses, as you want to be sure to have a firm grasp on your wire. Test the wire out by pulling on it before putting it to use.
What If The Wire Rope Is Too Thick For Standard Pliers?
If the wire rope hits a specific thickness, you won’t be able to use a hammer method to make it firm. This limit is in place because thicker wire rope is typically load bearing. Load bearing wires require very firm grips, which are best handled by a swaging tool.
If you plan on creating a small number of load-bearing wire ropes, your other choice is to use wire rope clips. Wire rope clips are sturdy and relatively easy to handle. Also, they support a good deal of thickness options, and you don’t have to worry about buying any special tools to clip them down.
How To Make A DIY Swaging Tool That Can Handle Heavy-Duty Projects
If you want to make a DIY swaging tool that can handle big projects, you can do this by drilling a hole directly in the center of a thick piece of metal. You will need a power drill to do this and a lot of patience.
Measure out the hole depending on the size of your crimping project. Because it would be a waste to do so with smaller gaps, you should limit this to a 1/4” or more extensive project.
After you drill the hole through this thick piece of metal, cut it directly in half. You will want to place either side of this DIY swaging tool on a large vice grip. Twist the vice grip until it is firm enough to squeeze your wire down in an even fashion. Doing this will give your swaging a great deal of firmness while also ensuring a high-quality appearance.
Where Can I Rent A Swaging Tool?
If the DIY project sounds like too much work, you can stick to renting a swaging tool. Any hardware store will have access to swaging tools, but only some of them will allow you to rent them. Call ahead to be sure they have the availability for rentals. Below are a few good examples of where you see these rentals.
- Home Depot
- Lowes
- Tool rental companies
When Do I Need An Electric Swaging Tool?
An electric swaging tool is for incredibly heavy-duty projects. This type of swaging tool involves creating rope wires that carry heavy freight materials. You may see one of these at a warehouse that has a well-funded maintenance department.
Buying an electric swaging tool for residential applications is a colossal waste of money. If you rent the device, that would make it far more useful to you. Most standard applications can use a manual swaging tool with relative ease.
Also, electronic swaging tools come with a series of dies. A “die” in this case refers to different cable width allowances. The owner’s manual will contain information on what number die refers to the width of your cable.
How Do You Use An Electric (Hydraulic) Swaging Tool?
- Determine the right die for your wire rope: You can determine the correct die for your wire rope by knowing its width. You can find the right die by referencing the owner’s manual. Determine the width of your wire rope at the time of purchase.
- Bend the wire rope through your ferrule: Place your wire rope at one end of the ferrule. Feed it through until you have the right amount of length, measuring as needed. Be sure you have it right the first time, as it is nearly impossible to undo.
- Slip the hydraulic swaging tool over the ferrule: Carefully move the swaging tool over the ferrule. Be careful not to nudge anything in the process. You can do this easily by avoiding the side with the curl entirely. Be sure that you are firmly on the wire before moving onto the final step.
- Crank the hydraulic swaging tool until done: Using the hand crank, crank the hydraulic arm until you cannot crank it anymore. This process produces much more firmness than a hand tool. It will ensure that your wire rope will not move.
What Is Swaging?
Swaging is when a single length of wire rope is in a different shape. This shaping of the wire is precise, with a circular end to hang from other items. You can do this with an aluminum fitting, otherwise known as a sleeve. This form of swaging is specific to securing wire rope. Different types of swaging do not apply to adjusting wire rope. Swaging is also confused with crimping.
Do You Need Handyman Services?
Get free, zero-commitment quotes from pro contractors near you.
Swaging vs. Crimping – What Is The Difference?
In swaging, the wire is bent with a series of rapid blows. That is why swaging can be done with a series of blows onto an aluminum sleeve with a hammer. Swaging is also often used in larger applications, with many electric swaging tools able to handle massive wire rope diameters.
You can do crimping with smaller applications, such as thin non-metal wires. As a result, crimping is not appropriate to create thick load-bearing cables. Instead, crimping is a technique used by electricians to sort metal wires.
The distinction is essential when you are looking for tools. A swaging tool is incredibly different when compared to a crimping tool. Also, you can crimp with small pliers. While there are hand tools for both, be sure to think about how you use it. Small electric wires are typically for crimping; large metal wire rope generally is for swaging.
I'm a guy who becomes the expert of whatever I stumble upon, writing-wise. I've written tons about cool home products, home improvement, and smart technology in the home. I'm also the proud father of a kiddo born on new years, making my holidays very busy.
More by Eli Smith