How To Run A Conduit Through An Exterior Wall (Do This!)

You will need to run wires through your exterior walls every once in a while. It’s a great way to add wiring to the garage or workshop. You can quickly run these wires through a conduit; however, not everyone knows exactly how to do this. So, how do you run a conduit through an exterior wall?
You will first need to drill a hole in your wall using the right size of drill bit. Then, you will slide the conduit through the wall after you cut and bend it. After, you will need to add some conduit supports, pull the conduit through, and then seal the gaps with caulk.
This guide will assist you in a step by step manner for running conduit through an exterior wall. We have all the information you need to know so that you’re not left with missing steps or unanswered questions. Let’s get to it!
Do You Need to Hire an Electrician?
Get free, zero-commitment quotes from pro contractors near you.

How To Run Conduit Through An Exterior Wall
By knowing how to run conduit through an exterior wall, there won’t be exposed wires running along walls to ruin the exterior of the house. PVC conduits are best for putting underground because they are corrosion resistant. They often come in a gray color so that people can differentiate between an electric line and a water line.
There are metal conduits that will shield circuits from electromagnetic interference. If you need to pull 3 or 4 wires, you will need a PVC conduit that is at least 1/2 inch. You might need to add wires in the future. So, it’s a good idea to use a larger one.
You will need to mark the area you want to use the conduit. After marking, measure the length of the EMT or PVC conduit that you will need. Below is a step-by-step guide to install a conduit through your exterior wall.
Steps To Run Conduit Through An Exterior Wall
We’ve included steps for you to follow to make this process easier. It’s not a difficult job, but it can be overwhelming. By taking it step by step, it will help to take the overwhelm out and put the ease in.
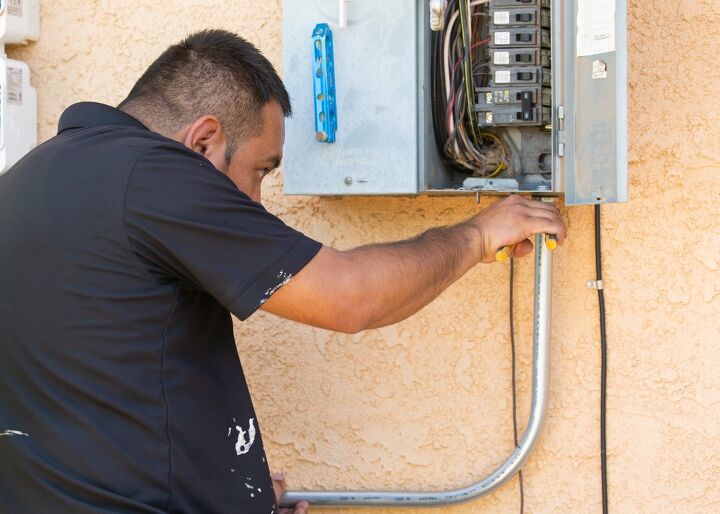
Step 1: Drill A Hole
First, drill a hole in the wall. You will need to choose the right size of the drill bit. The hole size should be able to hold the conduit. Check the side of the conduit and compare it to the size of the drill bit. If you drill the hole a little too thick, that’s fine as you will caulk it later anyway.
Step 2: Cut And Bend The Conduit (EMT, PVC & Metal)
- For the EMT conduit and non-flexible conduit, you will need to bend it with a bender. Without a bender, you can use fittings with 90- and 45-degree angles that will connect the straight sections of the conduit. For 90-degree bends, an easy solution is to use a pulling ell. It has a removable cover that you will use to bend the wires around the corner.
- For PVC conduit, you can use a propane torch to heat the pipe to bend it to the angle that you need. It will hold the shape once it is cooled. After taking the measurement, measure the conduit, and cut it accordingly. Clamp down the conduit on a workbench. Use a hacksaw. If you do not have a hacksaw to cut PVC conduit, check out this article.
- For thick metal conduit, a circular saw will make the cut smoother. Conduits need smooth insides with no sharp edges for easy pull-through action that won’t ruin conductors. So, use the blade of a screwdriver to smooth-out the inside edge of the cut end. Next, use slip-joint pliers on the outside of the cut end to remove any sharp edges.
Step 3: Slide The Conduit Through The Hole
Now you will slide the conduit through the hole in the wall. You likely need an ell puller. The ‘L’ or “el” stands for the 90-degree bend. The second letter refers to the direction of the exit point. Check that there is enough space for the conduit in the drilled hole of the outside wall.
Before sliding the conduit through the wall, make sure that there is no presence of water. Remember to add a GFCI breaker if the wires will be near water. The L fitting will help you turn the wires around at a 90-degree angle inside the conduit. The back part of the L fitting will be removable so that you can pull wires in or out easily. Attach the conduit with its L fitting. If working with PVC, you can use PVC glue.
Using A Conduit Connector
You may use a conduit connector for solid attachment to the wall and ground connection. Be sure to really tighten the nuts onto the box connector. If you’re using an existing electrical box to run the conduit, you will need a box extension. For a single gang box, use a 4-inch square box. Use an offset fitting for where the conduit enters the box.
Step 4: Add Conduit Supports
For conduit running along the wall, you will need to support it with conduit hangers—measure 3 feet from the first hanger box. Then, the next hangers will be 10 feet apart. Measure and mark where the hangers will be. Conduit hangers can be attached with a screw. You will need drywall anchors for areas that do not have a solid attachment.
Step 5: Pull The Wire Through The Conduit
You can use fish tape to pull the wire all the way through the conduit. The removable lid of the L fitting will help you turn the wire around the corner. Now the conduit, its connectors, and wires are slipped through the hole in the wall.
Step 6: Seal Wall Gaps
Finally, use silicone caulk to seal around the connection between the hole in the exterior wall and the conduit. Ensure you completely fill the gaps, as this will keep cold or bad weather from making its way into your home. Also, it can help to keep bugs out.
If you put too much caulk, let it dry, and then shave it off of the area with a straight razor blade. Then, you can paint over the silicone if you wish to make the area look better.
Step 7 (optional): Dig A Trench
If you are putting a wire underground, you’ll have to dig a trench. You should contact your local municipality before digging the hole. They will inform you of existing lines (electric, water, gas, etc.) where you want to dig.
Use a shovel to dig a narrow hole about 25 inches deep. For longer wire, use a trenching machine. These are also available for rent at local hardware stores.
Filling The Trench
After you run the wire through the trench, put a layer of sand in first. This layer acts as a warning for any future diggers. Then add red caution tape over the layer of sand. Finally, add the soil as the top layer.
How To Install EMT Conduit
EMT conduit is commonly used to install electrical conductors in houses. You will need to mark the area you want to cover with the conduit. After marking, measure the length of the conduit that you will need.
Use a hacksaw to cut the conduit. If the cut has not been smooth, use a tool to smooth out the corners, such as the blade of a screwdriver and pliers. Bend the EMT conduit if it is necessary.
You will need to attach fittings that will hold the conduit in its place. Use a fishing tape to pull the wires through the conduit.
Do Electrical Wires Need To Be In Conduit?
Yes, electrical wires need to be in conduit for protection from outside forces like sunlight, rain, chemical vapors, crushing force, etc. Based on your needs, you can use any type of conduit made from plastic, metal, or fiberglass. You can choose rigid ones or flexible ones.
It is a good idea to conduit electrical wires. As electrical wires can be extremely sensitive, you will need to protect them. Also, conduits like PVC conduit or electrical metallic tubing (EMT) conduit will last for a long time.
The wires that are kept in the conduit stay in a more organized way. If you need to repair or work with the wires, you will easily find all the wires. Finally, make sure the conduit is grounded with a wire that is securely connected to the ground.
Do You Need to Hire an Electrician?
Get free, zero-commitment quotes from pro contractors near you.

Our Takeaway
With the right tools and techniques, you can run a conduit through your exterior wall successfully. It does not have to be an overwhelming project. We all start somewhere in the DIY world, and running a conduit through an exterior wall is a perfect beginner’s project.
If you feel more comfortable, you can always ask a friend to help you and walk you through the process. Then, after you build your confidence, you can find another project that you want to try out. You only learn by doing, so go get started! Good luck.

Heather is a passionate writer who loves anything DIY. Growing up, she learned everything from home repairs to design, and wants to share her tips with you. When she's not writing, she's usually hiking or searching for her next DIY project.
More by Heather Robbins




![10 Best Electric Lawn Mowers - [2022 Reviews & Top Rated Models]](https://cdn-fastly.upgradedhome.com/media/2023/07/31/9070486/10-best-electric-lawn-mowers-2022-reviews-top-rated-models.jpg?size=350x220)


