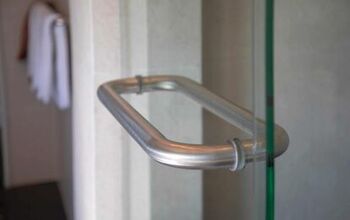
How To Remove a Kohler Shower Handle
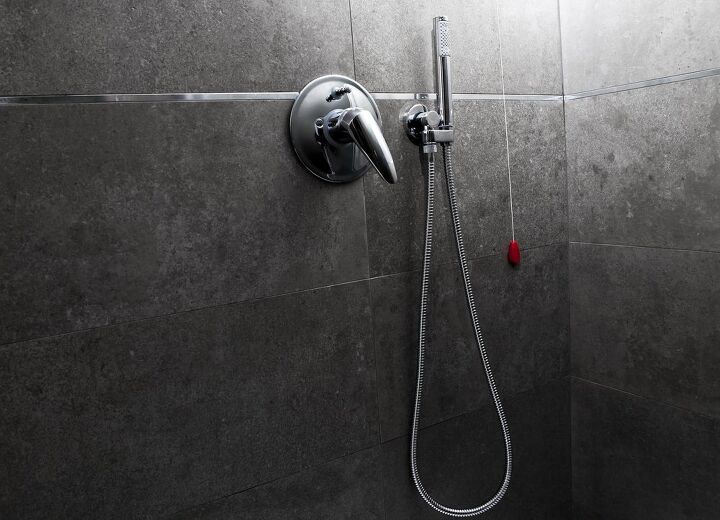
Removing a Kohler shower handle can be difficult, especially considering that there are several different Kohler shower handle types. However, you will be able to remove your Kohler shower handle in no time using the images and three steps below.
Do You Need a Maid Service?
Get free, zero-commitment quotes from pro contractors near you.

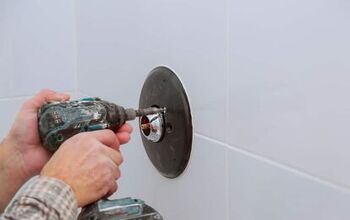
Step 1 – Getting Started
To get started, cover the drain with tape to avoid losing any parts. Next, gather the tools you may need. Depending on the shower handle type, you may need a 3/32-inch hex wrench, 1/16-inch hex wrench, pliers, Phillips screwdriver, and/or flat-blade screwdriver.
Step 2 – Remove Diverter Button
Once you have all of your tools in place, remove the diverter button. Not all handle types will have a diverter button. Skip to step three, if applicable.
Removing Knob Diverter Buttons
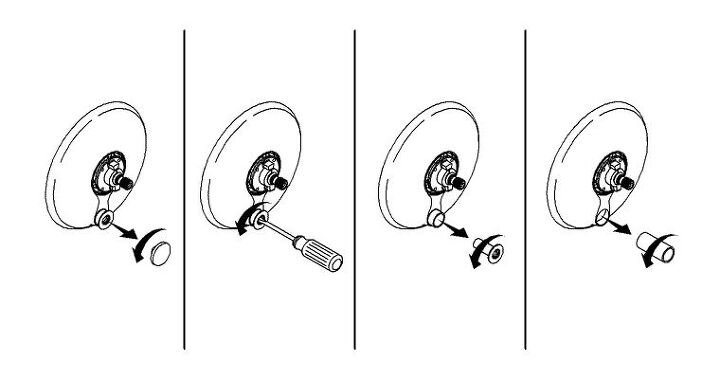
Unthread the knob from the diverter button. Then, use a flat blade screwdriver to hold the diverter stem in place while unthreading the diverter button. Unthread the diverter button and remove. Finally, unthread the diverter sleeve to remove.
Removing Threaded Diverter Buttons
Unthread and remove the diverter sleeve. Then, remove the valve trim. Once the trim is removed, use a flat-blade screw to hold the diverter stem in place while you unthread and remove the diverter button.
Removing Diverter Buttons with Setscrews
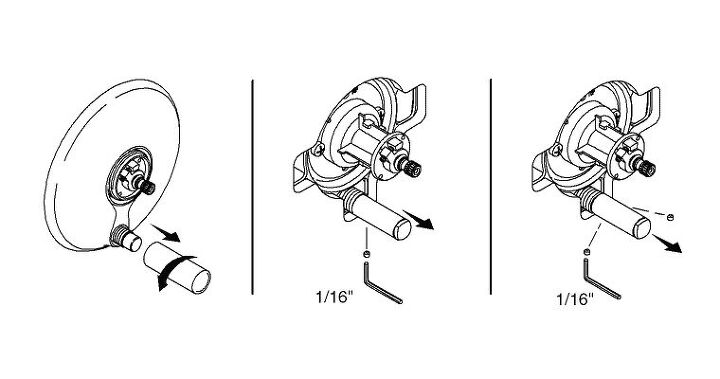
Begin by unthreading and removing the diverter sleeve. Then, remove the valve trim. Find the setscrew(s) on the diverter button. Loosen the setscrew(s) with the 1/16-inch hex wrench. Remove the diverter button.
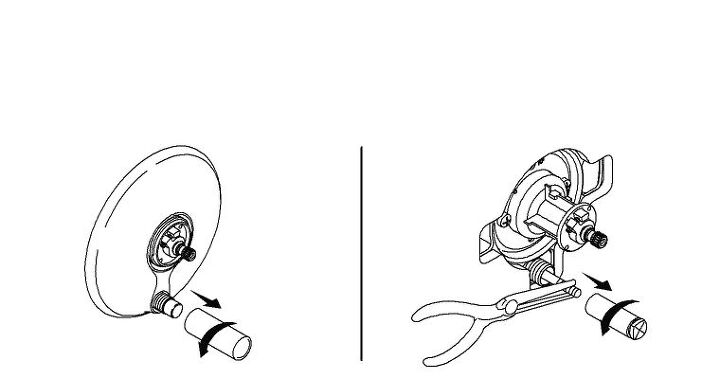
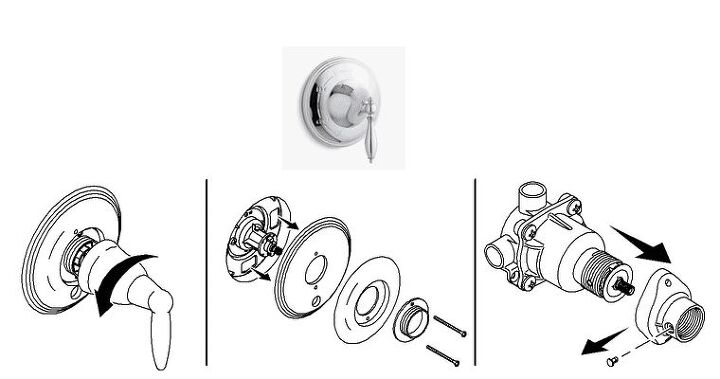
Step 3 – Remove Trim
Removing Trim with Exposed Screws
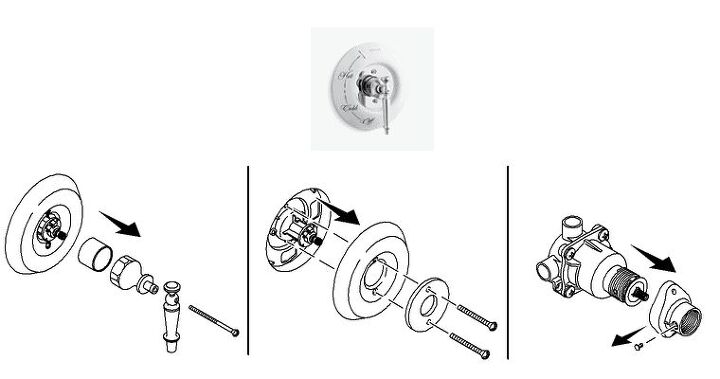
Use a Phillips screwdriver to unscrew the screw from the valve stem, allowing you to remove the handle, bonnet, and sleeve. Then, use the same screwdriver to unscrew the two screws on the faceplate. Remove the escutcheon and the faceplate.
If applicable, remove the pin from the adaptor with a flat-blade screwdriver. Then, unscrew and remove the adaptor from the valve.
Removing Trim with a Plug Button (Two Options)
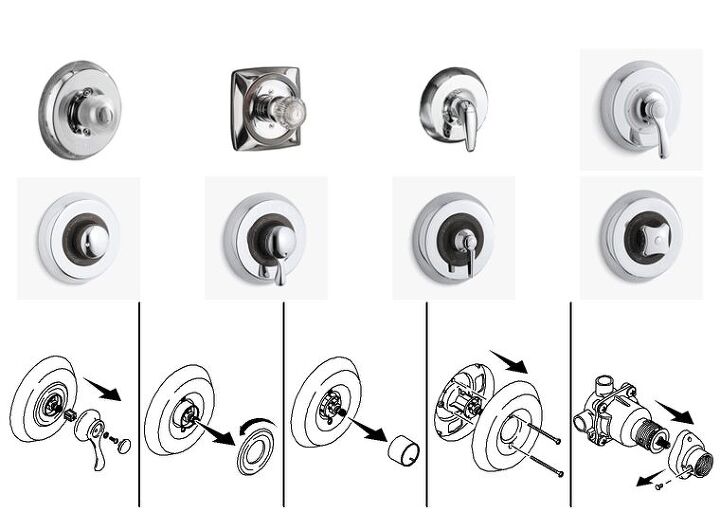
Using a flat-blade screwdriver, gently pry the plug button from the valve trim. Using a Phillips screwdriver, unscrew the screws and remove the handle and adaptor from the valve stem. You may need to turn the cover counterclockwise. With your Phillips screwdriver, unscrew the faceplate screws and remove the faceplate.
If applicable, remove the pin from the adaptor with a flat-blade screwdriver. Then, unscrew and remove the adaptor from the valve with a Phillips screwdriver.
Use a flat blade screwdriver to gently pry the plug button from the valve trim. Using a Phillips screwdriver, unthread the screw and remove the handle and adaptor from the valve stem.
Then, use a 3/32-inch hex wrench to loosen the setscrew. Once the setscrew is loosened, slide the bonnet off the valve and remove the sleeve by turning it counterclockwise.
Unthread the collar and remove the faceplate and collar. Also, unthread and remove the seal plate using a Phillips screwdriver.
If applicable, remove the pin from the adaptor with a flat-blade screwdriver. Then, unscrew and remove the adaptor from the valve with a Phillips screwdriver.
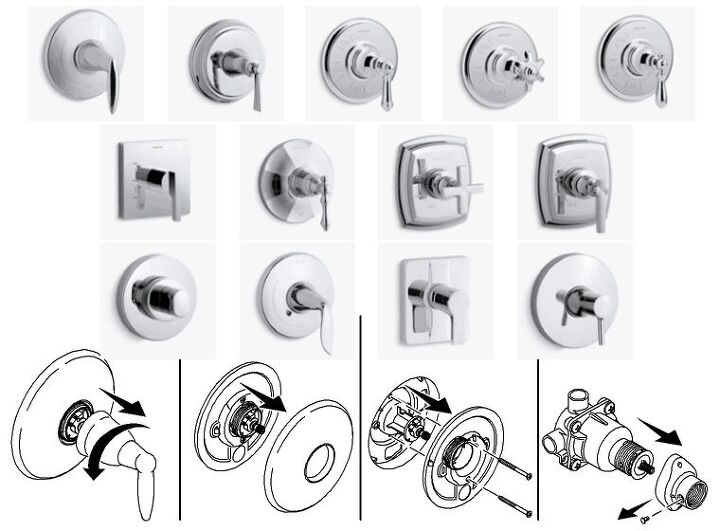
Removing Trim with Setscrews (Four Options)
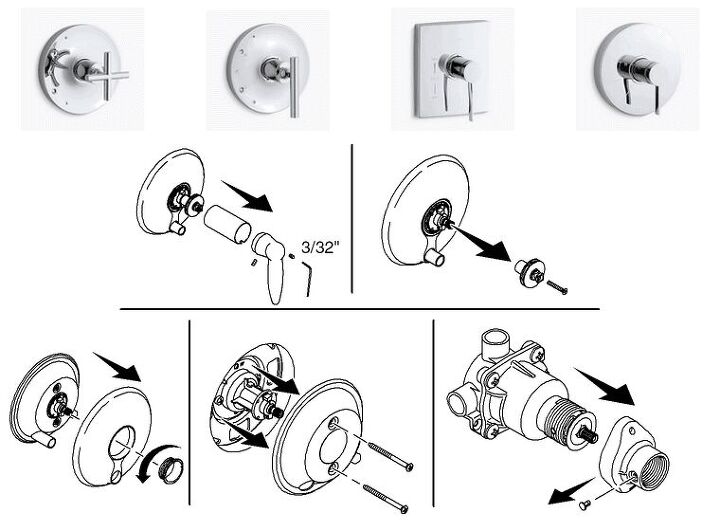
Loosen two setscrews with a 3/32-inch hex wrench. Remove the handle and sleeve from the valve. Unthread the screw using a Phillips screwdriver. Then, remove the adaptor from the valve stem.
Next, unthread the collar and remove it and the faceplate. Unthread the two screws using a Phillips screwdriver to remove the seal plate.
If applicable, remove the pin from the adaptor with a flat-blade screwdriver. Then, unscrew and remove the adaptor from the valve with a Phillips screwdriver.
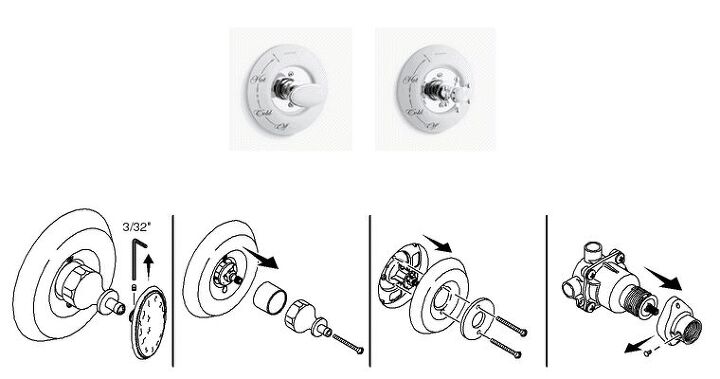
Loosen the setscrew using a 3/32-inch hex wrench. Remove the handle from the valve trim and unthread the screw using a Phillips screwdriver. Remove the bonnet and sleeve from the valve stem. Use the Phillips screwdriver to unthread the two faceplate screws. Remove the washer and faceplate.
If applicable, remove the pin from the adaptor with a flat-blade screwdriver. Then, unscrew and remove the adaptor from the valve with a Phillips screwdriver.

Using a 3/32-inch hex wrench, loosen the setscrew. Then, slide the handle, adaptor, and sleeve off the valve. Next, use a Phillips screwdriver to unthread the screws on the faceplate and remove the faceplate.
If applicable, remove the pin from the adaptor with a flat-blade screwdriver. Then, unscrew and remove the adaptor from the valve with a Phillips screwdriver.
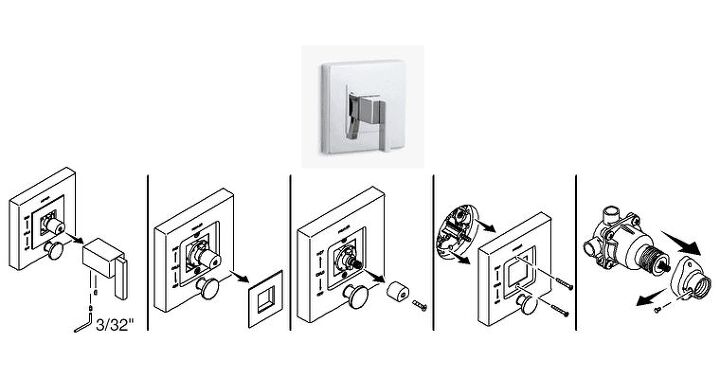
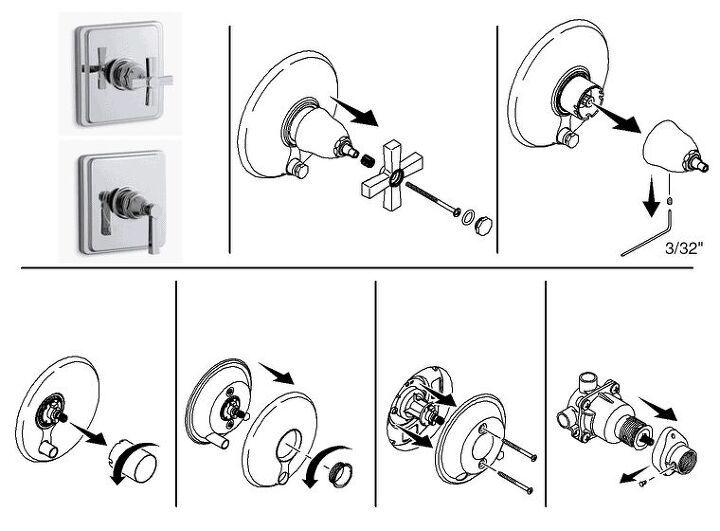
Loosen the two setscrews using a 3/32-inch hex wrench. Remove the handle and bonnet from the valve. Next, gently pry the cover plate from the escutcheon, which should expose two screws.
Using a Phillips screwdriver, unthread the screw from the adaptor and remove the adaptor from the valve stem. Once that is removed, unthread the two escutcheon screws with a Phillips screwdriver. Remove the escutcheon.
If applicable, remove the pin from the adaptor with a flat-blade screwdriver. Then, unscrew and remove the adaptor from the valve with a Phillips screwdriver.
Removing Trim with Threaded Bonnets (3 Options)
Grasp the handle firmly and turn the bonnet counterclockwise until the handle and bonnet are removed from the valve stem. Then, remove the faceplate from the seal plate. Use a Phillips screwdriver to unthread the screws and remove the seal plate as well.
If applicable, remove the pin from the adaptor with a flat-blade screwdriver. Then, unscrew and remove the adaptor from the valve with a Phillips screwdriver.

Grasp the handle firmly to turn the bonnet counterclockwise until the handle and bonnet are removed from the valve stem.
If applicable, remove the pivot ring. Then, remove the faceplate. Using a Phillips screwdriver, unthread the screws to remove the retainer. If you don’t see any screws, remove the retainer.
Grasping the handle firmly, turn the bonnet counterclockwise until the handle and bonnet are removed from the valve stem. Use a Phillips screwdriver to unthread the screws and remove the handle sleeve, shroud, and faceplate.
If applicable, remove the pin from the adaptor with a flat-blade screwdriver. Then, unscrew and remove the adaptor from the valve with a Phillips screwdriver.
Removing Trim with Center Cap
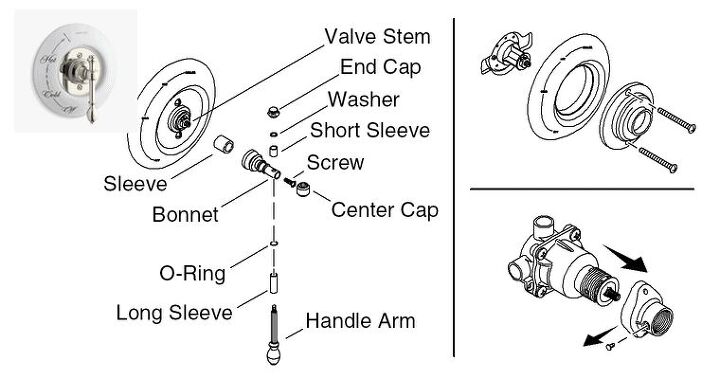
Holding the handle arm, unthread the end cap and remove it, the washer, and the short sleeve. Then, remove the handle arm from the bonnet, but keep the O-ring and long sleeve in place. Remove the center cap from the bonnet.
Using a 3/32-inch hex wrench, unthread the screw from the bonnet. Remove the bonnet and sleeve from the valve stem. After that, use a Phillips screwdriver to unthread the screws on the escutcheon, and remove the escutcheon and faceplate.
If applicable, remove the pin from the adaptor with a flat-blade screwdriver. Then, unscrew and remove the adaptor from the valve with a Phillips screwdriver.
Do You Need a Maid Service?
Get free, zero-commitment quotes from pro contractors near you.
Related Questions
How can I determine my Kohler single control bath-shower valve?
The best way to determine your Kohler single control bath-shower valve is to use Kohler’s identification guide.
When should I replace my shower/tub valves?
If you are remodeling your bathroom, you may want to consider new shower/tub valves. You should replace your shower/tub valves if they leak or have a slow reaction time.
Are there other good shower handle brands other than Kohler?
Yes. Delta, Moen, and Kingston Brass offer great alternatives to Kohler shower handles.

We are a team of passionate homeowners, home improvement pros, and DIY enthusiasts who enjoy sharing home improvement, housekeeping, decorating, and more with other homeowners! Whether you're looking for a step-by-step guide on fixing an appliance or the cost of installing a fence, we've here to help.
More by Upgraded Home Team