How To Put A Belt On A Yardman 42-Inch Lawnmower

Although a riding lawnmower can make cutting the grass much easier, these machines are far more complex than a standard push mower. Because of this, you will have to perform routine maintenance on it to ensure that it keeps running smoothly. One component that can wear down over time is the belt. There are two belts inside your lawnmower – one is for the engine (drive belt), and one is for the blades (deck belt).
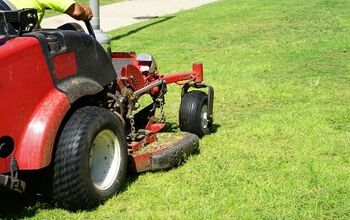
To install a new belt on a Yardman 42-inch lawnmower, you will have to lower the cutting deck all the way and remove the blade guard. Next, you’ll have to loosen the bolts that hold the belt in place and remove the belt keep rod. When taking the old piece off, be sure to take a picture of it first for reference. Then, install the new belt, reattach the fasteners and the guard piece, and raise the cutting deck.
This procedure is relatively complicated, so we will outline each step in detail. We’ll also discuss how to put both belts on your Yardman mower so that you’re prepared either way.
Do You Need a Mower Repair Service?
Get free, zero-commitment quotes from pro contractors near you.

What You’ll Need to Install a Belt on a Yardman Lawnmower
- Work Gloves
- Screwdriver
- Smartphone Camera
- Socket Wrench Set
- Rubber Mallet (if applicable)
- Wooden Blocks
Step by Step Guide to Installing a Belt on a 42-Inch Yardman Lawnmower
Although the process for putting both types of belts on your mower are similar, they are located in different parts of the mower, so the steps are slightly unique. However, because you have to remove the deck belt to access the drive belt, we will first illustrate those steps. This way, if you have to install both belts simultaneously, you can.
How to Install a New Deck Belt
Step One: Park the Mower and Disconnect the Spark Plug
It’s always a good idea to disconnect the spark plug wire before doing any work on your riding mower. Doing this will prevent accidental engine starts, which can be dangerous while working on the belt and pulley system.
Step Two: Lower the Cutting Deck
Make sure that it is at the lowest setting before starting your work.
Step Three: Remove the Belt Guard
There is a metal piece that protects the belt from dirt and debris. Using a screwdriver, you can take this off.
Step Four: Remove the Belt Keeper Rod
This component helps prevent the belt from loosening itself while spinning. This rod is also held in place by screws.
Step Five: Loosen the Idler Pulley Nuts
Although the deck belt’s orientation isn’t too confusing, it helps to take a photo of it before removing it. This way, you can be sure that it gets installed correctly. Next, use a socket wrench to loosen the nuts inside each pulley. Don’t take the nuts out since it will be easier that way.
Step Six: Remove the Belt
Once the pulleys are loosened, the belt should come off easily.
Step Seven: Install the New Belt
Wrap it around the pulleys the same way as the old belt, and tighten the pulley nuts to keep it in place. Don’t tighten them too much, or you could cause friction, which will wear the belt down faster.
Step Eight: Replace the Belt Keeper Rod and Guard
Reinstall the rod first, then the belt guard.
Step Nine: Test the Mower
Drive the lawnmower out to the yard and then engage the blades. If you notice any squealing or burning smells, the belt was likely installed incorrectly. Check the orientation and make adjustments as necessary.
How to Install a New Drive Belt
Step One: Park the Mower and Disconnect the Spark Plug
If you are changing both belts simultaneously, you can follow the first steps from the section above.
Step Two: Lower and Remove the Cutting Deck
Because the drive belt is part of the engine, you have to take the cutting deck out to access it. First, you will have to lower the deck all the way. We recommend putting wooden blocks underneath so that they can alleviate the spring tension. This method will allow you to disconnect the deck arms more easily.
You will have to remove the bolts connected to the engine pulley, followed by the deck belt (as discussed above). Disengage the arm springs so that you can pull the cutting deck from beneath the mower.
Step Three: Remove the Old Drive Belt
This step is similar to removing the deck belt. Take a photo first, and loosen the idler pulleys instead of taking them off completely.
Step Four: Install the New Belt
Make sure to wrap it around the pulleys in the correct order. If you have an assistant, they can hold the camera while you work.
Step Five: Tighten the Idler Pulleys
Once the belt is in place, you can tighten the bolts on the pulleys to keep it in place. Again, don’t tighten them too much to avoid friction.
Step Six: Reattach the Drive Belt and Cutting Deck
Follow the steps outlined above to see how to return the deck belt. Be sure to replace the guard and keeper rod accordingly. Next, reattach the deck arms. From there, you should be able to raise and lower the cutting deck normally.
Step Seven: Test the Mower
Run the engine for a few minutes to see if there are any issues with it. We also recommend driving your lawnmower around the yard to ensure that everything is working correctly.
Tips and Tricks for Installing a Belt on a Yardman Lawnmower
Here are some ways to make this project even easier.
- Read the Manual First – Before starting any work on your riding lawnmower, it helps to familiarize yourself with the layout. Doing this can save you a lot of time and hassle because you won’t have to figure out where each component is on the fly.
- Use an Assistant – It can be hard to see inside the engine, so having someone hold a flashlight can make a significant difference. Also, a helper can hand you tools while you work, making the time go by faster.
- Wear Goggles and Gloves – Chances are the inside of your engine is pretty dirty, so you don’t want dirt and grass getting into your eyes. Gloves will not only keep your hands clean, but they can protect against any potential scratches or pinches.
- Use the Correct Belt – It may be tempting to buy a cheaper aftermarket belt, but it won’t hold up as long. This means you’ll have to replace the belt sooner rather than later, so you’ll wind up spending more time and money in the end.
Signs That Your Belts Need Replacing
Usually, drive belts will last longer than deck belts because they don’t withstand as much abuse. However, here are some warning signs for both types of belts, so you know when to put a new one on.
- High-Pitched Squealing – Belts will almost always make noise when they are under stress. If you notice the sound when you turn the mower on, it’s likely the drive belt. If it doesn’t start until you activate the blades, it’s the deck belt.
- Burning Odor – When a belt is worn or frayed, it can rub against the pulleys. This friction can burn the material, creating a strong odor. Again, depending on when you notice the smell, you should be able to identify which belt is having problems.
- Uneven Cutting – Because the deck belt controls the blades, a faulty one can cause them to cut improperly. If you notice streaks or stingers in your grass, the belt could be to blame (or your blades need sharpening).
Do You Need a Mower Repair Service?
Get free, zero-commitment quotes from pro contractors near you.
Related Questions
What’s the difference between a drive belt and a deck belt?
The drive belt is part of the lawnmower’s engine, and it helps the machine move forward. The deck belt, however, works with the clutch and spindles to turn the blades. As we mentioned, deck belts usually wear down faster because they endure more abuse.
Are all belts the same?
No, each belt has an ID number. If you install the wrong belt inside your machine, it won’t fit correctly and will cause problems.

We are a team of passionate homeowners, home improvement pros, and DIY enthusiasts who enjoy sharing home improvement, housekeeping, decorating, and more with other homeowners! Whether you're looking for a step-by-step guide on fixing an appliance or the cost of installing a fence, we've here to help.
More by Upgraded Home Team


![10 Best Zero Turn Mowers – [2022 Reviews & Ultimate Buyer's Guide]](https://cdn-fastly.upgradedhome.com/media/2023/07/31/9070522/10-best-zero-turn-mowers-2022-reviews-ultimate-buyer-s-guide.jpg?size=350x220)


![Standard Dining Room Table Dimensions [for 4, 6, 8, 10 and 12 People]](https://cdn-fastly.upgradedhome.com/media/2023/07/31/9074335/standard-dining-room-table-dimensions-for-4-6-8-10-and-12-people.jpg?size=350x220)