


How To Paint Louvered Doors (Step-by-Step Guide)
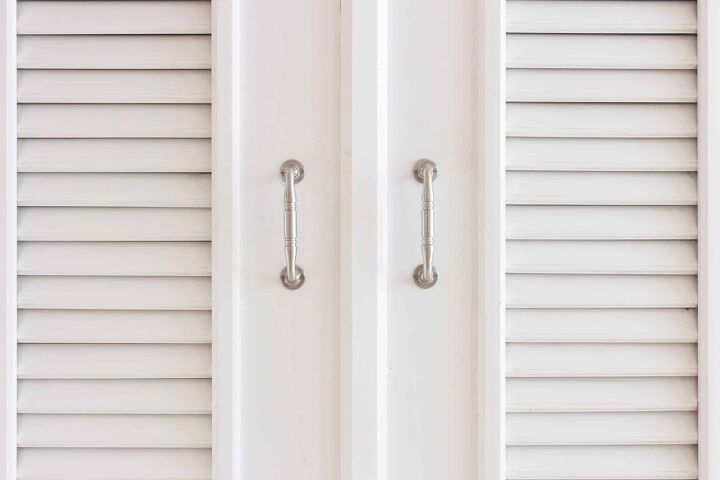
Louvered Doors can seem tricky to paint, with all the slats and spaces. You might worry about paint dripping, what the back will look like, or how many coats to use.
Done right, it’s a relatively easy DIY project that can save you the money of hiring a professional painter.
Painting a Louvered door is not a complicated process. It involves using a few different brush sizes, a roller, drop-cloth, and going at it in a uniform fashion. Start from the top and work your way down. Use a smaller brush for the slats and go one by one. Make sure to let one side dry completely before moving onto the other side. Check the opposite side for drips often and fix them immediately.
With time, attention to detail, and the right tools, anyone can tackle this project themselves!
Do You Need Painting or Staining Services?
Get free, zero-commitment quotes from pro contractors near you.

Before You Paint Louvered Doors
Matching Paint Colors
Match the new paint to the original color. You can go to Home Depot or Lowes with a paint sample that they can match for you. This will take hours off the project as you won’t need to sand and prime. It will also help make any missed spots harder to detect.
Using the Right Type of Paint
It is best to cover up old paint with the same type of paint, i.e. latex on top of latex.
Brush Sizes for Painting A Louvered Door
Keep a variety of different brush sizes at hand. This will help with painting the slats and the sides in a uniform way. Make sure one of your brushes is no wider than the slats themselves and angled, that way they can reach all the way to the edge.
Protecting Your Floor from Paint
Protect your floor! Put down newspaper, an old sheet, or a drop cloth that extends several inches around all sides. This will help with any paint dripping that occurs and save you the hassle of having to clean up as you go.
Preparing an Unfinished Wood Door for Painting
If you have a new, unpainted louvered door, these are the steps to prep it for painting:
Step 1: Use Sandpaper
Run sandpaper over the door so that it gives a surface the paint can adhere to. Make sure to wipe clean the door afterward to remove any dust that has accumulated on the surface.
Step 2: Applying a Base Coat
Apply a base coat of primer to the door. This will stop the wood from absorbing the paint and allow for a more even coat.
Step 3: Sand It Down Again
Once the primer is applied and has fully dried, rub-down the door with sandpaper to make sure there aren’t any blemishes and the door is smooth. Using a clean, dry brush, remove any of the dust left from sanding.
Step 4: Apply an Undercoat Layer
This will prevent you from seeing the visible wood grain and give a smoother finish. Once the undercoat is dry, run a hand block over the door, lightly scratching the surface.
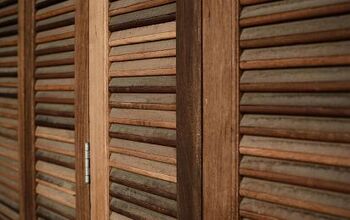
Repainting an Old Louvered Door
It is important to wipe down the door before painting so there is a clean surface for the paint to adhere to. Remove or tape over all the hardware and with a cloth and cleaning agent, wipe clean any grease, dirt, and dust.
Skipping this step could cause the paint to flake off and peel away later.
Step 1: Use a Roller
Starting with a roller, use enough paint to coat but not to cause drips. Bring it down over the slats and sides, top to bottom. Do not go up with the roller, only down.
Step 2: Painting the Border
Once the frame and the slats are covered in an even coating, take the 2” brush and use it on the wider areas. Go all the way to the edge, painting one area at a time. Clean up any drips and irregularities as you go along.
Step 3: Painting the Slats
Take your smaller brush and going horizontally along the slats, make sure they have an even coat of paint. Use the angled brush to go all the way to the ends, getting into the corners and any part of the slat that is hidden by the one above it.
Try to use the paint left by the roller and not load the brush itself, as it may create drips. This is why using a small brush the size of each slat is important. Regularly check the other side of the door for drips.
Step 4: Completing Your Louvered Door Paint Project
When the paint has fully dried on your door, look it over for any missed areas or drips and fix those as needed. If everything looks good, reattach or clean up all the hardware and remove the tape and drop cloth from your work area.
Spray Painting a Painted Louvered Door
Spray painting louvered doors is an option that requires a little more prep work but cuts down on the dry time.
Tape (or remove) handles and hinges. You can paint the hinges but if you decide not to, it’s best to remove all hardware that you want to stay clean. Not only does this save you the time of taping and possibly cleaning them afterward, but it takes having to paint around them out of the equation.
Step 1: Remove the Door
Take the door off the hinges and remove, or tape over, any of the hardware. Place the door in a well-ventilated area, preferably outside. Lay down a drop cloth and place the doors on this as painting flat will help reduce drips.
Step 2: Scrape Off the Old Paint
You will need to scrape off the old paint to ensure an even coating and prevent buildup. This is a necessary step even if you are painting it the same color. Take a paint scraper or hand sander and remove the paint from the slats and the border.
Step 3: Spray Painting a Louvered Door
Start by spraying from top to bottom in a quick, even motion. Do not hold the spray can in one place as this will cause pooling. The corners of the slats are more susceptible to this so have a small brush handy.
Light even coats are the way to go here. You will be covering up any unevenness with the second coat of paint.
Related Questions
Should I Paint Both Sides of My Louvered Doors?
If you are painting both sides make sure to allow one side to dry completely before beginning the other side. As you work on each side, periodically check the other side for any drips and make sure to blend them in with the brush whenever that happens.
How Many Coats of Paint Do I Apply?
The best thing to do is to assume a minimum of 2 coats and let each coat fully dry before adding another. When a coat of paint is fully dried, lightly scuff the paint before adding the next coat.
What If My Paint Drips onto The Other Side?
If this happens on the side that you already painted, take your brush and quickly repaint that area of the drip. If paint is tacky (not fully dried before you started the other side), then you will need to repaint the entire slat.This is why it is important to make sure to let the paint fully dry before going back to the other side!
Do You Need Painting or Staining Services?
Get free, zero-commitment quotes from pro contractors near you.
Happy Painting
If you follow these simple guidelines you can give your Louvered Doors an amazing facelift and save yourself the money of hiring someone else to do it for you!

We are a team of passionate homeowners, home improvement pros, and DIY enthusiasts who enjoy sharing home improvement, housekeeping, decorating, and more with other homeowners! Whether you're looking for a step-by-step guide on fixing an appliance or the cost of installing a fence, we've here to help.
More by Upgraded Home Team


![How To Reset A Whirlpool Cabrio Washer [In 5 Easy Steps!]](https://cdn-fastly.upgradedhome.com/media/2023/07/31/9076531/how-to-reset-a-whirlpool-cabrio-washer-in-5-easy-steps.jpg?size=350x220)


