How To Organize A Makeup Drawer
Time is precious, so who wants to spend more time than they need to get ready in the morning? But if your makeup drawer is a wreck, you’re likely wasting a bunch of time searching for items. Knowing how to organize a makeup drawer so you can find what you need quickly can make a huge difference in your day.
Pare down your makeup to just the things you use, say no to excessive samples, and use the right organizers. Measure your makeup drawer, so you get containers that fit well. Use deep containers for things like tubes and brushes, so they’re easier to grab. Go through your makeup regularly to keep things under control.
Organizing your makeup drawer isn’t rocket science, but it does take some discipline. If you’re tired of opening the drawer to a jumbled mess of products, brushes, and random items, it’s time for a change. Use these five simple tips to take back control of your makeup routine.
1. Gather All Of Your Makeup And Tools
To make the most of your time and energy, simplifying your makeup routine will go a long way. Go through your bathroom cabinets, drawers, vanity, your purse, and any other place you stash your products. Gather them all into one place, so you get an accurate assessment of what you have.
Start sorting like items together. For example, all your brushes in one place, your primer and foundation in another, eye shadows, mascara, blush, lipsticks and glosses, etc. If you have a bunch of sample sizes or random products you received in subscription boxes or from promotional deals, put these in their own pile.
2. Pare Down Your Products
Start easy. Anything that you’ve had for an extended period should be tossed. According to the Mayo Clinic, makeup doesn’t last forever. Water-based makeup lasts approximately one year, oil-based for 18 months, and powders for about two years. For mascara and eyeliner, you should toss it after about three months. Of course, this is assuming you store your makeup appropriately.
Next, weed out duplicate tools, including spare makeup pencil sharpeners, your five extra eyelash curlers, etc. You can’t use more than one eyebrow brush at once, so why do you have three?
If there’s anything that’s broken or damaged, toss it. By now, you should have significantly reduced your inventory. Next, move on to the tougher decisions. That huge pile of sample products? Maybe pull out one or two you genuinely plan to try and get rid of the rest.
It’s about simplifying your routine and only keeping the supplies and makeup that help you perform that routine. When you do this, it’s going to be much easier to organize your makeup drawer.
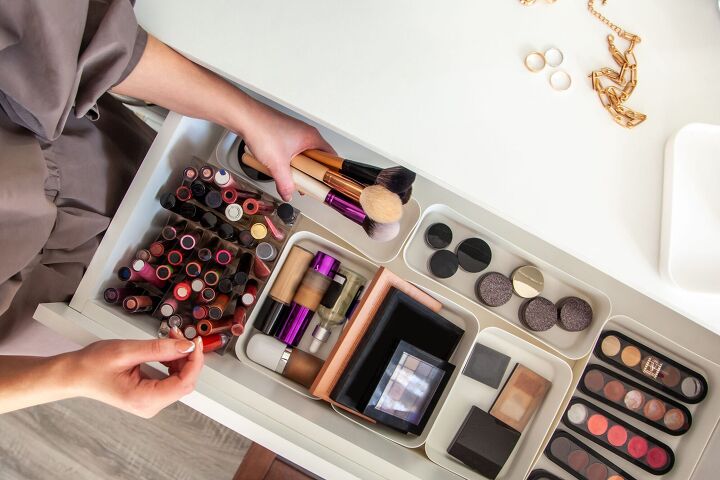
3. Choose The Right Organizers For Your Makeup Drawer
Beautiful organizers fill the shelves of home stores that call out to you to buy them. You might be tempted to fill your cart with these clever bins in the hopes that they’ll magically organize your makeup space.
But if you buy organizers first, you’re working backward. After you’ve pared down your items and know what you have, that’s when it’s time to get your containers.
But, measure your drawer first. No point in getting containers that won’t fit. Bring a tape measure with you when you shop (or pay attention to the measurement on the labeling or in online descriptions). Use tall containers for brushes and tubes so you can store them upright and grab what you need more quickly.
Clear bins are excellent, since they enable you to see everything at a glance. Makeup palette organizers help you see things like eye shadows, blushes, and compacts easily.
Divided containers are your friends, so you can really sort your products by type and put your hands and eyes on what you need in a moment.
4. Put Your Makeup In Its New Home
Once you know how you plan to store your makeup and organize it in your containers, it’s time to put everything into place. Before you put everything back, clean out the drawer. If it’s anything like most makeup drawers, it’s covered in various shades of pigment from various eyeshadows, blushes, and other products.
Position your containers in the drawer so they fit snugly. If you measured well in the beginning, this should be no problem. But if you find a tray has too much wiggle room, place something between it and the back of the drawer.
You can use a piece of pipe insulation, a cut pool noodle, or a folded washcloth to act as a wedge. Then, you don’t have to worry about products falling over every time you open and close the drawer.
5. Regularly Go Through Your Makeup
With any organizing project, once you complete it, it’s not done forever. It takes routine maintenance. Think of it like getting a new haircut. It looks fabulous and feels great for a few weeks, but you have to regularly brush and wash and style it. Then, eventually, you get a new haircut, etc.
With your makeup drawer, regularly wipe down items, so you don’t end up with pigment everywhere again. Routinely check makeup and toss anything old or broken. If you realize you’re not using a certain product anymore, get rid of it.
Then, every few weeks, do a quick tidy of the drawer. Inevitably, things end up in there that shouldn’t be there, like medicine, extra toothpaste, etc. Make sure everything is back where it belongs.
An Organized Makeup Drawer Makes Life Easier
No doubt, organizing your makeup drawer can have lots of benefits. You can get ready faster, and you won’t spend more money on products because you can’t find what you need. It will simplify your routine and greatly reduce your stress.
It doesn’t have to take forever, either. Gather all your products in one place, sort them, and get rid of everything old, broken, or that you don’t use. Then, measure your makeup drawer to decide the best containers for what you’re keeping.
Arrange your new containers in a way that makes sense for your makeup routine. Use tall containers for brushes and tubes, and use palette organizers for compacts and eyeshadows. Divided trays work great to separate different products, colors, and sizes.
Another big one is to stop taking so many samples and “free gifts”; they just add to the clutter. Follow these tips and routinely go through your makeup to keep your makeup drawer organized and efficient.
Related Guides:

Stacy Randall is a wife, mother, and freelance writer from NOLA that has always had a love for DIY projects, home organization, and making spaces beautiful. Together with her husband, she has been spending the last several years lovingly renovating her grandparent's former home, making it their own and learning a lot about life along the way.
More by Stacy Randall