How To Build A Garden Fence With Chicken Wire
Chicken wire is a very versatile and inexpensive material that can be used to craft a quick fence for your garden. While chicken wire is generally used to keep small animals contained, it can also be used to keep unwanted pests from nibbling at your growing produce. It even works great when you want a trellis for your vining plants.
In order to create an outside perimeter for your garden to help secure your plants, all you’ll need are a few building supplies. Along with the chicken wire, this project requires a few pieces of lumber and some simple tools. With these materials and some basic steps, you’ll have a chicken wire fence installed in your garden in no time at all.
Do You Need Landscaping Services?
Get free, zero-commitment quotes from pro contractors near you.

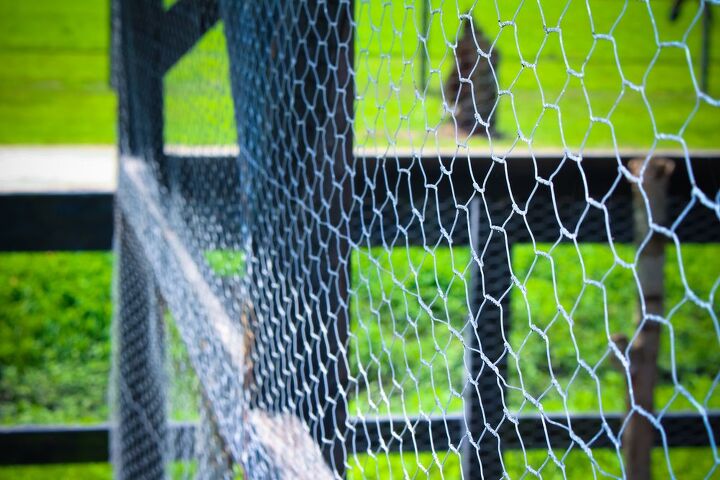
What is Chicken Wire?
Chicken wire is a type of mesh fencing that is, conventionally, used to confine poultry. Thus, earning the name ‘chicken wire.’ However, you do not have to be a farmer to use this material on your property. Comprised of galvanized wire and hexagonal gaps, chicken wire holds up exceptionally well to the elements. In fact, you’ll often find excavated pieces, used decades ago, on old homestead properties while digging around.
In addition to its durability, chicken wire also offers flexibility and is very easy to cut and manipulate. Although chain link fence looks similar, it is much more difficult to cut and install. This fact is why DIYers and farmers alike choose to use smaller gauge fencing, like chicken wire, for a number of outdoor projects.
How to Build a Garden Fence with Chicken Wire
When it comes to your garden, deterring animals is one of the greatest benefits of installing a fence. Using chicken wire is arguably the most economical containment fence option available. Although it is typically used to fence in chicken, it is a great choice for keeping out small dogs, rabbits, or any other small animal.
Step One: Determine Fence Positioning
The first step in installing your chicken wire garden fence is to determine where you’d like it to be located on your property. If your garden is already established, this should be a very quick and simple step.
One of the great advantages of using chicken wire fencing is that the dimensions do not have to be exactly perfect. The material is very flexible, allowing you to bend it into place very easily. After you’ve determined the placement, create an outline of your fence by marking with landscape paint.
Step Two: Dig Holes for Wooden Posts
For this project, we’ll be using 2x4s anchored into the ground to hold up the fencing. Before these can be installed, you’ll want to dig holes that are just large enough to fit the wooden stakes. They do not need to be too deep, but should have a depth of at least 10 to 12 inches to ensure that the 2x4s are secured in the ground. These holes should be no more than six feet apart.
Tips for Installing Garden Fence Posts
Whether you’re using chicken wire, or some other fence material, properly arranging the fence posts is the most important step. The posts are what provide longevity and stability for your garden fence. The following are some general tips to help you achieve proper positioning of your fence posts:
- Your garden fence posts should be placed no more than six feet apart. This distance will ensure the necessary holding power for the chicken wire. If you decide to position the posts closer together, make sure that the fence material you are using is strong enough to accommodate this change.
- Both heavy-duty and light-duty metal fence posts have tabs installed along the above-ground portion, allowing you to attach the chicken wire at multiple spots along the post. Instead of going the DIY route with pieces of lumber, you can purchase metal posts that are designed for this purpose. Adjusting the tabs on these posts can be easily done using a hammer or screwdriver.
- The heavy-duty fence posts should be used at the corners of your garden fence. This will provide ample support at the anchor points.
- Light-duty fence posts can be implemented on the straight sections of the garden fence.
Step Three: Place Posts in Holes
Whether you decide to purchase metal posts designed for supporting fences or go the DIY route with 2x4s, your garden fence will have plenty of support. After you dug the holes for the posts, place each one into the holes and pack the ground in around them. Stamp the dirt in tightly and use a level to check that these stakes are completely straight.
Step Four: Install Top and Bottom Rails
Now that the posts are installed in the ground, you need to create the rails for the chicken wire to attach to. Using 1×1 pieces of lumber, cut rails that are long enough to span your posts. The goal is to have both top and bottom rails to achieve a stable platform to secure the chicken wire fencing.
Once cut to size, nail the rails in place along the top of the posts so that the ends are positioned on the center of the posts. Follow this up by installing the bottom rails so that they are toenailed into place between your fence posts. These two rails will give your chicken wire some additional firmness after being nailed in position.
Step Five: Roll Out the Chicken Wire
For this step, you may want to request the assistance of a helper. Regardless, make sure that you wear gloves to protect your hands, as the chicken wire will be sharp once cut. Unroll your chicken wire so that the mesh reached from one end post to another. Using tin snips, cut the material to the appropriate size. If done correctly, you should end up with six-foot pieces.
Quick Tip: Cut the chicken wire carefully and try to make your cuts as straight as possible to make installation much easier.
Step Six: Staple Chicken Wire
Beginning at the corners of your garden fence, start stapling the chicken wire along the post. Move carefully, keeping the wire tight, and slowly unrolling the material along the top rail. Staple the chicken wire to the rail every three inches, temporarily leaving the bottom of the mesh unattached. Continue working your way to the next post.
At the post, pull the chicken wire taut and staple it every six inches from top to bottom. Once you’ve made your way to the bottom of the post, pull the chicken wire tight and work your way backward along the bottom rail. Place a staple every three inches for the bottom rail as well. Repeat these steps until you’ve made your way around the entire perimeter of your garden fence.
Step Seven: Trim Excess Chicken Wire
After you’ve finished installing the chicken wire between your fence posts, clean up the job by trimming excess wire. Examine your project for any mesh that extends beyond your posts and trim it off using tin snips, or fencing pliers.
Do You Need Landscaping Services?
Get free, zero-commitment quotes from pro contractors near you.
Step Eight: Build the Gate
If you’d like your garden fence to have a gate for easy access, you’ll need to craft a simple frame. Measure your posts at the top and bottom to ensure that your gate opening is square. Determine the width your gate needs to be by measuring the distance between the two posts and subtracting ½ inch. Using 1×1 lumber boards, build a square frame that fits this size.
Align your four frame pieces and connect them together using metal angle plates. To help strengthen your gate, you can add a cut piece of wood diagonally between the top of the hinge side and the bottom of the latch side. Then, cut a piece of chicken wire to the size of the frame and staple it tightly around the gate.
Now that the frame is built you can attach it to your fence posts. First, hold the frame up to the opening and attach hinges in the appropriate spot on the post. Follow up by deciding where your latch will go, either on the top or the side of your gate. This is entirely based on preference, as you can find a number of different types of latches available at your local hardware store.
With the hinges and latch installed, you can create a gate stop by cutting a strip of wood that is the length of the gate and placing it adjacent to the latch on the inside edge.

Jessica considers herself a home improvement and design enthusiast. She grew up surrounded by constant home improvement projects and owes most of what she knows to helping her dad renovate her childhood home. Being a Los Angeles resident, Jessica spends a lot of her time looking for her next DIY project and sharing her love for home design.
More by Jessica Stone


![Finishing Basement Without Permit [Is It Really Illegal?]](https://cdn-fastly.upgradedhome.com/media/2023/07/31/9070078/finishing-basement-without-permit-is-it-really-illegal.jpg?size=350x220)
![The 10 Best Table Saws - [2022 Reviews & Buyer's Guide]](https://cdn-fastly.upgradedhome.com/media/2023/07/31/9070645/the-10-best-table-saws-2022-reviews-buyer-s-guide.jpg?size=350x220)